

Bravo & Brava • 1995 To 2000
Bravo & Brava • 1995 To 2000
Bravo & Brava • 1995 To 2000

You also want an ePaper? Increase the reach of your titles
YUMPU automatically turns print PDFs into web optimized ePapers that Google loves.
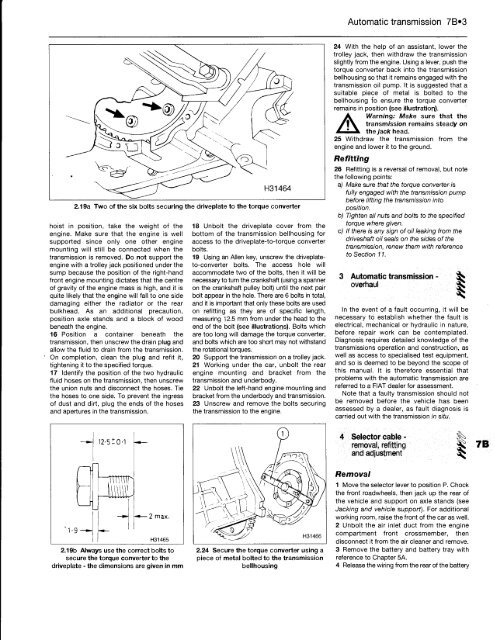
2.19a Two of the six bolts securing the driveplate to the torque converter<br />
hoist in position, take the weight of the<br />
engine. Make sure that the engine is well<br />
supported since only one other engine<br />
mounting will still be connected when the<br />
transmission is removed. Do not support the<br />
engine with a trolley jack positioned under the<br />
sump because the position of the right-hand<br />
front engine mounting dictates that the centre<br />
of gravity of the engine mass is high, and it is<br />
quite likely that the engine will fall to one side<br />
damaging either the radiator or the rear<br />
bulkhead. As an additional precaution,<br />
position axle stands and a block of wood<br />
beneath the engine.<br />
16 Position a container beneath the<br />
transmission, then unscrew the drain plug and<br />
allow the fluid to drain from the transmission.<br />
On completion, clean the plug and refit it,<br />
tightening it to the specified torque.<br />
17 Identify the position of the two hydraulic<br />
fluid hoses on the transmission, then unscrew<br />
the union nuts and disconnect the hoses. Tie<br />
the hoses to one side. <strong>To</strong> prevent the ingress<br />
of dust and dirt, plug the ends of the hoses<br />
and apertures in the transmission.<br />
'1-9<br />
12-5iCH<br />
lilt<br />
<strong>•</strong> 2 max.<br />
H31465<br />
2.19b Always use the correct bolts to<br />
secure the torque converter to the<br />
driveplate - the dimensions are given in mm<br />
18 Unbolt the driveplate cover from the<br />
bottom of the transmission bellhousing for<br />
access to the driveplate-to-torque converter<br />
bolts.<br />
19 Using an Allen key, unscrew the driveplateto-converter<br />
bolts. The access hole will<br />
accommodate two of the bolts, then it will be<br />
necessary to turn the crankshaft (using a spanner<br />
on the crankshaft pulley bolt) until the next pair<br />
bolt appear in the hole. There are 6 bolts in total,<br />
and it is important that only these bolts are used<br />
on refitting as they are of specific length,<br />
measuring 12.5 mm from under the head to the<br />
end of the bolt (see illustrations). Bolts which<br />
are too long will damage the torque converter,<br />
and bolts which are too short may not withstand<br />
the rotational torques.<br />
20 Support the transmission on a trolley jack.<br />
21 Working under the car, unbolt the rear<br />
engine mounting and bracket from the<br />
transmission and underbody.<br />
22 Unbolt the left-hand engine mounting and<br />
bracket from the underbody and transmission.<br />
23 Unscrew and remove the bolts securing<br />
the transmission to the engine.<br />
(7)<br />
4YY\<br />
mil)<br />
H31466<br />
2.24 Secure the torque converter using a<br />
piece of metal bolted to the transmission<br />
bellhousing<br />
Automatic transmission 7B»3<br />
24 With the help of an assistant, lower the<br />
trolley jack, then withdraw the transmission<br />
slightly from the engine. Using a lever, push the<br />
torque converter back into the transmission<br />
bellhousing so that it remains engaged with the<br />
transmission oil pump. It is suggested that a<br />
suitable piece of metal is bolted to the<br />
bellhousing to ensure the torque converter<br />
remains in position (see illustration).<br />
A<br />
Warning: Make sure that the<br />
transmission remains steady on<br />
the jack head.<br />
25 Withdraw the transmission from the<br />
engine and lower it to the ground.<br />
Refitting<br />
26 Refitting is a reversal of removal, but note<br />
the following points:<br />
a) Make sure that the torque converter is<br />
fully engaged with the transmission pump<br />
before lifting the transmission into<br />
position.<br />
b) Tighten all nuts and bolts to the specified<br />
torque where given.<br />
c) If there is any sign of oil leaking from the<br />
driveshaft oil seals on the sides of the<br />
transmission, renew them with reference<br />
to Section 11.<br />
Automatic transmission<br />
overhaul<br />
In the event of a fault occurring, it will be<br />
necessary to establish whether the fault is<br />
electrical, mechanical or hydraulic in nature,<br />
before repair work can be contemplated.<br />
Diagnosis requires detailed knowledge of the<br />
transmissions operation and construction, as<br />
well as access to specialised test equipment,<br />
and so is deemed to be beyond the scope of<br />
this manual. It is therefore essential that<br />
problems with the automatic transmission are<br />
referred to a FIAT dealer for assessment.<br />
Note that a faulty transmission should not<br />
be removed before the vehicle has been<br />
assessed by a dealer, as fault diagnosis is<br />
carried out with the transmission in situ.<br />
4 Selector cable -<br />
removal, refitting<br />
and adjustment<br />
Removal<br />
Jk<br />
1 Move the selector lever to position P. Chock<br />
the front roadwheels, then jack up the rear of<br />
the vehicle and support on axle stands (see<br />
Jacking and vehicle support). For additional<br />
working room, raise the front of the car as well.<br />
2 Unbolt the air inlet duct from the engine<br />
compartment front crossmember, then<br />
disconnect it from the air cleaner and remove.<br />
3 Remove the battery and battery tray with<br />
reference to Chapter 5A.<br />
4 Release the wiring from the rear of the battery


