

Bravo & Brava • 1995 To 2000
Bravo & Brava • 1995 To 2000
Bravo & Brava • 1995 To 2000

You also want an ePaper? Increase the reach of your titles
YUMPU automatically turns print PDFs into web optimized ePapers that Google loves.
6«4 Clutch<br />
6.4 Clutch slave cylinder location on the<br />
transmission<br />
Removal<br />
1 Remove the battery and battery tray as<br />
described in Chapter 5A, and unbolt the<br />
battery mounting bracket. Release the wiring<br />
from the supports on the bracket. Move the<br />
relay holder box to one side after removing<br />
the cover and unscrewing the mounting bolts.<br />
2 Remove the air cleaner ducting as<br />
described in Chapter 4A or 4B. Also remove<br />
the resonator (as applicable).<br />
3 <strong>To</strong> seal off the hydraulic supply to the<br />
clutch slave cylinder, fit a brake hose clamp to<br />
the flexible section of the hose located over<br />
the transmission.<br />
4 Unscrew the union nut and disconnect the<br />
hydraulic pipe from the slave cylinder (see<br />
illustration). Be prepared for some fluid loss<br />
by placing rags beneath the cylinder.<br />
5 Unscrew the mounting bolts and release<br />
the slave cylinder pushrod from the release<br />
arm on the transmission, then remove the<br />
slave cylinder from the engine compartment<br />
(see illustration).<br />
6 It is not possible to obtain an overhaul kit<br />
from FIAT however some motor factors may<br />
be able to supply one. Follow the instructions<br />
with the repair kit if obtained.<br />
Refitting<br />
7 Refitting is a reversal of removal, but apply<br />
a little grease to the tip of the slave cylinder<br />
pushrod. Tighten the mounting bolts and<br />
union nut securely. On completion bleed the<br />
clutch hydraulic system as described in<br />
Section 4.<br />
7 Clutch assembly - g^><br />
removal, inspection S<br />
and refitting<br />
A<br />
Warning: Dust created by clutch<br />
wear and deposited on the<br />
clutch components may contain<br />
asbestos, which is a health<br />
hazard. DO NOT blow it out with<br />
compressed air, or inhale any of it. DO NOT<br />
use petrol or petroleum-based solvents to<br />
clean off the dust. Brake system cleaner or<br />
methylated spirit should be used to flush<br />
the dust into a suitable receptacle. After<br />
the clutch components are wiped clean<br />
6.6 Removing the clutch slave cylinder<br />
from the transmission<br />
with rags, dispose of the contaminated<br />
rags and cleaner in a sealed, marked<br />
container.<br />
Note: Although some friction materials may<br />
no longer contain asbestos, it is safest to<br />
assume that they DO, and to take precautions<br />
accordingly.<br />
Removal<br />
1 Unless the complete engine/transmission is<br />
to be removed from the car and separated for<br />
major overhaul (see Chapter 2E), the clutch<br />
can be reached by removing the transmission<br />
as described in Chapter 7A (see illustration).<br />
2 Before disturbing the clutch, use chalk or a<br />
marker pen to mark the relationship of the<br />
pressure plate assembly to the flywheel.<br />
3 Working in a diagonal sequence, unscrew<br />
the pressure plate bolts by half a turn at a<br />
time, until spring pressure is released and the<br />
bolts can be removed by hand (see<br />
illustration). Note that on some models, the<br />
bolts are of Ribe-type, requiring a special key<br />
to remove them.<br />
4 Prise the pressure plate assembly off its<br />
locating dowels, and collect the friction disc,<br />
noting which way round the friction disc is<br />
fitted (see illustration).<br />
Inspection<br />
Note: Due to the amount of work necessary to<br />
remove and refit clutch components, it is<br />
usually considered good practice to renew the<br />
clutch friction disc, pressure plate assembly<br />
and release bearing as a matched set, even if<br />
only one of these is actually worn enough to<br />
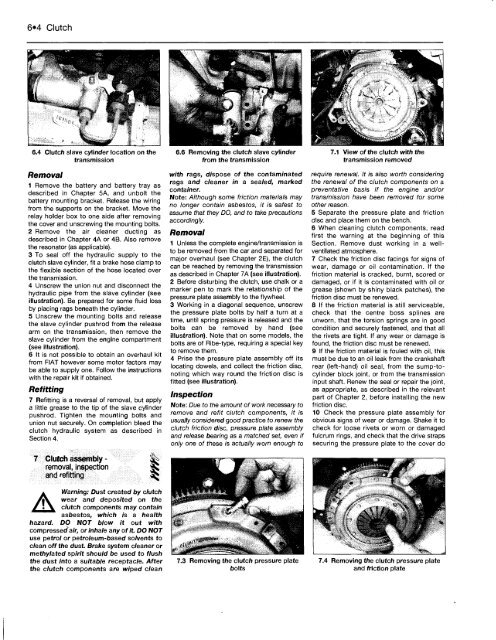
7.3 Removing the clutch pressure plate<br />
bolts<br />
7.1 View of the clutch with the<br />
transmission removed<br />
require renewal. It is also worth considering<br />
the renewal of the clutch components on a<br />
preventative basis if the engine and/or<br />
transmission have been removed for some<br />
other reason.<br />
5 Separate the pressure plate and friction<br />
disc and place them on the bench.<br />
6 When cleaning clutch components, read<br />
first the warning at the beginning of this<br />
Section. Remove dust working in a wellventilated<br />
atmosphere.<br />
7 Check the friction disc facings for signs of<br />
wear, damage or oil contamination. If the<br />
friction material is cracked, burnt, scored or<br />
damaged, or if it is contaminated with oil or<br />
grease (shown by shiny black patches), the<br />
friction disc must be renewed.<br />
8 If the friction material is still serviceable,<br />
check that the centre boss splines are<br />
unworn, that the torsion springs are in good<br />
condition and securely fastened, and that all<br />
the rivets are tight. If any wear or damage is<br />
found, the friction disc must be renewed.<br />
9 If the friction material is fouled with oil, this<br />
must be due to an oil leak from the crankshaft<br />
rear (left-hand) oil seal, from the sump-tocylinder<br />
block joint, or from the transmission<br />
input shaft. Renew the seal or repair the joint,<br />
as appropriate, as described in the relevant<br />
part of Chapter 2, before installing the new<br />
friction disc.<br />
10 Check the pressure plate assembly for<br />
obvious signs of wear or damage. Shake it to<br />
check for loose rivets or worn or damaged<br />
fulcrum rings, and check that the drive straps<br />
securing the pressure plate to the cover do<br />
7.4 Removing the clutch pressure plate<br />
and friction plate


