

Bravo & Brava • 1995 To 2000
Bravo & Brava • 1995 To 2000
Bravo & Brava • 1995 To 2000

Create successful ePaper yourself
Turn your PDF publications into a flip-book with our unique Google optimized e-Paper software.
5 Before removing the filter, note any<br />
direction-of-flow markings on the filter body,<br />
and check against the new filter - the arrow<br />
should point in the direction of fuel flow<br />
(following the hose leading to the front of the<br />
car) (see illustration).<br />
6 The inlet and outlet hoses are equipped<br />
with quick-release connectors. <strong>To</strong> release the<br />
connectors, squeeze them together at the<br />
sides, then pull apart (see illustration).<br />
7 Loosen the retaining clamp bolt and<br />
remove the old filter (see illustration).<br />
8 If the fuel hoses show any sign of damage,<br />
or if the quick-release connectors are not<br />
making a secure fit, seek the advice of a FIAT<br />
dealer on renewing the hoses.<br />
9 Fit the new filter into position, with the flow<br />
marking arrow correctly orientated, and<br />
tighten the retaining clamp bolt (see<br />
illustration).<br />
10 Reconnect the fuel hoses, ensuring that<br />
no dirt is allowed to enter the hoses or filter<br />
connections, and that the quick-release<br />
connectors click together fully.<br />
11 Start the engine (there may be a delay as<br />
the system re-pressurises and the new filter<br />
fills with fuel). Let the engine run for several<br />
minutes while you check the filter hose<br />
connections for leaks.<br />
12 Refit the cover panel below the filter,<br />
secure with the bolts, then lower the vehicle to<br />
the ground.<br />
Warning: Dispose safely of the old<br />
filter; it will be highly flammable, A and may explode if thrown on a<br />
fire.<br />
21 Auxiliary drivebelt<br />
check and renewal<br />
1.2 litre engine<br />
1 Remove the three bolts securing the engine<br />
upper cover, and remove the cover for access<br />
to the belts.<br />
2 With the car parked on a level surface, apply<br />
the handbrake and chock the rear wheels.<br />
Loosen the right-hand front wheel bolts.<br />
3 Raise the front of the vehicle, rest it<br />
securely on axle stands and remove the righthand<br />
front roadwheel.<br />
4 Unscrew and release the fasteners securing<br />
the wheelarch inner panel, to gain access to<br />
the belt run.<br />
Power steering pump drivebelt<br />
5 The power steering pump is located at the<br />
front of the engine. Check the condition of the<br />
pump drivebelt as follows.<br />
6 Look for cracks, splitting and fraying on the<br />
surface of the belt; check also for signs of<br />
glazing (shiny patches) and separation of the<br />
belt plies. If damage or wear is visible, the belt<br />
should be renewed. If there is any evidence of<br />
contamination by oil, grease or coolant, the<br />
reason should be investigated without delay.<br />
Every 24 000 miles (40 000 km) 1.17<br />
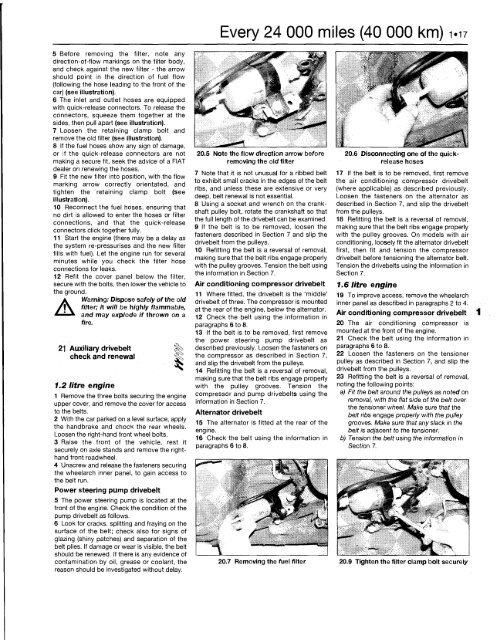
20.5 Note the flow direction arrow before<br />
removing the old filter<br />
7 Note that it is not unusual for a ribbed belt<br />
to exhibit small cracks in the edges of the belt<br />
ribs, and unless these are extensive or very<br />
deep, belt renewal is not essential.<br />
8 Using a socket and wrench on the crankshaft<br />
pulley bolt, rotate the crankshaft so that<br />
the full length of the drivebelt can be examined.<br />
9 If the belt is to be removed, loosen the<br />
fasteners described in Section 7 and slip the<br />
drivebelt from the pulleys.<br />
10 Refitting the belt is a reversal of removal,<br />
making sure that the belt ribs engage properly<br />
with the pulley grooves. Tension the belt using<br />
the information in Section 7.<br />
Air conditioning compressor drivebelt<br />
11 Where fitted, the drivebelt is the 'middle'<br />
drivebelt of three. The compressor is mounted<br />
at the rear of the engine, below the alternator.<br />
12 Check the belt using the information in<br />
paragraphs 6 to 8.<br />
13 If the belt is to be removed, first remove<br />
the power steering pump drivebelt as<br />
described previously. Loosen the fasteners on<br />
the compressor as described in Section 7,<br />
and slip the drivebelt from the pulleys.<br />
14 Refitting the belt is a reversal of removal,<br />
making sure that the belt ribs engage properly<br />
with the pulley grooves. Tension the<br />
compressor and pump drivebelts using the<br />
information in Section 7.<br />
Alternator drivebelt<br />
15 The alternator is fitted at the rear of the<br />
engine.<br />
16 Check the belt using the information in<br />
paragraphs 6 to 8.<br />
20.6 Disconnecting one of the quickrelease<br />
hoses<br />
17 If the belt is to be removed, first remove<br />
the air conditioning compressor drivebelt<br />
(where applicable) as described previously.<br />
Loosen the fasteners on the alternator as<br />
described in Section 7, and slip the drivebelt<br />
from the pulleys.<br />
18 Refitting the belt is a reversal of removal,<br />
making sure that the belt ribs engage properly<br />
with the pulley grooves. On models with air<br />
conditioning, loosely fit the alternator drivebelt<br />
first, then fit and tension the compressor<br />
drivebelt before tensioning the alternator belt.<br />
Tension the drivebelts using the information in<br />
Section 7.<br />
1.6 litre engine<br />
19 <strong>To</strong> improve access, remove the wheelarch<br />
inner panel as described in paragraphs 2 to 4.<br />
Air conditioning compressor drivebelt<br />
20 The air conditioning compressor is<br />
mounted at the front of the engine.<br />
21 Check the belt using the information in<br />
paragraphs 6 to 8.<br />
22 Loosen the fasteners on the tensioner<br />
pulley as described in Section 7, and slip the<br />
drivebelt from the pulleys.<br />
23 Refitting the belt is a reversal of removal,<br />
noting the following points:<br />
a) Fit the belt around the pulleys as noted on<br />
removal, with the flat side of the belt over<br />
the tensioner wheel. Make sure that the<br />
belt ribs engage properly with the pulley<br />
grooves. Make sure that any slack in the<br />
belt is adjacent to the tensioner.<br />
b) Tension the belt using the information in<br />
Section 7.<br />
20.7 Removing the fuel filter 20.9 Tighten the filter clamp bolt securely


