

Bravo & Brava • 1995 To 2000
Bravo & Brava • 1995 To 2000
Bravo & Brava • 1995 To 2000

Create successful ePaper yourself
Turn your PDF publications into a flip-book with our unique Google optimized e-Paper software.
208 1.6 litre engine in-car repair procedures<br />
5.4 Removing the timing belt tensioner<br />
pulley<br />
4 Completely unscrew the nut, and slide the tensioner<br />
off the mounting stud (see illustration). If<br />
required, the tensioner mounting plate can be<br />
unbolted from the engine, noting the location of<br />
each bolt, as they are of different sizes.<br />
Inspection<br />
5 Wipe the tensioner clean, but do not use<br />
excessive amounts of solvent, as these may<br />
contaminate the bearings. Spin the tensioner<br />
<strong>To</strong> make a camshaft sprocket holding<br />
tool, obtain two lengths of steel strip<br />
about 6 mm thick by 30 mm wide or<br />
similar, one 600 mm long, the other<br />
200 mm long (all dimensions approximate).<br />
Bolt the two strips together to<br />
form a forked end, leaving the bolt slack<br />
so that the shorter strip can pivot freely.<br />
At the end of each 'prong' of the fork,<br />
secure a bolt with a nut and a locknut,<br />
to act as the fulcmms; these will engage<br />
with the cut-outs in the sprocket, and<br />
should protrude by about 30 mm.<br />
5.13a Unscrew and remove the bolt and<br />
washer, and remove the camshaft<br />
sprocket...<br />
pulley on its hub by hand. Stiff movement or<br />
excessive freeplay is an indication of severe<br />
wear; the tensioner is not a serviceable<br />
component, and should be renewed if its<br />
condition is suspect, or as a precaution at the<br />
time of a major engine overhaul.<br />
Refitting<br />
6 Hold the timing belt aside, then slide the<br />
tensioner over the mounting stud and secure<br />
loosely with the nut. Ensuring that all slack is<br />
taken out of the belt, engage the timing belt<br />
with tensioner sprocket.<br />
7 Set the belt tension with reference to<br />
Section 4, paragraphs 21 to 24.<br />
8 Refit the timing belt cover and rubber<br />
gasket, and secure with the eight bolts,<br />
correctly refitted to their original locations.<br />
9 Refit and tension the auxiliary drivebelt as<br />
described in Chapter 1.<br />
Camshaft sprockets<br />
Removal<br />
10 Remove the timing belt as described in<br />
Section 4. In addition to the alignment marks<br />
suggested in Section 4, it is useful to have a<br />
mark between each sprocket and the cylinder<br />
head - make your own if none are present,<br />
particularly if the camshaft holding tools<br />
described in Section 4 are not available.<br />
11 The camshaft sprocket must now be held<br />
stationary while the retaining bolt is loosened;<br />
if the sprocket turns very far, there is a risk<br />
that the valves will hit the pistons. Make up a<br />
tool as follows and engage it with the holes in<br />
the sprocket (see <strong>To</strong>ol Tip).<br />
12 Alternatively, pass a rod through one of<br />
the holes in the camshaft sprocket to prevent<br />
it rotating. Position a pad of rag or a piece of<br />
wood under the rod to avoid damaging the<br />
cylinder head.<br />
13 Unscrew the bolt (recover the washer),<br />
and slide the sprocket from the end of the<br />
camshaft. Note the integral location key on<br />
the inner face of the sprocket, and the notch<br />
on the end of the camshaft into which it fits<br />
(see illustrations).<br />
Inspection<br />
14 With the sprockets removed, examine the<br />
camshaft oil seals for signs of leaking. If<br />
necessary, refer to Section 7 and renew them.<br />
5.13b ... noting how the sprocket locates<br />
on the end of the camshaft<br />
15 Check the sprocket teeth for damage.<br />
16 Wipe clean the sprocket and camshaft<br />
mating surfaces.<br />
Refitting<br />
17 Locate the sprocket on the end of the<br />
camshaft, noting that it is (loosely) keyed.<br />
Refit the bolt and washer, and tighten to the<br />
specified torque while holding the camshaft<br />
stationary using the method described<br />
previously.<br />
18 Align the marks made between the<br />
camshaft sprockets and cylinder head, then<br />
refit the timing belt as described in Section 4.<br />
Crankshaft sprocket<br />
Removal<br />
19 Remove the timing belt as described in<br />
Section 4.<br />
20 Slide the sprocket off the end of the<br />
crankshaft (see illustration). If it is tight,<br />
remove it using a puller or a pair of suitable<br />
screwdrivers. The sprocket has a separate<br />
key which locates in a groove in the<br />
crankshaft nose - recover the key if it is loose.<br />
Inspection<br />
21 With the sprocket removed, examine the<br />
crankshaft oil seal for signs of leaking. If<br />
necessary, refer to Section 10 and renew it.<br />
22 Wipe clean the sprocket and crankshaft<br />
mating surfaces. Check the sprocket teeth for<br />
damage.<br />
Refitting<br />
23 Slide the sprocket fully onto the<br />
crankshaft, making sure it engages the key.<br />
24 Refit the timing belt as described in<br />
Section 4.<br />
Auxiliary shaft sprocket<br />
Removal<br />
25 Remove the timing belt as described in<br />
Section 4. There is no need to make any<br />
alignment marks to show the auxiliary shaft<br />
sprocket fitted position.<br />
26 The sprocket must now be held stationary<br />
while the bolt is loosened. Locking up the<br />
flywheel will not help in this case, as the<br />
sprocket turns the oil pump driveshaft. One<br />
solution would be to hold the sprocket using a<br />
strap wrench, as used for oil filter removal;<br />
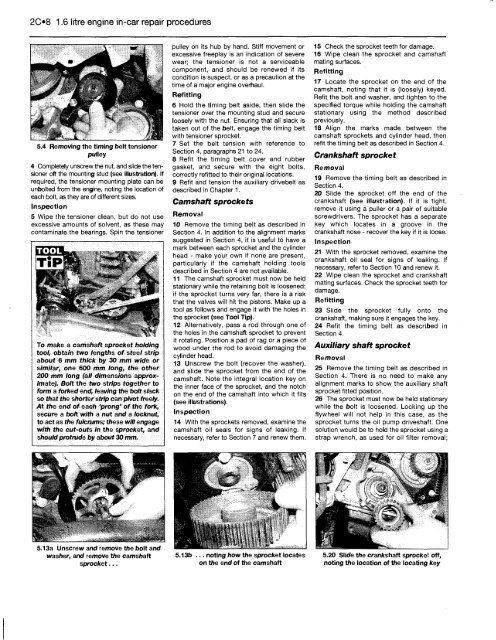
5.20 Slide the crankshaft sprocket off,<br />
noting the location of the locating key


