

Bravo & Brava • 1995 To 2000
Bravo & Brava • 1995 To 2000
Bravo & Brava • 1995 To 2000

You also want an ePaper? Increase the reach of your titles
YUMPU automatically turns print PDFs into web optimized ePapers that Google loves.
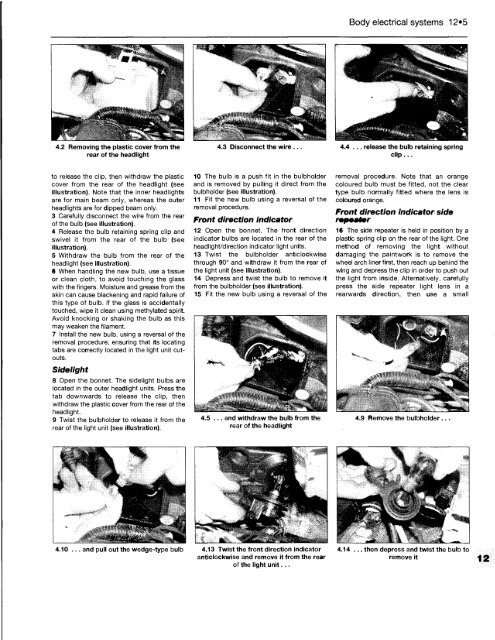
to release the clip, then withdraw the plastic<br />
cover from the rear of the headlight (see<br />
illustration). Note that the inner headlights<br />
are for main beam only, whereas the outer<br />
headlights are for dipped beam only.<br />
3 Carefully disconnect the wire from the rear<br />
of the bulb (see illustration).<br />
4 Release the bulb retaining spring clip and<br />
swivel it from the rear of the bulb'(see<br />
illustration).<br />
5 Withdraw the bulb from the rear of the<br />
headlight (see illustration).<br />
6 When handling the new bulb, use a tissue<br />
or clean cloth, to avoid touching the glass<br />
with the fingers. Moisture and grease from the<br />
skin can cause blackening and rapid failure of<br />
this type of bulb. If the glass is accidentally<br />
touched, wipe it clean using methylated spirit.<br />
Avoid knocking or shaking the bulb as this<br />
may weaken the filament.<br />
7 Install the new bulb, using a reversal of the<br />
removal procedure, ensuring that its locating<br />
tabs are correctly located in the light unit cutouts.<br />
Sidelight<br />
8 Open the bonnet. The sidelight bulbs are<br />
located in the outer headlight units. Press the<br />
tab downwards to release the clip, then<br />
withdraw the plastic cover from the rear of the<br />
headlight.<br />
9 Twist the bulbholder to release it from the<br />
rear of the light unit (see illustration).<br />
10 The bulb is a push fit in the bulbholder<br />
and is removed by pulling it direct from the<br />
bulbholder (see illustration).<br />
11 Fit the new bulb using a reversal of the<br />
removal procedure.<br />
Front direction indicator<br />
12 Open the bonnet. The front direction<br />
indicator bulbs are located in the rear of the<br />
headlight/direction indicator light units.<br />
13 Twist the bulbholder anticlockwise<br />
through 90° and withdraw it from the rear of<br />
the light unit (see illustration).<br />
14 Depress and twist the bulb to remove it<br />
from the bulbholder (see illustration).<br />
15 Fit the new bulb using a reversal of the<br />
4.5 ... and withdraw the bulb from the<br />
rear of the headlight<br />
4.10 ... and pull out the wedge-type bulb 4.13 Twist the front direction indicator<br />
anticlockwise and remove it from the rear<br />
of the light unit...<br />
Body electrical systems 12*5<br />
removal procedure. Note that an orange<br />
coloured bulb must be fitted, not the clear<br />
type bulb normally fitted where the lens is<br />
coloured orange.<br />
Front direction indicator side<br />
16 The side repeater is held in position by a<br />
plastic spring clip on the rear of the light. One<br />
method of removing the light without<br />
damaging the paintwork is to remove the<br />
wheel arch liner first, then reach up behind the<br />
wing and depress the clip in order to push out<br />
the light from inside. Alternatively, carefully<br />
press the side repeater light lens in a<br />
rearwards direction, then use a small<br />
4.9 Remove the bulbholder.<br />
4.14 . then depress and twist the bulb to<br />
remove it


