

Bravo & Brava • 1995 To 2000
Bravo & Brava • 1995 To 2000
Bravo & Brava • 1995 To 2000

Create successful ePaper yourself
Turn your PDF publications into a flip-book with our unique Google optimized e-Paper software.
Brake (and clutch*) fluid level<br />
*0n models with a hydraulically-operated clutch, this information is also applicable to the clutch fluid level.<br />
A<br />
Warning:<br />
<strong>•</strong> Brake fluid can harm your<br />
eyes and damage painted<br />
surfaces, so use extreme<br />
caution when handling and<br />
pouring it.<br />
<strong>•</strong> Do not use fluid that has<br />
been standing open for some<br />
time, as it absorbs moisture<br />
from the air, which can cause a<br />
dangerous loss of braking<br />
effectiveness.<br />
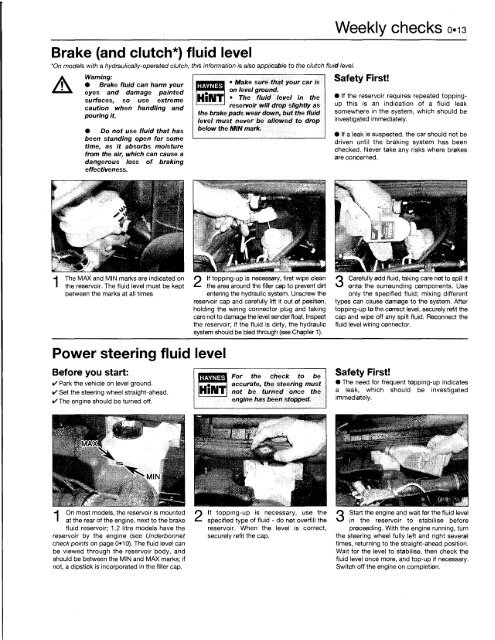
The MAX and MIN marks are indicated on<br />
the reservoir. The fluid level must be kept<br />
between the marks at all times<br />
Power steering fluid level<br />
Before you start:<br />
<strong>•</strong> Park the vehicle on level ground.<br />
<strong>•</strong> Set the steering wheel straight-ahead.<br />
<strong>•</strong> The engine should be turned off.<br />
<strong>•</strong>H On most models, the reservoir is mounted<br />
I at the rear of the engine, next to the brake<br />
fluid reservoir; 1.2 litre models have the<br />
reservoir by the engine (see Underbonnet<br />
check points on page O10). The fluid level can<br />
be viewed through the reservoir body, and<br />
should be between the MIN and MAX marks; if<br />
not, a dipstick is incorporated in the filler cap.<br />
HAYNES<br />
<strong>•</strong> Make<br />
on level<br />
sure that your<br />
ground.<br />
car is<br />
The fluid level in the<br />
reservoir will drop slightly as<br />
the brake pads wear down, but the fluid<br />
level must never be allowed to drop<br />
below the MIN mark.<br />
If topping-up is necessary, first wipe clean<br />
the area around the filler cap to prevent dirt<br />
entering the hydraulic system. Unscrew the<br />
reservoir cap and carefully lift it out of position,<br />
holding the wiring connector plug and taking<br />
care not to damage the level sender float. Inspect<br />
the reservoir; if the fluid is dirty, the hydraulic<br />
system should be bled through (see Chapter 1).<br />
REHflSl F o r t n e check to be<br />
accurate, the steering must<br />
|Hli\IT| not be turned once the<br />
engine has been stopped.<br />
If topping-up is necessary, use the<br />
specified type of fluid - do not overfill the<br />
reservoir. When the level is correct,<br />
securely refit the cap.<br />
Weekly checks 0.13<br />
Safety First!<br />
<strong>•</strong> If the reservoir requires repeated toppingup<br />
this is an indication of a fluid leak<br />
somewhere in the system, which should be<br />
investigated immediately.<br />
<strong>•</strong> If a leak is suspected, the car should not be<br />
driven until the braking system has been<br />
checked. Never take any risks where brakes<br />
are concerned.<br />
3<br />
Carefully add fluid, taking care not to spill it<br />
onto the surrounding components. Use<br />
only the specified fluid; mixing different<br />
types can cause damage to the system. After<br />
topping-up to the correct level, securely refit the<br />
cap and wipe off any spilt fluid. Reconnect the<br />
fluid level wiring connector.<br />
Safety First!<br />
<strong>•</strong> The need for frequent topping-up indicates<br />
a leak, which should be investigated<br />
immediately.<br />
3<br />
<strong>•</strong> -M<br />
Start the engine and wait for the fluid level<br />
in the reservoir to stabilise before<br />
proceeding. With the engine running, turn<br />
the steering wheel fully left and right several<br />
times, returning to the straight-ahead position.<br />
Wait for the level to stabilise, then check the<br />
fluid level once more, and top-up if necessary.<br />
Switch off the engine on completion.


