

Bravo & Brava • 1995 To 2000
Bravo & Brava • 1995 To 2000
Bravo & Brava • 1995 To 2000

You also want an ePaper? Increase the reach of your titles
YUMPU automatically turns print PDFs into web optimized ePapers that Google loves.
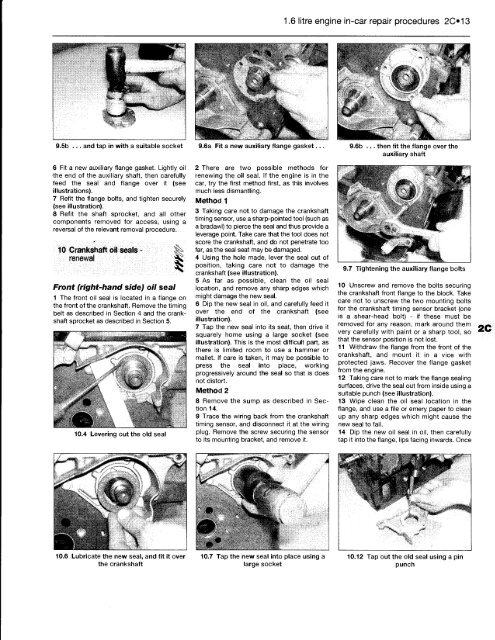
9.5b ... and tap in with a suitable socket 9.6a Fit a new auxiliary flange gasket...<br />
6 Fit a new auxiliary flange gasket. Lightly oil<br />
the end of the auxiliary shaft, then carefully<br />
feed the seal and flange over it (see<br />
illustrations).<br />
7 Refit the flange bolts, and tighten securely<br />
(see illustration).<br />
8 Refit the shaft sprocket, and all other<br />
components removed for access, using a<br />
reversal of the relevant removal procedure.<br />
10 Crankshaft oil seals -<br />
renewal I<br />
Front (right-hand side) oil seal<br />
1 The front oil seal is located in a flange on<br />
the front of the crankshaft. Remove the timing<br />
belt as described in Section 4 and the crankshaft<br />
sprocket as described in Section 5.<br />
10.4 Levering out the old seal<br />
2 There are two possible methods for<br />
renewing the oil seal. If the engine is in the<br />
car, try the first method first, as this involves<br />
much less dismantling.<br />
Method 1<br />
3 Taking care not to damage the crankshaft<br />
timing sensor, use a sharp-pointed tool (such as<br />
a bradawl) to pierce the seal and thus provide a<br />
leverage point. Take care that the tool does not<br />
score the crankshaft, and do not penetrate too<br />
far, as the seal seat may be damaged.<br />
4 Using the hole made, lever the seal out of<br />
position, taking care not to damage the<br />
crankshaft (see illustration).<br />
5 As far as possible, clean the oil seal<br />
location, and remove any sharp edges which<br />
might damage the new seal.<br />
6 Dip the new seal in oil, and carefully feed it<br />
over the end of the crankshaft (see<br />
illustration).<br />
7 Tap the new seal into its seat, then drive it<br />
squarely home using a large socket (see<br />
illustration). This is the most difficult part, as<br />
there is limited room to use a hammer or<br />
mallet. If care is taken, it may be possible to<br />
press the seal into place, working<br />
progressively around the seal so that is does<br />
not distort.<br />
Method 2<br />
8 Remove the sump as described in Section<br />
14.<br />
9 Trace the wiring back from the crankshaft<br />
timing sensor, and disconnect it at the wiring<br />
plug. Remove the screw securing the sensor<br />
to its mounting bracket, and remove it.<br />
10.6 Lubricate the new seal, and fit it over 10.7 Tap the new seal into place using a<br />
the crankshaft large socket<br />
1.6 litre engine in-car repair procedures 2013<br />
9.6b ... then fit the flange over the<br />
auxiliary shaft<br />
9.7 Tightening the auxiliary flange bolts<br />
10 Unscrew and remove the bolts securing<br />
the crankshaft front flange to the block. Take<br />
care not to unscrew the two mounting bolts<br />
for the crankshaft timing sensor bracket (one<br />
is a shear-head bolt) - if these must be<br />
removed for any reason, mark around them<br />
very carefully with paint or a sharp tool, so<br />
that the sensor position is not lost.<br />
11 Withdraw the flange from the front of the<br />
crankshaft, and mount it in a vice with<br />
protected jaws. Recover the flange gasket<br />
from the engine.<br />
12 Taking care not to mark the flange sealing<br />
surfaces, drive the seal out from inside using a<br />
suitable punch (see illustration).<br />
13 Wipe clean the oil seal location in the<br />
flange, and use a file or emery paper to clean<br />
up any sharp edges which might cause the<br />
new seal to fail.<br />
14 Dip the new oil seal in oil, then carefully<br />
tap it into the flange, lips facing inwards. Once<br />
10.12 Tap out the old seal using a pin<br />
punch


