

Bravo & Brava • 1995 To 2000
Bravo & Brava • 1995 To 2000
Bravo & Brava • 1995 To 2000

Create successful ePaper yourself
Turn your PDF publications into a flip-book with our unique Google optimized e-Paper software.
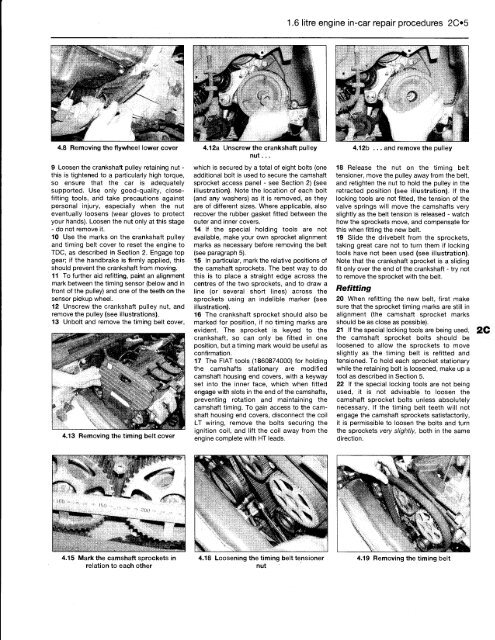
4.8 Removing the flywheel lower cover<br />
9 Loosen the crankshaft pulley retaining nut -<br />
this is tightened to a particularly high torque,<br />
so ensure that the car is adequately<br />
supported. Use only good-quality, closefitting<br />
tools, and take precautions against<br />
personal injury, especially when the nut<br />
eventually loosens (wear gloves to protect<br />
your hands). Loosen the nut only at this stage<br />
- do not remove it.<br />
10 Use the marks on the crankshaft pulley<br />
and timing belt cover to reset the engine to<br />
TDC, as described in Section 2. Engage top<br />
gear; if the handbrake is firmly applied, this<br />
should prevent the crankshaft from moving.<br />
11 <strong>To</strong> further aid refitting, paint an alignment<br />
mark between the timing sensor (below and in<br />
front of the pulley) and one of the teeth on the<br />
sensor pickup wheel.<br />
12 Unscrew the crankshaft pulley nut, and<br />
remove the pulley (see illustrations).<br />
13 Unbolt and remove the timing belt cover,<br />
4.13 Removing the timing belt cover<br />
«-'\ '77'<br />
4.15 Mark the camshaft sprockets in<br />
relation to each other<br />
4.12a Unscrew the crankshaft pulley<br />
nut...<br />
which is secured by a total of eight bolts (one<br />
additional bolt is used to secure the camshaft<br />
sprocket access panel - see Section 2) (see<br />
illustration). Note the location of each bolt<br />
(and any washers) as it is removed, as they<br />
are of different sizes. Where applicable, also<br />
recover the rubber gasket fitted between the<br />
outer and inner covers.<br />
14 If the special holding tools are not<br />
available, make your own sprocket alignment<br />
marks as necessary before removing the belt<br />
(see paragraph 5).<br />
15 In particular, mark the relative positions of<br />
the camshaft sprockets. The best way to do<br />
this is to place a straight edge across the<br />
centres of the two sprockets, and to draw a<br />
line (or several short lines) across the<br />
sprockets using an indelible marker (see<br />
illustration).<br />
16 The crankshaft sprocket should also be<br />
marked for position, if no timing marks are<br />
evident. The sprocket is keyed to the<br />
crankshaft, so can only be fitted in one<br />
position, but a timing mark would be useful as<br />
confirmation.<br />
17 The FIAT tools (1860874000) for holding<br />
the camshafts stationary are modified<br />
camshaft housing end covers, with a keyway<br />
set into the inner face, which when fitted<br />
engage with slots in the end of the camshafts,<br />
preventing rotation and maintaining the<br />
camshaft timing. <strong>To</strong> gain access to the camshaft<br />
housing end covers, disconnect the coil<br />
LT wiring, remove the bolts securing the<br />
ignition coil, and lift the coil away from the<br />
engine complete with HT leads.<br />
4.18 Loosening the timing belt tensioner<br />
nut<br />
1.6 litre engine in-car repair procedures 205<br />
4.12b ... and remove the pulley<br />
18 Release the nut on the timing belt<br />
tensioner, move the pulley away from the belt,<br />
and retighten the nut to hold the pulley in the<br />
retracted position (see illustration). If the<br />
locking tools are not fitted, the tension of the<br />
valve springs will move the camshafts very<br />
slightly as the belt tension is released - watch<br />
how the sprockets move, and compensate for<br />
this when fitting the new belt.<br />
19 Slide the drivebelt from the sprockets,<br />
taking great care not to turn them if locking<br />
tools have not been used (see illustration).<br />
Note that the crankshaft sprocket is a sliding<br />
fit only over the end of the crankshaft - try not<br />
to remove the sprocket with the belt.<br />
Refitting<br />
20 When refitting the new belt, first make<br />
sure that the sprocket timing marks are still in<br />
alignment (the camshaft sprocket marks<br />
should be as close as possible).<br />
21 If the special locking tools are being used,<br />
the camshaft sprocket bolts should be<br />
loosened to allow the sprockets to move<br />
slightly as the timing belt is refitted and<br />
tensioned. <strong>To</strong> hold each sprocket stationary<br />
while the retaining bolt is loosened, make up a<br />
tool as described in Section 5.<br />
22 If the special locking tools are not being<br />
used, it is not advisable to loosen the<br />
camshaft sprocket bolts unless absolutely<br />
necessary. If the timing belt teeth will not<br />
engage the camshaft sprockets satisfactorily,<br />
it is permissible to loosen the bolts and turn<br />
the sprockets very slightly, both in the same<br />
direction.<br />
4.19 Removing the timing belt


