

Bravo & Brava • 1995 To 2000
Bravo & Brava • 1995 To 2000
Bravo & Brava • 1995 To 2000

You also want an ePaper? Increase the reach of your titles
YUMPU automatically turns print PDFs into web optimized ePapers that Google loves.
2E»6 Engine removal and overhaul procedures<br />
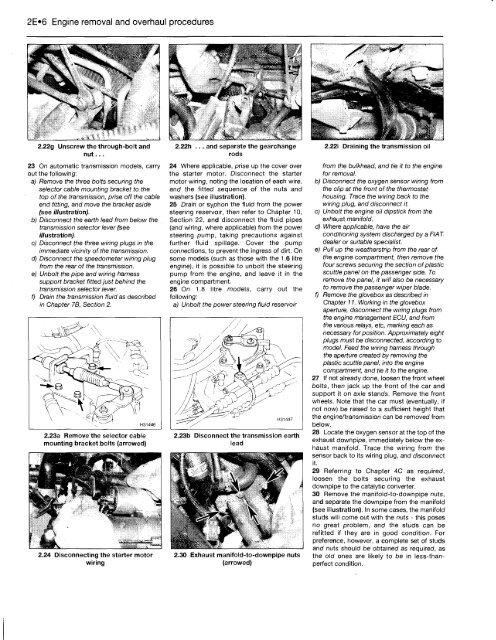
2.22g Unscrew the through-bolt and<br />
nut...<br />
23 On automatic transmission models, carry<br />
out the following:<br />
a) Remove the three bolts securing the<br />
selector cable mounting bracket to the<br />
top of the transmission, prise off the cable<br />
end fitting, and move the bracket aside<br />
(see illustration).<br />
b) Disconnect the earth lead from below the<br />
transmission selector lever (see<br />
illustration).<br />
c) Disconnect the three wiring plugs in the<br />
immediate vicinity of the transmission.<br />
d) Disconnect the speedometer wiring plug<br />
from the rear of the transmission.<br />
e) Unbolt the pipe and wiring harness<br />
support bracket fitted just behind the<br />
transmission selector lever.<br />
f) Drain the transmission fluid as described<br />
in Chapter 7B, Section 2.<br />
2.23a Remove the selector cable<br />
mounting bracket bolts (arrowed)<br />
2.24 Disconnecting the starter motor<br />
wiring<br />
2.22h ... and separate the gearchange<br />
rods<br />
24 Where applicable, prise up the cover over<br />
the starter motor. Disconnect the starter<br />
motor wiring, noting the location of each wire,<br />
and the fitted sequence of the nuts and<br />
washers (see illustration).<br />
25 Drain or syphon the fluid from the power<br />
steering reservoir, then refer to Chapter 10,<br />
Section 22, and disconnect the fluid pipes<br />
(and wiring, where applicable) from the power<br />
steering pump, taking precautions against<br />
further fluid spillage. Cover the pump<br />
connections, to prevent the ingress of dirt. On<br />
some models (such as those with the 1.6 litre<br />
engine), it is possible to unbolt the steering<br />
pump from the engine, and leave it in the<br />
engine compartment.<br />
26 On 1.8 litre models, carry out the<br />
following:<br />
a) Unbolt the power steering fluid reservoir<br />
2.23b Disconnect the transmission earth<br />
lead<br />
2.30 Exhaust manifold-to-downpipe nuts<br />
(arrowed)<br />
2.22i Draining the transmission oil<br />
from the bulkhead, and tie it to the engine<br />
for removal.<br />
b) Disconnect the oxygen sensor wiring from<br />
the clip at the front of the thermostat<br />
housing. Trace the wiring back to the<br />
wiring plug, and disconnect it.<br />
c) Unbolt the engine oil dipstick from the<br />
exhaust manifold.<br />
d) Where applicable, have the air<br />
conditioning system discharged by a FIAT<br />
dealer or suitable specialist.<br />
e) Pull up the weatherstrip from the rear of<br />
the engine compartment, then remove the<br />
four screws securing the section of plastic<br />
scuttle panel on the passenger side. <strong>To</strong><br />
remove the panel, it will also be necessary<br />
to remove the passenger wiper blade.<br />
f) Remove the glovebox as described in<br />
Chapter 11. Working in the glovebox<br />
aperture, disconnect the wiring plugs from<br />
the engine management ECU, and from<br />
the various relays, etc, marking each as<br />
necessary for position. Approximately eight<br />
plugs must be disconnected, according to<br />
model. Feed the wiring harness through<br />
the aperture created by removing the<br />
plastic scuttle panel, into the engine<br />
compartment, and tie it to the engine.<br />
27 If not already done, loosen the front wheel<br />
bolts, then jack up the front of the car and<br />
support it on axle stands. Remove the front<br />
wheels. Note that the car must (eventually, if<br />
not now) be raised to a sufficient height that<br />
the engine/transmission can be removed from<br />
below.<br />
28 Locate the oxygen sensor at the top of the<br />
exhaust downpipe, immediately below the exhaust<br />
manifold. Trace the wiring from the<br />
sensor back to its wiring plug, and disconnect<br />
it.<br />
29 Referring to Chapter 4C as required,<br />
loosen the bolts securing the exhaust<br />
downpipe to the catalytic converter.<br />
30 Remove the manifold-to-downpipe nuts,<br />
and separate the downpipe from the manifold<br />
(see illustration). In some cases, the manifold<br />
studs will come out with the nuts - this poses<br />
no great problem, and the studs can be<br />
refitted if they are in good condition. For<br />
preference, however, a complete set of studs<br />
and nuts should be obtained as required, as<br />
the old ones are likely to be in less-thanperfect<br />
condition.


