

Bravo & Brava • 1995 To 2000
Bravo & Brava • 1995 To 2000
Bravo & Brava • 1995 To 2000

You also want an ePaper? Increase the reach of your titles
YUMPU automatically turns print PDFs into web optimized ePapers that Google loves.
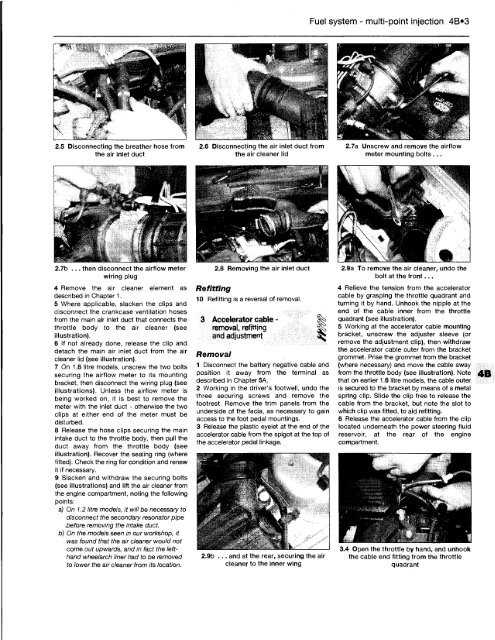
2.5 Disconnecting the breather hose from<br />
the air inlet duct<br />
2.7b ... then disconnect the airflow meter<br />
wiring plug<br />
4 Remove the air cleaner element as<br />
described in Chapter 1.<br />
5 Where applicable, slacken the clips and<br />
disconnect the crankcase ventilation hoses<br />
from the main air inlet duct that connects the<br />
throttle body to the air cleaner (see<br />
illustration).<br />
6 If not already done, release the clip and<br />
detach the main air inlet duct from the air<br />
cleaner lid (see illustration).<br />
7 On 1.8 litre models, unscrew the two bolts<br />
securing the airflow meter to its mounting<br />
bracket, then disconnect the wiring plug (see<br />
illustrations). Unless the airflow meter is<br />
being worked on, it is best to remove the<br />
meter with the inlet duct - otherwise the two<br />
clips at either end of the meter must be<br />
disturbed.<br />
8 Release the hose clips securing the main<br />
intake duct to the throttle body, then pull the<br />
duct away from the throttle body (see<br />
illustration). Recover the sealing ring (where<br />
fitted). Check the ring for condition and renew<br />
it if necessary.<br />
9 Slacken and withdraw the securing bolts<br />
(see illustrations) and lift the air cleaner from<br />
the engine compartment, noting the following<br />
points:<br />
a) On 1.2 litre models, it will be necessary to<br />
disconnect the secondary resonator pipe<br />
before removing the intake duct.<br />
b) On the models seen in our workshop, it<br />
was found that the air cleaner would not<br />
come out upwards, and in fact the lefthand<br />
wheelarch liner had to be removed<br />
to lower the air cleaner from its location.<br />
2.6 Disconnecting the air inlet duct from<br />
the air cleaner lid<br />
Refitting<br />
2.8 Removing the air inlet duct<br />
10 Refitting is a reversal of removal.<br />
3 Accelerator cable - f|<br />
removal, refitting ^<br />
and adjustment<br />
Removal<br />
1 Disconnect the battery negative cable and<br />
position it away from the terminal as<br />
described in Chapter 5A.<br />
2 Working in the driver's footwell, undo the<br />
three securing screws and remove the<br />
footrest. Remove the trim panels from the<br />
underside of the facia, as necessary to gain<br />
access to the foot pedal mountings.<br />
3 Release the plastic eyelet at the end of the<br />
accelerator cable from the spigot at the top of<br />
the accelerator pedal linkage.<br />
2.9b ... and at the rear, securing the air<br />
cleaner to the inner wing<br />
Fuel system - multi-point injection 4B«3<br />
2.7a Unscrew and remove the airflow<br />
meter mounting bolts ...<br />
2.9a <strong>To</strong> remove the air cleaner, undo the<br />
bolt at the front...<br />
4 Relieve the tension from the accelerator<br />
cable by grasping the throttle quadrant and<br />
turning it by hand. Unhook the nipple at the<br />
end of the cable inner from the throttle<br />
quadrant (see illustration).<br />
5 Working at the accelerator cable mounting<br />
bracket, unscrew the adjuster sleeve (or<br />
remove the adjustment, clip), then withdraw<br />
the accelerator cable outer from the bracket<br />
grommet. Prise the grommet from the bracket<br />
(where necessary) and move the cable away<br />
from the throttle body (see illustration). Note 4B<br />
that on earlier 1.6 litre models, the cable outer<br />
is secured to the bracket by means of a metal<br />
spring clip. Slide the clip free to release the<br />
cable from the bracket, but note the slot to<br />
which clip was fitted, to aid refitting.<br />
6 Release the accelerator cable from the clip<br />
located underneath the power steering fluid<br />
reservoir, at the rear of the engine<br />
compartment.<br />
3.4 Open the throttle by hand, and unhook<br />
the cable end fitting from the throttle<br />
quadrant


