

Bravo & Brava • 1995 To 2000
Bravo & Brava • 1995 To 2000
Bravo & Brava • 1995 To 2000

Create successful ePaper yourself
Turn your PDF publications into a flip-book with our unique Google optimized e-Paper software.
4.31 Fit the new belt around the sprockets<br />
observing the direction markings<br />
32 Insert the jaws of a pair of right-angled<br />
circlip pliers (or similar) into the two holes on<br />
the front face of the tensioner pulley (see<br />
illustration). Rotate the pulley to tension the<br />
belt until the belt is quite taut. Maintain the<br />
effort applied to the tensioner pulley, then<br />
tighten the pulley retaining nut.<br />
33 Tighten the camshaft sprocket retaining<br />
bolt to the specified torque while holding the<br />
camshaft stationary using the method<br />
described previously (see illustration).<br />
34 Remove the piston positioning tools and<br />
camshaft locking tools, and turn the crankshaft<br />
through two complete turns in the<br />
normal direction of rotation.<br />
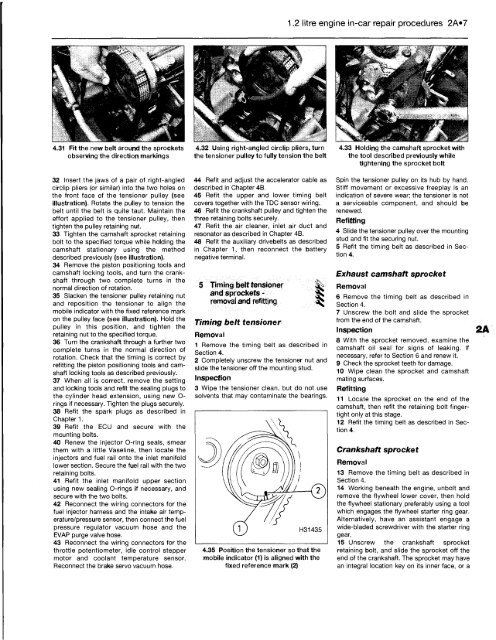
35 Slacken the tensioner pulley retaining nut<br />
and reposition the tensioner to align the<br />
mobile indicator with the fixed reference mark<br />
on the pulley face (see illustration). Hold the<br />
pulley in this position, and tighten the<br />
retaining nut to the specified torque.<br />
36 Turn the crankshaft through a further two<br />
complete turns in the normal direction of<br />
rotation. Check that the timing is correct by<br />
refitting the piston positioning tools and camshaft<br />
locking tools as described previously.<br />
37 When all is correct, remove the setting<br />
and locking tools and refit the sealing plugs to<br />
the cylinder head extension, using new Orings<br />
if necessary. Tighten the plugs securely.<br />
38 Refit the spark plugs as described in<br />
Chapter 1.<br />
39 Refit the ECU and secure with the<br />
mounting bolts.<br />
40 Renew the injector O-ring seals, smear<br />
them with a little Vaseline, then locate the<br />
injectors and fuel rail onto the inlet manifold<br />
lower section. Secure the fuel rail with the two<br />
retaining bolts.<br />
41 Refit the inlet manifold upper section<br />
using new sealing O-rings if necessary, and<br />
secure with the two bolts.<br />
42 Reconnect the wiring connectors for the<br />
fuel injector harness and the intake air temperature/pressure<br />
sensor, then connect the fuel<br />
pressure regulator vacuum hose and the<br />
EVAP purge valve hose.<br />
43 Reconnect the wiring connectors for the<br />
throttle potentiometer, idle control stepper<br />
motor and coolant temperature sensor.<br />
Reconnect the brake servo vacuum hose.<br />
4.32 Using right-angled circlip pliers, turn<br />
the tensioner pulley to fully tension the belt<br />
44 Refit and adjust the accelerator cable as<br />
described in Chapter 4B.<br />
45 Refit the upper and lower timing belt<br />
covers together with the TDC sensor wiring.<br />
46 Refit the crankshaft pulley and tighten the<br />
three retaining bolts securely.<br />
47 Refit the air cleaner, inlet air duct and<br />
resonator as described in Chapter 4B.<br />
48 Refit the auxiliary drivebelts as described<br />
in Chapter 1, then reconnect the battery<br />
negative terminal.<br />
Timing belt tensioner<br />
and sprockets -<br />
removal and refitting<br />
Timing belt tensioner<br />
Removal<br />
1 Remove the timing belt as described in<br />
Section 4.<br />
2 Completely unscrew the tensioner nut and<br />
slide the tensioner off the mounting stud.<br />
Inspection<br />
3 Wipe the tensioner clean, but do not use<br />
solvents that may contaminate the bearings.<br />
4.35 Position the tensioner so that the<br />
mobile indicator (1) is aligned with the<br />
fixed reference mark (2)<br />
1.2 litre engine in-car repair procedures 2A»7<br />
4.33 Holding the camshaft sprocket with<br />
the tool described previously while<br />
tightening the sprocket bolt<br />
Spin the tensioner pulley on its hub by hand.<br />
Stiff movement or excessive freeplay is an<br />
indication of severe wear; the tensioner is not<br />
a serviceable component, and should be<br />
renewed.<br />
Refitting<br />
4 Slide the tensioner pulley over the mounting<br />
stud and fit the securing nut.<br />
5 Refit the timing belt as described in Section<br />
4.<br />
Exhaust camshaft sprocket<br />
Removal<br />
6 Remove the timing belt as described in<br />
Section 4.<br />
7 Unscrew the bolt and slide the sprocket<br />
from the end of the camshaft.<br />
Inspection<br />
8 With the sprocket removed, examine the<br />
camshaft oil seal for signs of leaking. If<br />
necessary, refer to Section 6 and renew it.<br />
9 Check the sprocket teeth for damage.<br />
10 Wipe clean the sprocket and camshaft<br />
mating surfaces.<br />
Refitting<br />
11 Locate the sprocket on the end of the<br />
camshaft, then refit the retaining bolt fingertight<br />
only at this stage.<br />
12 Refit the timing belt as described in Section<br />
4.<br />
Crankshaft sprocket<br />
Removal<br />
13 Remove the timing belt as described in<br />
Section 4.<br />
14 Working beneath the engine, unbolt and<br />
remove the flywheel lower cover, then hold<br />
the flywheel stationary preferably using a tool<br />
which engages the flywheel starter ring gear.<br />
Alternatively, have an assistant engage a<br />
wide-bladed screwdriver with the starter ring<br />
gear.<br />
15 Unscrew the crankshaft sprocket<br />
retaining bolt, and slide the sprocket off the<br />
end of the crankshaft. The sprocket may have<br />
an integral location key on its inner face, or a


