

Bravo & Brava • 1995 To 2000
Bravo & Brava • 1995 To 2000
Bravo & Brava • 1995 To 2000

You also want an ePaper? Increase the reach of your titles
YUMPU automatically turns print PDFs into web optimized ePapers that Google loves.
11 »8 Bodywork and fittings<br />
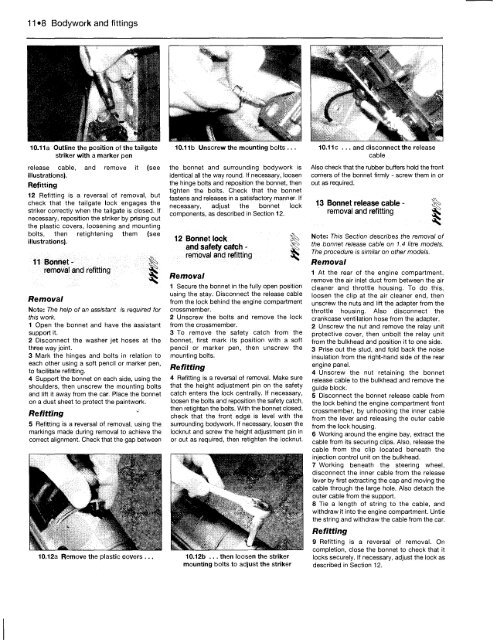
10.11 a Outline the position of the tailgate<br />
striker with a marker pen<br />
release cable, and remove it (see<br />
illustrations).<br />
Refitting<br />
12 Refitting is a reversal of removal, but<br />
check that the tailgate lock engages the<br />
striker correctly when the tailgate is closed. If<br />
necessary, reposition the striker by prising out<br />
the plastic covers, loosening and mounting<br />
bolts, then retightening them (see<br />
illustrations).<br />
11 Bonnet -<br />
removal and refitting<br />
Removal<br />
Note: The help of an assistant is required for<br />
this work.<br />
1 Open the bonnet and have the assistant<br />
support it.<br />
2 Disconnect the washer jet hoses at the<br />
three way joint.<br />
3 Mark the hinges and bolts in relation to<br />
each other using a soft pencil or marker pen,<br />
to facilitate refitting.<br />
4 Support the bonnet on each side, using the<br />
shoulders, then unscrew the mounting bolts<br />
and lift it away from the car. Place the bonnet<br />
on a dust sheet to protect the paintwork.<br />
Refitting<br />
5 Refitting is a reversal of removal, using the<br />
markings made during removal to achieve the<br />
correct alignment. Check that the gap between<br />
10.12a Remove the plastic covers ...<br />
10.11b Unscrew the mounting bolts ...<br />
the bonnet and surrounding bodywork is<br />
identical all the way round. If necessary, loosen<br />
the hinge bolts and reposition the bonnet, then<br />
tighten the bolts. Check that the bonnet<br />
fastens and releases in a satisfactory manner. If<br />
necessary, adjust the bonnet lock<br />
components, as described in Section 12.<br />
12 Bonnet lock ^<br />
and safety catch - |k<br />
removal and refitting<br />
Removal<br />
1 Secure the bonnet in the fully open position<br />
using the stay. Disconnect the release cable<br />
from the lock behind the engine compartment<br />
crossmember.<br />
2 Unscrew the bolts and remove the lock<br />
from the crossmember.<br />
3 <strong>To</strong> remove the safety catch from the<br />
bonnet, first mark its position with a soft<br />
pencil or marker pen, then unscrew the<br />
mounting bolts.<br />
Refitting<br />
4 Refitting is a reversal of removal. Make sure<br />
that the height adjustment pin on the safety<br />
catch enters the lock centrally. If necessary,<br />
loosen the bolts and reposition the safety catch,<br />
then retighten the bolts. With the bonnet closed,<br />
check that the front edge is level with the<br />
surrounding bodywork. If necessary, loosen the<br />
locknut and screw the height adjustment pin in<br />
or out as required, then retighten the locknut.<br />
10.12b ... then loosen the striker<br />
mounting bolts to adjust the striker<br />
10.11c ... and disconnect the release<br />
cable<br />
Also check that the rubber buffers hold the front<br />
corners of the bonnet firmly - screw them in or<br />
out as required.<br />
13 Bonnet release cable - %<strong>•</strong><br />
removal and refitting S%<br />
Note: This Section describes the removal of<br />
the bonnet release cable on 1.4 litre models.<br />
The procedure is similar on other models.<br />
Removal<br />
1 At the rear of the engine compartment,<br />
remove the air inlet duct from between the air<br />
cleaner and throttle housing. <strong>To</strong> do this,<br />
loosen the clip at the air cleaner end, then<br />
unscrew the nuts and lift the adapter from the<br />
throttle housing. Also disconnect the<br />
crankcase ventilation hose from the adapter.<br />
2 Unscrew the nut and remove the relay unit<br />
protective cover, then unbolt the relay unit<br />
from the bulkhead and position it to one side.<br />
3 Prise out the stud, and fold back the noise<br />
insulation from the right-hand side of the rear<br />
engine panel.<br />
4 Unscrew the nut retaining the bonnet<br />
release cable to the bulkhead and remove the<br />
guide block.<br />
5 Disconnect the bonnet release cable from<br />
the lock behind the engine compartment front<br />
crossmember, by unhooking the inner cable<br />
from the lever and releasing the outer cable<br />
from the lock housing.<br />
6 Working around the engine bay, extract the<br />
cable from its securing clips. Also, release the<br />
cable from the clip located beneath the<br />
injection control unit on the bulkhead.<br />
7 Working beneath the steering wheel,<br />
disconnect the inner cable from the release<br />
lever by first extracting the cap and moving the<br />
cable through the large hole. Also detach the<br />
outer cable from the support.<br />
8 Tie a length of string to the cable, and<br />
withdraw it into the engine compartment. Untie<br />
the string and withdraw the cable from the car.<br />
Refitting<br />
9 Refitting is a reversal of removal. On<br />
completion, close the bonnet to check that it<br />
locks securely. If necessary, adjust the lock as<br />
described in Section 12.


