

Bravo & Brava • 1995 To 2000
Bravo & Brava • 1995 To 2000
Bravo & Brava • 1995 To 2000

Create successful ePaper yourself
Turn your PDF publications into a flip-book with our unique Google optimized e-Paper software.
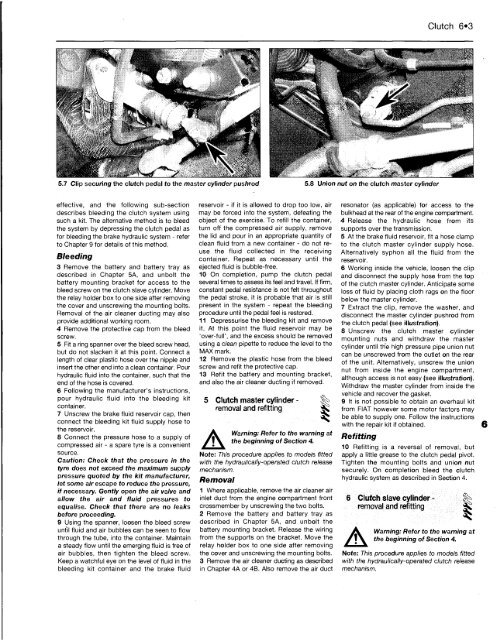
5.7 Clip securing the clutch pedal to the master cylinder pushrod 5.8 Union nut on the clutch master cylinder<br />
effective, and the following sub-section<br />
describes bleeding the clutch system using<br />
such a kit. The alternative method is to bleed<br />
the system by depressing the clutch pedal as<br />
for bleeding the brake hydraulic system - refer<br />
to Chapter 9 for details of this method.<br />
Bleeding<br />
3 Remove the battery and battery tray as<br />
described in Chapter 5A, and unbolt the<br />
battery mounting bracket for access to the<br />
bleed screw on the clutch slave cylinder. Move<br />
the relay holder box to one side after removing<br />
the cover and unscrewing the mounting bolts.<br />
Removal of the air cleaner ducting may also<br />
provide additional working room.<br />
4 Remove the protective cap from the bleed<br />
screw.<br />
5 Fit a ring spanner over the bleed screw head,<br />
but do not slacken it at this point. Connect a<br />
length of clear plastic hose over the nipple and<br />
insert the other end into a clean container. Pour<br />
hydraulic fluid into the container, such that the<br />
end of the hose is covered.<br />
6 Following the manufacturer's instructions,<br />
pour hydraulic fluid into the bleeding kit<br />
container.<br />
7 Unscrew the brake fluid reservoir cap, then<br />
connect the bleeding kit fluid supply hose to<br />
the reservoir.<br />
8 Connect the pressure hose to a supply of<br />
compressed air - a spare tyre is a convenient<br />
source.<br />
Caution: Check that the pressure in the<br />
tyre does not exceed the maximum supply<br />
pressure quoted by the kit manufacturer,<br />
let some air escape to reduce the pressure,<br />
if necessary. Gently open the air valve and<br />
allow the air and fluid pressures to<br />
equalise. Check that there are no leaks<br />
before proceeding.<br />
9 Using the spanner, loosen the bleed screw<br />
until fluid and air bubbles can be seen to flow<br />
through the tube, into the container. Maintain<br />
a steady flow until the emerging fluid is free of<br />
air bubbles, then tighten the bleed screw.<br />
Keep a watchful eye on the level of fluid in the<br />
bleeding kit container and the brake fluid<br />
reservoir - if it is allowed to drop too low, air<br />
may be forced into the system, defeating the<br />
object of the exercise. <strong>To</strong> refill the container,<br />
turn off the compressed air supply, remove<br />
the lid and pour in an appropriate quantity of<br />
clean fluid from a new container - do not reuse<br />
the fluid collected in the receiving<br />
container. Repeat as necessary until the<br />
ejected fluid is bubble-free.<br />
10 On completion, pump the clutch pedal<br />
several times to assess its feel and travel. If firm,<br />
constant pedal resistance is not felt throughout<br />
the pedal stroke, it is probable that air is still<br />
present in the system - repeat the bleeding<br />
procedure until the pedal feel is restored.<br />
11 Depressurise the bleeding kit and remove<br />
it. At this point the fluid reservoir may be<br />
'over-full', and the excess should be removed<br />
using a clean pipette to reduce the level to the<br />
MAX mark.<br />
12 Remove the plastic hose from the bleed<br />
screw and refit the protective cap.<br />
13 Refit the battery and mounting bracket,<br />
and also the air cleaner ducting if removed.<br />
5 Clutch master cylinder -<br />
removal and refitting<br />
A Warning:<br />
Refer to the warning at<br />
the beginning of Section 4.<br />
Note: This procedure applies to models fitted<br />
with the hydraulically-operated clutch release<br />
mechanism.<br />
Removal<br />
1 Where applicable, remove the air cleaner air<br />
inlet duct from the engine compartment front<br />
crossmember by unscrewing the two bolts.<br />
2 Remove the battery and battery tray as<br />
described in Chapter 5A, and unbolt the<br />
battery mounting bracket. Release the wiring<br />
from the supports on the bracket. Move the<br />
relay holder box to one side after removing<br />
the cover and unscrewing the mounting bolts.<br />
3 Remove the air cleaner ducting as described<br />
in Chapter 4A or 4B. Also remove the air duct<br />
Clutch 6«3<br />
resonator (as applicable) for access to the<br />
bulkhead at the rear of the engine compartment.<br />
4 Release the hydraulic hose from its<br />
supports over the transmission.<br />
5 At the brake fluid reservoir, fit a hose clamp<br />
to the clutch master cylinder supply hose.<br />
Alternatively syphon all the fluid from the<br />
reservoir.<br />
6 Working inside the vehicle, loosen the clip<br />
and disconnect the supply hose from the top<br />
of the clutch master cylinder. Anticipate some<br />
loss of fluid by placing cloth rags on the floor<br />
below the master cylinder.<br />
7 Extract the clip, remove the washer, and<br />
disconnect the master cylinder pushrod from<br />
the clutch pedal (see illustration).<br />
8 Unscrew the clutch master cylinder<br />
mounting nuts and withdraw the master<br />
cylinder until the high pressure pipe union nut<br />
can be unscrewed from the outlet on the rear<br />
of the unit. Alternatively, unscrew the union<br />
nut from inside the engine compartment,<br />
although access is not easy (see illustration).<br />
Withdraw the master cylinder from inside the<br />
vehicle and recover the gasket.<br />
9 It is not possible to obtain an overhaul kit<br />
from FIAT however some motor factors may<br />
be able to supply one. Follow the instructions<br />
with the repair kit if obtained.<br />
Refitting<br />
10 Refitting is a reversal of removal, but<br />
apply a little grease to the clutch pedal pivot.<br />
Tighten the mounting bolts and union nut<br />
securely. On completion bleed the clutch<br />
hydraulic system as described in Section 4.<br />
A Warning:<br />
Clutch slave cylinder -<br />
removal and refitting<br />
Refer to the warning at<br />
the beginning of Section 4.<br />
Note: This procedure applies to models fitted<br />
with the hydraulically-operated clutch release<br />
mechanism.


