

Bravo & Brava • 1995 To 2000
Bravo & Brava • 1995 To 2000
Bravo & Brava • 1995 To 2000

You also want an ePaper? Increase the reach of your titles
YUMPU automatically turns print PDFs into web optimized ePapers that Google loves.
Battery<br />
Caution: Before carrying out any work on the<br />
vehicle battery, read the precautions given in<br />
Safety first! at the start of this manual.<br />
<strong>•</strong> Make sure that the battery tray is in good<br />
condition, and that the clamp is tight.<br />
Corrosion on the tray, retaining clamp and the<br />
battery itself can be removed with a solution<br />
of water and baking soda. Thoroughly rinse all<br />
cleaned areas with water. Any metal parts<br />
damaged by corrosion should be covered<br />
with a zinc-based primer, then painted.<br />
<strong>•</strong> Periodically (approximately every three<br />
months), check the charge condition of the<br />
battery as described in Chapter 5A.<br />
<strong>•</strong> On batteries which are not of the<br />
maintenance-free type, periodically check the<br />
electrolyte level in the battery - see Chapter 1.<br />
<strong>•</strong> If the battery is flat, and you need to jump<br />
start your vehicle, see Roadside repairs.<br />
Battery corrosion can be kept to a<br />
minimum by applying a layer of<br />
petroleum jelly to the clamps and<br />
terminals after they are reconnected.<br />
Bulbs and fuses<br />
<strong>•</strong> Check all external lights and the horn. Refer<br />
to the appropriate Sections of Chapter 12 for<br />
details if any of the circuits are found to be<br />
inoperative.<br />
H If a single indicator light, stop-light or<br />
I headlight has failed, it is likely that a<br />
bulb has blown and will need to be<br />
replaced. Refer to Chapter 12 for details. If<br />
both stop-lights have failed, it is possible<br />
that the stop-light switch is faulty (see<br />
Chapter 9).<br />
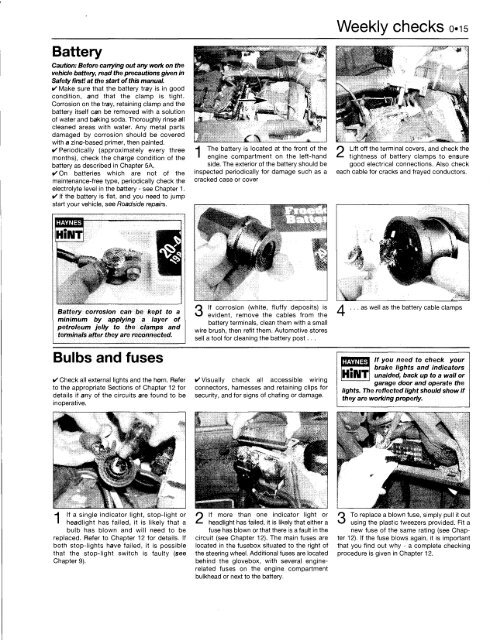
The battery is located at the front of the<br />
engine compartment on the left-hand<br />
side. The exterior of the battery should be<br />
inspected periodically for damage such as a<br />
cracked case or cover<br />
If corrosion (white, fluffy deposits) is<br />
evident, remove the cables from the<br />
battery terminals, clean them with a small<br />
wire brush, then refit them. Automotive stores<br />
sell a tool for cleaning the battery post. . .<br />
<strong>•</strong> Visually check all accessible wiring<br />
connectors, harnesses and retaining clips for<br />
security, and for signs of chafing or damage.<br />
2<br />
If more than one indicator light or<br />
headlight has failed, it is likely that either a<br />
fuse has blown or that there is a fault in the<br />
circuit (see Chapter 12). The main fuses are<br />
located in the fusebox situated to the right of<br />
the steering wheel. Additional fuses are located<br />
behind the glovebox, with several enginerelated<br />
fuses on the engine compartment<br />
bulkhead or next to the battery.<br />
Weekly checks 0-15<br />
Lift off the terminal covers, and check the<br />
tightness of battery clamps to ensure<br />
good electrical connections. Also check<br />
each cable for cracks and frayed conductors.<br />
as well as the battery cable clamps<br />
If you need to check your<br />
brake lights and indicators<br />
^<br />
unaided, back up to a wall or<br />
garage door and operate the<br />
lights. The reflected light should show if<br />
they are working properly.<br />
3<br />
<strong>To</strong> replace a blown fuse, simply pull it out<br />
using the plastic tweezers provided. Fit a<br />
new fuse of the same rating (see Chapter<br />
12). If the fuse blows again, it is important<br />
that you find out why - a complete checking<br />
procedure is given in Chapter 12.


