

Bravo & Brava • 1995 To 2000
Bravo & Brava • 1995 To 2000
Bravo & Brava • 1995 To 2000

Create successful ePaper yourself
Turn your PDF publications into a flip-book with our unique Google optimized e-Paper software.
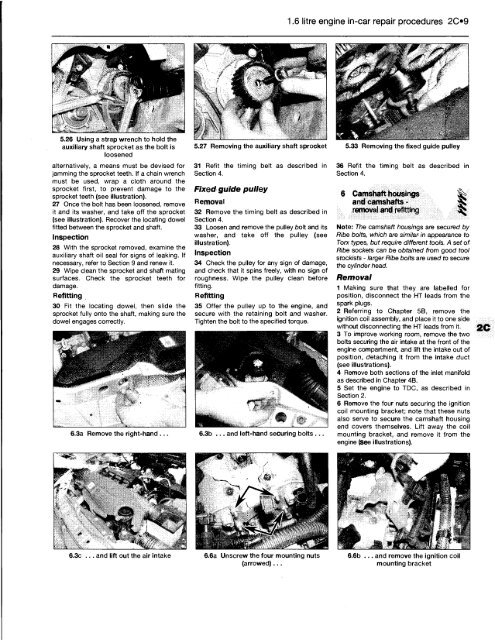
5.26 Using a strap wrench to hold the<br />
auxiliary shaft sprocket as the bolt is<br />
loosened<br />
alternatively, a means must be devised for<br />
jamming the sprocket teeth. If a chain wrench<br />
must be used, wrap a cloth around the<br />
sprocket first, to prevent damage to the<br />
sprocket teeth (see illustration).<br />
27 Once the bolt has been loosened, remove<br />
it and its washer, and take off the sprocket<br />
(see illustration). Recover the locating dowel<br />
fitted between the sprocket and shaft.<br />
Inspection<br />
28 With the sprocket removed, examine the<br />
auxiliary shaft oil seal for signs of leaking. If<br />
necessary, refer to Section 9 and renew it.<br />
29 Wipe clean the sprocket and shaft mating<br />
surfaces. Check the sprocket teeth for<br />
damage.<br />
Refitting<br />
30 Fit the locating dowel, then slide the<br />
sprocket fully onto the shaft, making sure the<br />
dowel engages correctly.<br />
\ V<br />
6.3a Remove the right-hand ...<br />
6.3c ... and lift out the air intake<br />
5.27 Removing the auxiliary shaft sprocket<br />
31 Refit the timing belt as described in<br />
Section 4.<br />
Fixed guide pulley<br />
Removal<br />
32 Remove the timing belt as described in<br />
Section 4.<br />
33 Loosen and remove the pulley bolt and its<br />
washer, and take off the pulley (see<br />
illustration).<br />
Inspection<br />
34 Check the pulley for any sign of damage,<br />
and check that it spins freely, with no sign of<br />
roughness. Wipe the pulley clean before<br />
fitting.<br />
Refitting<br />
35 Offer the pulley up to the engine, and<br />
secure with the retaining bolt and washer.<br />
Tighten the bolt to the specified torque.<br />
6.3b ... and left-hand securing bolts ...<br />
6.6a Unscrew the four mounting nuts<br />
(arrowed)...<br />
1.6 litre engine in-car repair procedures 209<br />
5.33 Removing the fixed guide pulley<br />
36 Refit the timing belt as described in<br />
Section 4.<br />
6 Camshaft housings<br />
and camshafts - *K<br />
removal and refitting 05<br />
Note: The camshaft housings are secured by<br />
Ribe bolts, which are similar in appearance to<br />
<strong>To</strong>n types, but require different tools. A set of<br />
Ribe sockets can be obtained from good tool<br />
stockists - larger Ribe bolts are used to secure<br />
the cylinder head.<br />
Removal<br />
1 Making sure that they are labelled for<br />
position, disconnect the HT leads from the<br />
spark plugs.<br />
2 Referring to Chapter 5B, remove the<br />
ignition coil assembly, and place it to one side<br />
without disconnecting the HT leads from it.<br />
3 <strong>To</strong> improve working room, remove the two<br />
bolts securing the air intake at the front of the<br />
engine compartment, and lift the intake out of<br />
position, detaching it from the intake duct<br />
(see illustrations).<br />
4 Remove both sections of the inlet manifold<br />
as described in Chapter 4B.<br />
5 Set the engine to TDC, as described in<br />
Section 2.<br />
6 Remove the four nuts securing the ignition<br />
coil mounting bracket; note that these nuts<br />
also serve to secure the camshaft housing<br />
end covers themselves. Lift away the coil<br />
mounting bracket, and remove it from the<br />
engine (see illustrations).<br />
6.6b ... and remove the ignition coil<br />
mounting bracket


