

Bravo & Brava • 1995 To 2000
Bravo & Brava • 1995 To 2000
Bravo & Brava • 1995 To 2000

You also want an ePaper? Increase the reach of your titles
YUMPU automatically turns print PDFs into web optimized ePapers that Google loves.
Section 4. It is essential that an alignment<br />
mark is made between the sprocket and the<br />
oil pump housing, to preserve the timing -<br />
make your own if none are present,<br />
particularly if the sprocket holding tool<br />
described in Section 4 is not available.<br />
23 Working beneath the engine, unbolt and<br />
remove the flywheel lower cover, then hold<br />
the flywheel stationary, preferably using a tool<br />
which engages the flywheel starter ring gear<br />
(see Section 10). Alternatively, have an<br />
assistant engage a wide-bladed screwdriver<br />
with the starter ring gear.<br />
24 Unscrew the crankshaft sprocket<br />
retaining bolt - this is tightened to a<br />
particularly high torque, so ensure that the car<br />
is adequately supported. Use only goodquality,<br />
close-fitting tools, and take<br />
precautions against personal injury, especially<br />
when the bolt eventually loosens (wear gloves<br />
to protect your hands). The bolt has a lefthand<br />
thread - ie it unscrews clockwise.<br />
25 Slide the sprocket off the end of the<br />
crankshaft. If it is tight, remove it using a<br />
puller or a pair of suitable screwdrivers. The<br />
sprocket may have an integral location key on<br />
its inner face, or a separate key which locates<br />
in a groove in the crankshaft nose.<br />
Inspection<br />
26 With the sprocket removed, examine the<br />
crankshaft oil seal for signs of leaking. If<br />
necessary, refer to Section 8 and renew it.<br />
27 Wipe clean the sprocket and crankshaft<br />
mating surfaces. Check the sprocket teeth for<br />
damage.<br />
Refitting<br />
28 Slide the sprocket onto the crankshaft,<br />
making sure it engages the integral key or<br />
separate key. Fit the washer to a new bolt - do<br />
not lubricate the threads. It is not advisable to<br />
re-use the old bolt, given the extremely high<br />
torque to which it is tightened.<br />
29 Fit the new bolt and washer, tightening the<br />
bolt to the specified torque while holding the<br />
crankshaft stationary using the method<br />
described in paragraph 23. Also bear in mind<br />
the advice in paragraph 24.<br />
30 Refit the timing belt as described in<br />
Section 4.<br />
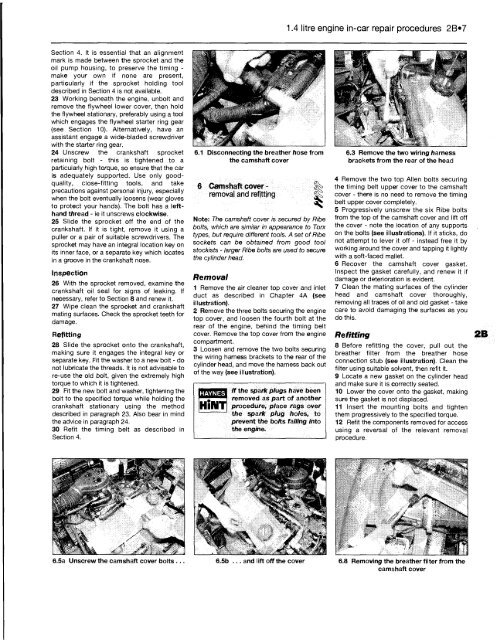
6.1 Disconnecting the breather hose from<br />
the camshaft cover<br />
Camshaft cover -<br />
removal and refitting<br />
1.4 litre engine in-car repair procedures 2B»7<br />
1<br />
Note: The camshaft cover is secured by Ribe<br />
bolts, which are similar in appearance to <strong>To</strong>rx<br />
types, but require different tools. A set of Ribe<br />
sockets can be obtained from good tool<br />
stockists - larger Ribe bolts are used to secure<br />
the cylinder head.<br />
Removal<br />
1 Remove the air cleaner top cover and inlet<br />
duct as described in Chapter 4A (see<br />
illustration).<br />
2 Remove the three bolts securing the engine<br />
top cover, and loosen the fourth bolt at the<br />
rear of the engine, behind the timing belt<br />
cover. Remove the top cover from the engine<br />
compartment.<br />
3 Loosen and remove the two bolts securing<br />
the wiring harness brackets to the rear of the<br />
cylinder head, and move the harness back out<br />
of the way (see illustration).<br />
^<br />
If the spark plugs have been<br />
removed as part of another<br />
procedure, place rags over<br />
the spark plug holes, to<br />
prevent the bolts falling into<br />
the engine.<br />
6.3 Remove the two wiring harness<br />
brackets from the rear of the head<br />
4 Remove the two top Allen bolts securing<br />
the timing belt upper cover to the camshaft<br />
cover - there is no need to remove the timing<br />
belt upper cover completely.<br />
5 Progressively unscrew the six Ribe bolts<br />
from the top of the camshaft cover and lift off<br />
the cover - note the location of any supports<br />
on the bolts (see illustrations). If it sticks, do<br />
not attempt to lever it off - instead free it by<br />
working around the cover and tapping it lightly<br />
with a soft-faced mallet.<br />
6 Recover the camshaft cover gasket.<br />
Inspect the gasket carefully, and renew it if<br />
damage or deterioration is evident.<br />
7 Clean the mating surfaces of the cylinder<br />
head and camshaft cover thoroughly,<br />
removing all traces of oil and old gasket - take<br />
care to avoid damaging the surfaces as you<br />
do this.<br />
Refitting<br />
8 Before refitting the cover, pull out the<br />
breather filter from the breather hose<br />
connection stub (see illustration). Clean the<br />
filter using suitable solvent, then refit it.<br />
9 Locate a new gasket on the cylinder head<br />
and make sure it is correctly seated.<br />
10 Lower the cover onto the gasket, making<br />
sure the gasket is not displaced.<br />
11 Insert the mounting bolts and tighten<br />
them progressively to the specified torque.<br />
12 Refit the components removed for access<br />
using a reversal of the relevant removal<br />
procedure.<br />
6.5a Unscrew the camshaft cover bolts ... 6.5b ... and lift off the cover 6.8 Removing the breather filter from the<br />
camshaft cover


