

Bravo & Brava • 1995 To 2000
Bravo & Brava • 1995 To 2000
Bravo & Brava • 1995 To 2000

Create successful ePaper yourself
Turn your PDF publications into a flip-book with our unique Google optimized e-Paper software.
A - -A<br />
6.3 <strong>To</strong>pping-up the battery electrolyte<br />
or debris enters the transmission as this is<br />
done - use a clean funnel (preferably with a<br />
filter) and fresh fluid from a clean container.<br />
7 Pour the fresh fluid a little at a time down<br />
the dipstick tube, checking the level<br />
frequently.<br />
8 When the level is correct, refit the dipstick<br />
and switch off the engine.<br />
A<br />
Battery electrolyte level<br />
check<br />
Warning: The electrolyte inside a<br />
battery is diluted acid - it is a<br />
good idea to wear suitable rubber<br />
gloves. When topping-up, don't overfill the<br />
cells so that the electrolyte overflows. In<br />
the event of any spillage, rinse the<br />
electrolyte off without delay. Refit the cell<br />
covers and rinse the battery with copious<br />
quantities of clean water. Don't attempt to<br />
siphon out any excess electrolyte.<br />
1 Models covered by this Manual are fitted<br />
with a 'limited-maintenance' battery as<br />
standard equipment (or may have had a<br />
'maintenance-free' one fitted as a<br />
replacement). If the battery in your vehicle is<br />
marked 'Freedom', 'Maintenance-Free' or<br />
similar, no electrolyte level checking is<br />
required (the battery is often completely<br />
sealed, preventing any topping-up).<br />
2 Batteries which do require their electrolyte<br />
level to be checked can be recognised by the<br />
presence of level markings and removable<br />
covers over the six battery cells - the battery<br />
casing is also sometimes translucent, so that<br />
the electrolyte level can be more easily<br />
checked. Some of the batteries fitted by FIAT<br />
have level markings, but no means of toppingup!<br />
3 Remove the cell covers and either look<br />
down inside the battery to see the level web,<br />
or check the level using any markings<br />
provided on the battery casing. The<br />
electrolyte should at least cover the battery<br />
plates. If necessary, top up a little at a time<br />
with distilled (de-ionised) water until the level<br />
in all six cells is correct - don't fill the cells up<br />
to the brim (see illustration). Wipe up any<br />
spillage, then refit the cell covers.<br />
Every 12 000 miles (20 000 km) 1.9<br />
4 On batteries where the level can be<br />
checked but not topped-up, if the level is low,<br />
consult a dealer or automotive electrical<br />
specialist as to the best course of action<br />
(likely to be fitting a replacement battery).<br />
7 Auxiliary drivebelt tension<br />
check<br />
Note: On models with 1.4 and 1.8 litre<br />
engines, an automatic belt tensioner is used,<br />
and regular tension checks are not required.<br />
Check the belt condition at the specified<br />
intervals, however, as described in Section 21.<br />
1 The only belt tension specifications quoted<br />
by FIAT are for use with their dedicated belt<br />
tensioning equipment, and are not of great<br />
practical help. The advice given below should<br />
be treated as a rough guide, and should be<br />
adequate in most cases. If there is serious<br />
concern over belt tension, refer to a FIAT<br />
dealer for advice.<br />
2 If a drivebelt is set too tight, it will subject<br />
the driven unit to excess load, resulting in<br />
premature wear of the unit (and of the belt). If<br />
the belt is too slack, it will not transmit drive<br />
properly, and the belt will suffer wear due to<br />
slippage.<br />
1.2 litre engine<br />
3 Two or three separate belts are used on this<br />
engine, depending on whether or not air<br />
conditioning is fitted.<br />
4 For improved access to the belts, remove<br />
the three bolts securing the engine top cover,<br />
and lift the cover away.<br />
5 Each of the drivebelts is checked and<br />
adjusted in much the same way. <strong>To</strong> check the<br />
power steering pump drivebelt, remove the<br />
bolt securing the belt upper cover, and<br />
remove the cover. <strong>To</strong> access the air<br />
conditioning compressor drivebelt, refer to<br />
paragraphs 16 to 18.<br />
6 Press on the belt at the centre-point<br />
between the two pulleys, and the drivebelt<br />
should deflect by approximately 5 mm.<br />
Alternator drivebelt<br />
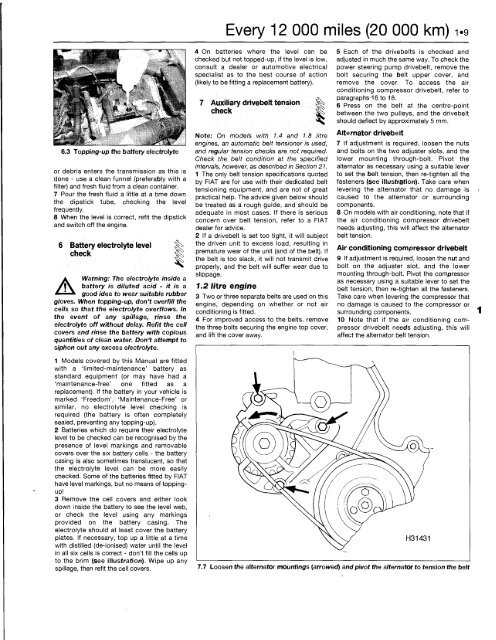
7 If adjustment is required, loosen the nuts<br />
and bolts on the two adjuster slots, and the<br />
lower mounting through-bolt. Pivot the<br />
alternator as necessary using a suitable lever<br />
to set the belt tension, then re-tighten all the<br />
fasteners (see illustration). Take care when<br />
levering the alternator that no damage is<br />
caused to the alternator or surrounding<br />
components.<br />
8 On models with air conditioning, note that if<br />
the air conditioning compressor drivebelt<br />
needs adjusting, this will affect the alternator<br />
belt tension.<br />
Air conditioning compressor drivebelt<br />
9 If adjustment is required, loosen the nut and<br />
bolt on the adjuster slot, and the lower<br />
mounting through-bolt. Pivot the compressor<br />
as necessary using a suitable lever to set the<br />
belt tension, then re-tighten all the fasteners.<br />
Take care when levering the compressor that<br />
no damage is caused to the compressor or<br />
surrounding components.<br />
10 Note that if the air conditioning compressor<br />
drivebelt needs adjusting, this will<br />
affect the alternator belt tension.<br />
7.7 Loosen the alternator mountings (arrowed) and pivot the alternator to tension the belt


