

Bravo & Brava • 1995 To 2000
Bravo & Brava • 1995 To 2000
Bravo & Brava • 1995 To 2000

Create successful ePaper yourself
Turn your PDF publications into a flip-book with our unique Google optimized e-Paper software.
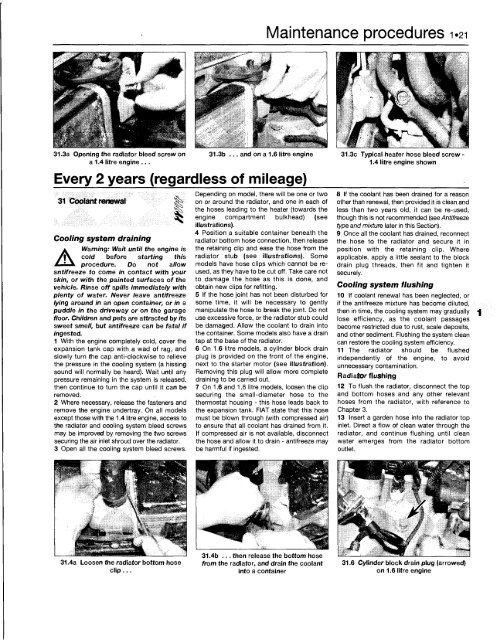
31.3a Opening the radiator bleed screw on<br />
a 1.4 litre engine ...<br />
Every 2 years (regardless of mileage)<br />
31 Coolant renewal<br />
Cooling system draining<br />
A<br />
Warning: Wait until the engine is<br />
cold before starting this<br />
procedure. Do not allow<br />
antifreeze to come in contact with your<br />
skin, or with the painted surfaces of the<br />
vehicle. Rinse off spills immediately with<br />
plenty of water. Never leave antifreeze<br />
lying around in an open container, or in a<br />
puddle in the driveway or on the garage<br />
floor. Children and pets are attracted by its<br />
sweet smell, but antifreeze can be fatal if<br />
ingested.<br />
1 With the engine completely cold, cover the<br />
expansion tank cap with a wad of rag, and<br />
slowly turn the cap anti-clockwise to relieve<br />
the pressure in the cooling system (a hissing<br />
sound will normally be heard). Wait until any<br />
pressure remaining in the system is released,<br />
then continue to turn the cap until it can be<br />
removed.<br />
2 Where necessary, release the fasteners and<br />
remove the engine undertray. On all models<br />
except those with the 1.4 litre engine, access to<br />
the radiator and cooling system bleed screws<br />
may be improved by removing the two screws<br />
securing the air inlet shroud over the radiator.<br />
3 Open all the cooling system bleed screws.<br />
31.4a Loosen the radiator bottom hose<br />
clip...<br />
Maintenance procedures 1.21<br />
31.3b ... and on a 1.6 litre engine 31.3c Typical heater hose bleed screw <strong>•</strong><br />
1.4 litre engine shown<br />
Depending on model, there will be one or two<br />
on or around the radiator, and one in each of<br />
the hoses leading to the heater (towards the<br />
engine compartment bulkhead) {see<br />
illustrations).<br />
4 Position a suitable container beneath the<br />
radiator bottom hose connection, then release<br />
the retaining clip and ease the hose from the<br />
radiator stub (see illustrations). Some<br />
models have hose clips which cannot be reused,<br />
as they have to be cut off. Take care not<br />
to damage the hose as this is done, and<br />
obtain new clips for refitting.<br />
5 If the hose joint has not been disturbed for<br />
some time, it will be necessary to gently<br />
manipulate the hose to break the joint. Do not<br />
use excessive force, or the radiator stub could<br />
be damaged. Allow the coolant to drain into<br />
the container. Some models also have a drain<br />
tap at the base of the radiator.<br />
6 On 1.6 litre models, a cylinder block drain<br />
plug is provided on the front of the engine,<br />
next to the starter motor (see illustration).<br />
Removing this plug will allow more complete<br />
draining to be carried out.<br />
7 On 1.6 and 1.8 litre models, loosen the clip<br />
securing the small-diameter hose to the<br />
thermostat housing - this hose leads back to<br />
the expansion tank. FIAT state that this hose<br />
must be blown through (with compressed air)<br />
to ensure that all coolant has drained from it.<br />
If compressed air is not available, disconnect<br />
the hose and allow it to drain - antifreeze may<br />
be harmful if ingested.<br />
31.4b ... then release the bottom hose<br />
from the radiator, and drain the coolant<br />
into a container<br />
8 If the coolant has been drained for a reason<br />
other than renewal, then provided it is clean and<br />
less than two years old, it can be re-used,<br />
though this is not recommended (see Antifreeze<br />
type and mixture later in this Section).<br />
9 Once all the coolant has drained, reconnect<br />
the hose to the radiator and secure it in<br />
position with the retaining clip. Where<br />
applicable, apply a little sealant to the block<br />
drain plug threads, then fit and tighten it<br />
securely.<br />
Cooling system flushing<br />
10 If coolant renewal has been neglected, or<br />
if the antifreeze mixture has become diluted,<br />
then in time, the cooling system may gradually<br />
lose efficiency, as the coolant passages<br />
become restricted due to rust, scale deposits,<br />
and other sediment. Flushing the system clean<br />
can restore the cooling system efficiency.<br />
11 The radiator should be flushed<br />
independently of the engine, to avoid<br />
unnecessary contamination.<br />
Radiator flushing<br />
12 <strong>To</strong> flush the radiator, disconnect the top<br />
and bottom hoses and any other relevant<br />
hoses from the radiator, with reference to<br />
Chapter 3.<br />
13 Insert a garden hose into the radiator top<br />
inlet. Direct a flow of clean water through the<br />
radiator, and continue flushing until clean<br />
water emerges from the radiator bottom<br />
outlet.<br />
31.6 Cylinder block drain plug (arrowed)<br />
on 1.6 litre engine


