

Bravo & Brava • 1995 To 2000
Bravo & Brava • 1995 To 2000
Bravo & Brava • 1995 To 2000

You also want an ePaper? Increase the reach of your titles
YUMPU automatically turns print PDFs into web optimized ePapers that Google loves.
i.a Every 12 000 miles (20 000 km)<br />
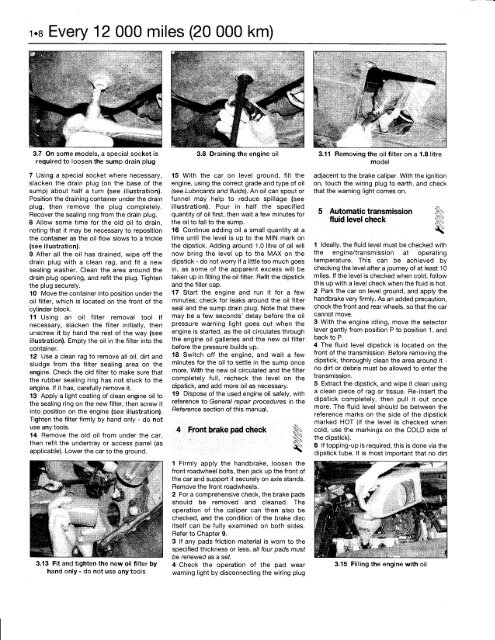
3.7 On some models, a special socket is<br />
required to loosen the sump drain plug<br />
7 Using a special socket where necessary,<br />
slacken the drain plug (on the base of the<br />
sump) about half a turn (see illustration).<br />
Position the draining container under the drain<br />
plug, then remove the plug completely.<br />
Recover the sealing ring from the drain plug.<br />
8 Allow some time for the old oil to drain,<br />
noting that it may be necessary to reposition<br />
the container as the oil flow slows to a trickle<br />
(see illustration).<br />
9 After all the oil has drained, wipe off the<br />
drain plug with a clean rag, and fit a new<br />
sealing washer. Clean the area around the<br />
drain plug opening, and refit the plug. Tighten<br />
the plug securely.<br />
10 Move the container into position under the<br />
011 filter, which is located on the front of the<br />
cylinder block.<br />
11 Using an oil filter removal tool if<br />
necessary, slacken the filter initially, then<br />
unscrew it by hand the rest of the way (see<br />
illustration). Empty the oil in the filter into the<br />
container.<br />
12 Use a clean rag to remove all oil, dirt and<br />
sludge from the filter sealing area on the<br />
engine. Check the old filter to make sure that<br />
the rubber sealing ring has not stuck to the<br />
engine. If it has, carefully remove it.<br />
13 Apply a light coating of clean engine oil to<br />
the sealing ring on the new filter, then screw it<br />
into position on the engine (see illustration).<br />
Tighten the filter firmly by hand only - do not<br />
use any tools.<br />
14 Remove the old oil from under the car,<br />
then refit the undertray or access panel (as<br />
applicable). Lower the car to the ground.<br />
3.13 Fit and tighten the new oil filter by<br />
hand only - do not use any tools<br />
rt'!' <strong>•</strong><br />
3.8 Draining the engine oil<br />
15 With the car on level ground, fill the<br />
engine, using the correct grade and type of oil<br />
(see Lubricants and fluids). An oil can spout or<br />
funnel may help to reduce spillage (see<br />
illustration). Pour in half the specified<br />
quantity of oil first, then wait a few minutes for<br />
the oil to fall to the sump.<br />
16 Continue adding oil a small quantity at a<br />
time until the level is up to the MIN mark on<br />
the dipstick. Adding around 1.0 litre of oil will<br />
now bring the level up to the MAX on the<br />
dipstick - do not worry if a little too much goes<br />
in, as some of the apparent excess will be<br />
taken up in filling the oil filter. Refit the dipstick<br />
and the filler cap.<br />
17 Start the engine and run it for a few<br />
minutes; check for leaks around the oil filter<br />
seal and the sump drain plug. Note that there<br />
may be a few seconds' delay before the oil<br />
pressure warning light goes out when the<br />
engine is started, as the oil circulates through<br />
the engine oil galleries and the new oil filter<br />
before the pressure builds up.<br />
18 Switch off the engine, and wait a few<br />
minutes for the oil to settle in the sump once<br />
more. With the new oil circulated and the filter<br />
completely full, recheck the level on the<br />
dipstick, and add more oil as necessary.<br />
19 Dispose of the used engine oil safely, with<br />
reference to General repair procedures in the<br />
Reference section of this manual.<br />
4 Front brake pad check ^<br />
1<br />
1 Firmly apply the handbrake, loosen the<br />
front road wheel bolts, then jack up the front of<br />
the car and support it securely on axle stands.<br />
Remove the front roadwheels.<br />
2 For a comprehensive check, the brake pads<br />
should be removed and cleaned. The<br />
operation of the caliper can then also be<br />
checked, and the condition of the brake disc<br />
itself can be fully examined on both sides.<br />
Refer to Chapter 9.<br />
3 If any pads friction material is worn to the<br />
specified thickness or less, all four pads must<br />
be renewed as a set.<br />
4 Check the operation of the pad wear<br />
warning light by disconnecting the wiring plug<br />
3.11 Removing the oil filter on a 1.8 litre<br />
model<br />
adjacent to the brake caliper. With the ignition<br />
on, touch the wiring plug to earth, and check<br />
that the warning light comes on.<br />
5 Automatic transmission ^<br />
fluid level check i|<br />
f|<br />
1 Ideally, the fluid level must be checked with<br />
the engine/transmission at operating<br />
temperature. This can be achieved by<br />
checking the level after a journey of at least 10<br />
miles. If the level is checked when cold, follow<br />
this up with a level check when the fluid is hot.<br />
2 Park the car on level ground, and apply the<br />
handbrake very firmly. As an added precaution,<br />
chock the front and rear wheels, so that the car<br />
cannot move.<br />
3 With the engine idling, move the selector<br />
lever gently from position P to position 1, and<br />
back to P.<br />
4 The fluid level dipstick is located on the<br />
front of the transmission. Before removing the<br />
dipstick, thoroughly clean the area around it -<br />
no dirt or debris must be allowed to enter the<br />
transmission.<br />
5 Extract the dipstick, and wipe it clean using<br />
a clean piece of rag or tissue. Re-insert the<br />
dipstick completely, then pull it out once<br />
more. The fluid level should be between the<br />
reference marks on the side of the dipstick<br />
marked HOT (if the level is checked when<br />
cold, use the markings on the COLD side of<br />
the dipstick).<br />
6 If topping-up is required, this is done via the<br />
dipstick tube. It is most important that no dirt<br />
3.15 Filling the engine with oil


