

Bravo & Brava • 1995 To 2000
Bravo & Brava • 1995 To 2000
Bravo & Brava • 1995 To 2000

You also want an ePaper? Increase the reach of your titles
YUMPU automatically turns print PDFs into web optimized ePapers that Google loves.
2E»4 Engine removal and overhaul procedures<br />
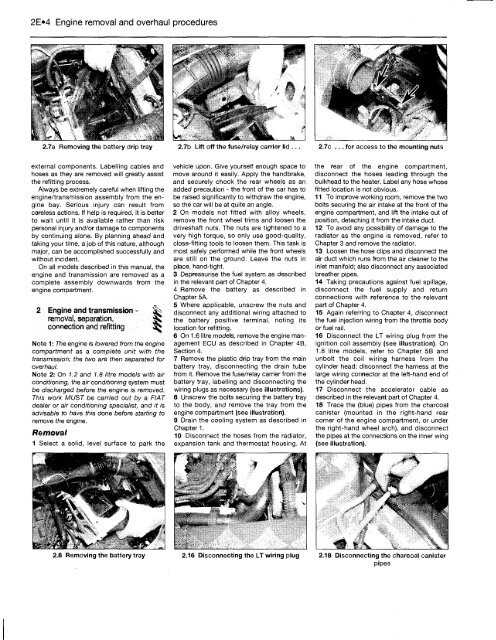
2.7a Removing the battery drip tray 2.7b Lift off the fuse/relay carrier lid ... 2.7c ... for access to the mounting nuts<br />
external components. Labelling cables and<br />
hoses as they are removed will greatly assist<br />
the refitting process.<br />
Always be extremely careful when lifting the<br />
engine/transmission assembly from the engine<br />
bay. Serious injury can result from<br />
careless actions. If help is required, it is better<br />
to wait until it is available rather than risk<br />
personal injury and/or damage to components<br />
by continuing alone. By planning ahead and<br />
taking your time, a job of this nature, although<br />
major, can be accomplished successfully and<br />
without incident.<br />
On all models described in this manual, the<br />
engine and transmission are removed as a<br />
complete assembly downwards from the<br />
engine compartment.<br />
2 Engine and transmission -<br />
removal, separation, S<br />
connection and refitting 3^<br />
Note 1: The engine is lowered from the engine<br />
compartment as a complete unit with the<br />
transmission; the two are then separated for<br />
overhaul.<br />
Note 2: On 1.2 and 1.8 litre models with air<br />
conditioning, the air conditioning system must<br />
be discharged before the engine is removed.<br />
This work MUST be carried out by a FIAT<br />
dealer or air conditioning specialist, and it is<br />
advisable to have this done before starting to<br />
remove the engine.<br />
Removal<br />
1 Select a solid, level surface to park the<br />
2.8 Removing the battery tray<br />
vehicle upon. Give yourself enough space to<br />
move around it easily. Apply the handbrake,<br />
and securely chock the rear wheels as an<br />
added precaution - the front of the car has to<br />
be raised significantly to withdraw the engine,<br />
so the car will be at quite an angle.<br />
2 On models not fitted with alloy wheels,<br />
remove the front wheel trims and loosen the<br />
driveshaft nuts. The nuts are tightened to a<br />
very high torque, so only use good-quality,<br />
close-fitting tools to loosen them. This task is<br />
most safely performed while the front wheels<br />
are still on the ground. Leave the nuts in<br />
place, hand-tight.<br />
3 Depressurise the fuel system as described<br />
in the relevant part of Chapter 4.<br />
4 Remove the battery as described in<br />
Chapter 5A.<br />
5 Where applicable, unscrew the nuts and<br />
disconnect any additional wiring attached to<br />
the battery positive terminal, noting its<br />
location for refitting.<br />
6 On 1.6 litre models, remove the engine management<br />
ECU as described in Chapter 4B,<br />
Section 4.<br />
7 Remove the plastic drip tray from the main<br />
battery tray, disconnecting the drain tube<br />
from it. Remove the fuse/relay carrier from the<br />
battery tray, labelling and disconnecting the<br />
wiring plugs as necessary (see illustrations).<br />
8 Unscrew the bolts securing the battery tray<br />
to the body, and remove the tray from the<br />
engine compartment (see illustration).<br />
9 Drain the cooling system as described in<br />
Chapter 1.<br />
10 Disconnect the hoses from the radiator,<br />
expansion tank and thermostat housing. At<br />
2.16 Disconnecting the LT wiring plug<br />
the rear of the engine compartment,<br />
disconnect the hoses leading through the<br />
bulkhead to the heater. Label any hose whose<br />
fitted location is not obvious.<br />
11 <strong>To</strong> improve working room, remove the two<br />
bolts securing the air intake at the front of the<br />
engine compartment, and lift the intake out of<br />
position, detaching it from the intake duct.<br />
12 <strong>To</strong> avoid any possibility of damage to the<br />
radiator as the engine is removed, refer to<br />
Chapter 3 and remove the radiator.<br />
13 Loosen the hose clips and disconnect the<br />
air duct which runs from the air cleaner to the<br />
inlet manifold; also disconnect any associated<br />
breather pipes.<br />
14 Taking precautions against fuel spillage,<br />
disconnect the fuel supply and return<br />
connections with reference to the relevant<br />
part of Chapter 4.<br />
15 Again referring to Chapter 4, disconnect<br />
the fuel injection wiring from the throttle body<br />
or fuel rail.<br />
16 Disconnect the LT wiring plug from the<br />
ignition coil assembly (see illustration). On<br />
1.8 litre models, refer to Chapter 5B and<br />
unbolt the coil wiring harness from the<br />
cylinder head; disconnect the harness at the<br />
large wiring connector at the left-hand end of<br />
the cylinder head.<br />
17 Disconnect the accelerator cable as<br />
described in the relevant part of Chapter 4.<br />
18 Trace the (blue) pipes from the charcoal<br />
canister (mounted in the right-hand rear<br />
corner of the engine compartment, or under<br />
the right-hand wheel arch), and disconnect<br />
the pipes at the connections on the inner wing<br />
(see illustration).<br />
2.18 Disconnecting the charcoal canister<br />
pipes


