

Bravo & Brava • 1995 To 2000
Bravo & Brava • 1995 To 2000
Bravo & Brava • 1995 To 2000

Create successful ePaper yourself
Turn your PDF publications into a flip-book with our unique Google optimized e-Paper software.
2016 1.6 litre engine in-car repair procedures<br />
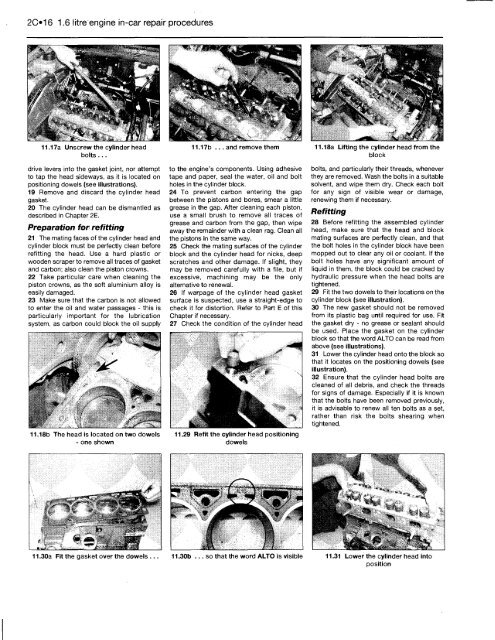
11.17a Unscrew the cylinder head 11.17b ... and remove them 11.18a Lifting the cylinder head from the<br />
bolts ... block<br />
drive levers into the gasket joint, nor attempt<br />
to tap the head sideways, as it is located on<br />
positioning dowels (see illustrations).<br />
19 Remove and discard the cylinder head<br />
gasket.<br />
20 The cylinder head can be dismantled as<br />
described in Chapter 2E.<br />
Preparation for refitting<br />
21 The mating faces of the cylinder head and<br />
cylinder block must be perfectly clean before<br />
refitting the head. Use a hard plastic or<br />
wooden scraper to remove all traces of gasket<br />
and carbon; also clean the piston crowns.<br />
22 Take particular care when cleaning the<br />
piston crowns, as the soft aluminium alloy is<br />
easily damaged.<br />
23 Make sure that the carbon is not allowed<br />
to enter the oil and water passages - this is<br />
particularly important for the lubrication<br />
system, as carbon could block the oil supply<br />
11.18b The head is located on two dowels<br />
- one shown<br />
to the engine's components. Using adhesive<br />
tape and paper, seal the water, oil and bolt<br />
holes in the cylinder block.<br />
24 <strong>To</strong> prevent carbon entering the gap<br />
between the pistons and bores, smear a little<br />
grease in the gap. After cleaning each piston,<br />
use a small brush to remove all traces of<br />
grease and carbon from the gap, then wipe<br />
away the remainder with a clean rag. Clean all<br />
the pistons in the same way.<br />
25 Check the mating surfaces of the cylinder<br />
block and the cylinder head for nicks, deep<br />
scratches and other damage. If slight, they<br />
may be removed carefully with a file, but if<br />
excessive, machining may be the only<br />
alternative to renewal.<br />
26 If warpage of the cylinder head gasket<br />
surface is suspected, use a straight-edge to<br />
check it for distortion. Refer to Part E of this<br />
Chapter if necessary.<br />
27 Check the condition of the cylinder head<br />
11.29 Refit the cylinder head positioning<br />
dowels<br />
bolts, and particularly their threads, whenever<br />
they are removed. Wash the bolts in a suitable<br />
solvent, and wipe them dry. Check each bolt<br />
for any sign of visible wear or damage,<br />
renewing them if necessary.<br />
Refitting<br />
28 Before refitting the assembled cylinder<br />
head, make sure that the head and block<br />
mating surfaces are perfectly clean, and that<br />
the bolt holes in the cylinder block have been<br />
mopped out to clear any oil or coolant. If the<br />
bolt holes have any significant amount of<br />
liquid in them, the block could be cracked by<br />
hydraulic pressure when the head bolts are<br />
tightened.<br />
29 Fit the two dowels to their locations on the<br />
cylinder block (see illustration).<br />
30 The new gasket should not be removed<br />
from its plastic bag until required for use. Fit<br />
the gasket dry - no grease or sealant should<br />
be used. Place the gasket on the cylinder<br />
block so that the word ALTO can be read from<br />
above (see illustrations).<br />
31 Lower the cylinder head onto the block so<br />
that it locates on the positioning dowels (see<br />
illustration).<br />
32 Ensure that the cylinder head bolts are<br />
cleaned of all debris, and check the threads<br />
for signs of damage. Especially if it is known<br />
that the bolts have been removed previously,<br />
it is advisable to renew all ten bolts as a set,<br />
rather than risk the bolts shearing when<br />
tightened.<br />
11.30a Fit the gasket over the dowels .. 11.30b ... so that the word ALTO is visible 11.31 Lower the cylinder head into<br />
position


