

Bravo & Brava • 1995 To 2000
Bravo & Brava • 1995 To 2000
Bravo & Brava • 1995 To 2000

You also want an ePaper? Increase the reach of your titles
YUMPU automatically turns print PDFs into web optimized ePapers that Google loves.
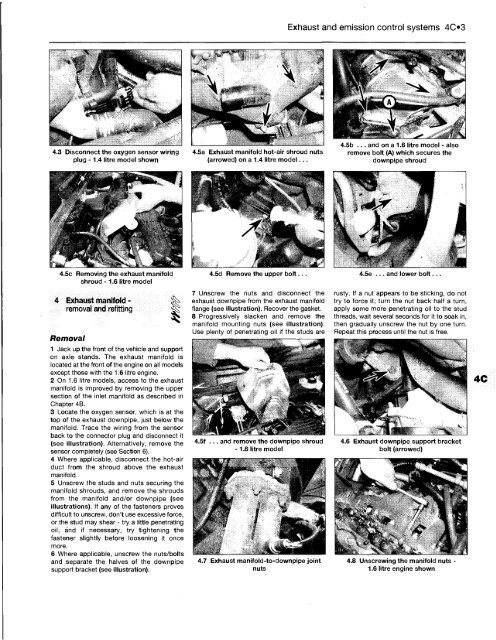
4.3 Disconnect the oxygen sensor wiring<br />
plug -1.4 litre model shown<br />
4.5c Removing the exhaust manifold<br />
shroud -1.6 litre model<br />
4 Exhaust manifold -<br />
removal and refitting<br />
Removal<br />
1 Jack up the front of the vehicle and support<br />
on axle stands. The exhaust manifold is<br />
located at the front of the engine on all models<br />
except those with the 1.6 litre engine.<br />
2 On 1.6 litre models, access to the exhaust<br />
manifold is improved by removing the upper<br />
section of the inlet manifold as described in<br />
Chapter 4B.<br />
3 Locate the oxygen sensor, which is at the<br />
top of the exhaust downpipe, just below the<br />
manifold. Trace the wiring from the sensor<br />
back to the connector plug and disconnect it<br />
(see illustration). Alternatively, remove the<br />
sensor completely (see Section 6).<br />
4 Where applicable, disconnect the hot-air<br />
duct from the shroud above the exhaust<br />
manifold.<br />
5 Unscrew the studs and nuts securing the<br />
manifold shrouds, and remove the shrouds<br />
from the manifold and/or downpipe (see<br />
illustrations). If any of the fasteners proves<br />
difficult to unscrew, don't use excessive force,<br />
or the stud may shear - try a little penetrating<br />
oil, and if necessary, try tightening the<br />
fastener slightly before loosening it once<br />
more.<br />
6 Where applicable, unscrew the nuts/bolts<br />
and separate the halves of the downpipe<br />
support bracket (see illustration).<br />
|<br />
4.5a Exhaust manifold hot-air shroud nuts<br />
(arrowed) on a 1.4 litre model...<br />
4.5d Remove the upper bolt...<br />
7 Unscrew the nuts and disconnect the<br />
exhaust downpipe from the exhaust manifold<br />
flange (see illustration). Recover the gasket.<br />
8 Progressively slacken and remove the<br />
manifold mounting nuts (see illustration).<br />
Use plenty of penetrating oil if the studs are<br />
4.5f ... and remove the downpipe shroud<br />
-1.6 litre model<br />
4.7 Exhaust manifold-to-downpipe joint<br />
nuts<br />
Exhaust and emission control systems 403<br />
4.5b ... and on a 1.6 litre model - also<br />
remove bolt (A) which secures the<br />
downpipe shroud<br />
4.5e ... and lower bolt...<br />
rusty. If a nut appears to be sticking, do not<br />
try to force it; turn the nut back half a turn,<br />
apply some more penetrating oil to the stud<br />
threads, wait several seconds for it to soak in,<br />
then gradually unscrew the nut by one turn.<br />
Repeat this process until the nut is free.<br />
4.6 Exhaust downpipe support bracket<br />
bolt (arrowed)<br />
4.8 Unscrewing the manifold nuts -<br />
1.6 litre engine shown


