

Bravo & Brava • 1995 To 2000
Bravo & Brava • 1995 To 2000
Bravo & Brava • 1995 To 2000

Create successful ePaper yourself
Turn your PDF publications into a flip-book with our unique Google optimized e-Paper software.
2D»8 1.8 litre engine in-car repair procedures<br />
6.4 Removing one of the Allen screws<br />
under the oil filler cap<br />
4 Unscrew and remove the oil filler cap, and<br />
remove the two Allen screws concealed<br />
underneath (see illustration).<br />
5 Remove the six main bolts securing the<br />
6.7a Unscrew the two mounting bolts ...<br />
6.8c ... and move the harness clear of the<br />
cover<br />
6.5 Removing the engine top cover<br />
engine top cover, then lift the cover away (see<br />
illustration).<br />
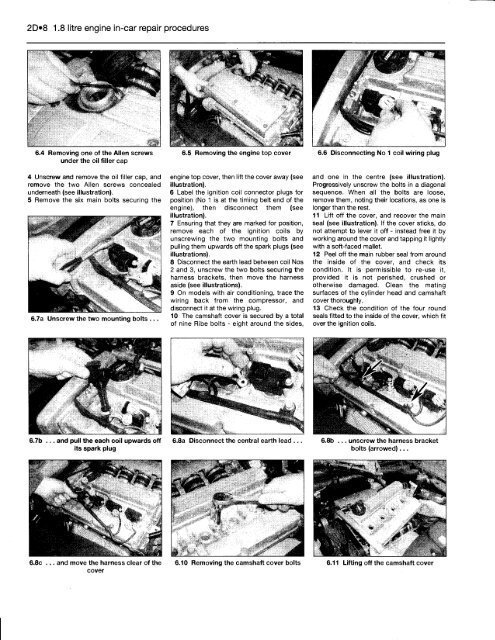
6 Label the ignition coil connector plugs for<br />
position (No 1 is at the timing belt end of the<br />
engine), then disconnect them (see<br />
illustration).<br />
7 Ensuring that they are marked for position,<br />
remove each of the ignition coils by<br />
unscrewing the two mounting bolts and<br />
pulling them upwards off the spark plugs (see<br />
illustrations).<br />
8 Disconnect the earth lead between coil Nos<br />
2 and 3, unscrew the two bolts securing the<br />
harness brackets, then move the harness<br />
aside (see illustrations).<br />
9 On models with air conditioning, trace the<br />
wiring back from the compressor, and<br />
disconnect it at the wiring plug.<br />
10 The camshaft cover is secured by a total<br />
of nine Ribe bolts - eight around the sides,<br />
6.8a Disconnect the central earth lead ...<br />
6.10 Removing the camshaft cover bolts<br />
6.6 Disconnecting No 1 coil wiring plug<br />
and one in the centre (see illustration).<br />
Progressively unscrew the bolts in a diagonal<br />
sequence. When all the bolts are loose,<br />
remove them, noting their locations, as one is<br />
longer than the rest.<br />
11 Lift off the cover, and recover the main<br />
seal (see illustration). If the cover sticks, do<br />
not attempt to lever it off - instead free it by<br />
working around the cover and tapping it lightly<br />
with a soft-faced mallet.<br />
12 Peel off the main rubber seal from around<br />
the inside of the cover, and check its<br />
condition. It is permissible to re-use it,<br />
provided it is not perished, crushed or<br />
otherwise damaged. Clean the mating<br />
surfaces of the cylinder head and camshaft<br />
cover thoroughly.<br />
13 Check the condition of the four round<br />
seals fitted to the inside of the cover, which fit<br />
over the ignition coils.<br />
6.8b ... unscrew the harness bracket<br />
bolts (arrowed)...<br />
6.11 Lifting off the camshaft cover


