

Bravo & Brava • 1995 To 2000
Bravo & Brava • 1995 To 2000
Bravo & Brava • 1995 To 2000

Create successful ePaper yourself
Turn your PDF publications into a flip-book with our unique Google optimized e-Paper software.
i.io Every 12 000 miles (20 000 km)<br />
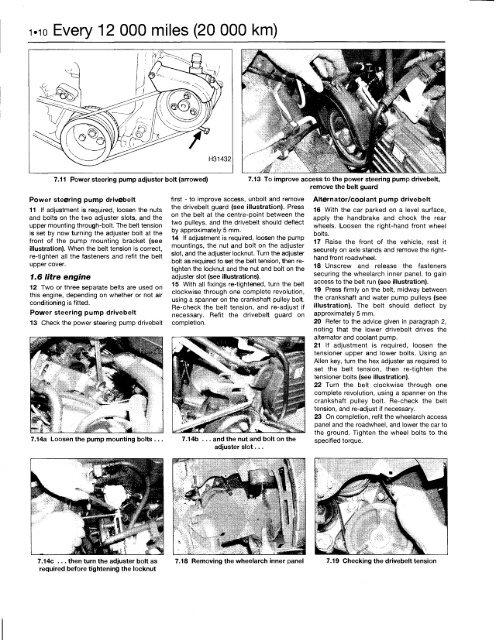
7.11 Power steering pump adjuster bolt (arrowed) 7.13 <strong>To</strong> improve access to the power steering pump drivebelt,<br />
remove the belt guard<br />
Power steering pump drivebelt<br />
11 If adjustment is required, loosen the nuts<br />
and bolts on the two adjuster slots, and the<br />
upper mounting through-bolt. The belt tension<br />
is set by now turning the adjuster bolt at the<br />
front of the pump mounting bracket (see<br />
illustration). When the belt tension is correct,<br />
re-tighten all the fasteners and refit the belt<br />
upper cover.<br />
1.6 litre engine<br />
12 Two or three separate belts are used on<br />
this engine, depending on whether or not air<br />
conditioning is fitted.<br />
Power steering pump drivebelt<br />
13 Check the power steering pump drivebelt<br />
first - to improve access, unbolt and remove<br />
the drivebelt guard (see illustration). Press<br />
on the belt at the centre-point between the<br />
two pulleys, and the drivebelt should deflect<br />
by approximately 5 mm.<br />
14 If adjustment is required, loosen the pump<br />
mountings, the nut and bolt on the adjuster<br />
slot, and the adjuster locknut. Turn the adjuster<br />
bolt as required to set the belt tension, then retighten<br />
the locknut and the nut and bolt on the<br />
adjuster slot (see illustrations).<br />
15 With all fixings re-tightened, turn the belt<br />
clockwise through one complete revolution,<br />
using a spanner on the crankshaft pulley bolt.<br />
Re-check the belt tension, and re-adjust if<br />
necessary. Refit the drivebelt guard on<br />
completion.<br />
7.14a Loosen the pump mounting bolts , 7.14b ... and the nut and bolt on the<br />
adjuster slot...<br />
7.14c ... then turn the adjuster bolt as<br />
required before tightening the locknut<br />
Alternator/coolant pump drivebelt<br />
16 With the car parked on a level surface,<br />
apply the handbrake and chock the rear<br />
wheels. Loosen the right-hand front wheel<br />
bolts.<br />
17 Raise the front of the vehicle, rest it<br />
securely on axle stands and remove the righthand<br />
front road wheel.<br />
18 Unscrew and release the fasteners<br />
securing the wheelarch inner panel, to gain<br />
access to the belt run (see illustration).<br />
19 Press firmly on the belt, midway between<br />
the crankshaft and water pump pulleys (see<br />
illustration). The belt should deflect by<br />
approximately 5 mm.<br />
20 Refer to the advice given in paragraph 2,<br />
noting that the lower drivebelt drives the<br />
alternator and coolant pump.<br />
21 If adjustment is required, loosen the<br />
tensioner upper and lower bolts. Using an<br />
Allen key, turn the hex adjuster as required to<br />
set the belt tension, then re-tighten the<br />
tensioner bolts (see illustration).<br />
22 Turn the belt clockwise through one<br />
complete revolution, using a spanner on the<br />
crankshaft pulley bolt. Re-check the belt<br />
tension, and re-adjust if necessary.<br />
23 On completion, refit the wheelarch access<br />
panel and the roadwheel, and lower the car to<br />
the ground. Tighten the wheel bolts to the<br />
specified torque.<br />
7.18 Removing the wheelarch inner panel 7.19 Checking the drivebelt tension


