

Bravo & Brava • 1995 To 2000
Bravo & Brava • 1995 To 2000
Bravo & Brava • 1995 To 2000

You also want an ePaper? Increase the reach of your titles
YUMPU automatically turns print PDFs into web optimized ePapers that Google loves.
2A»10 1.2 litre engine in-car repair procedures<br />
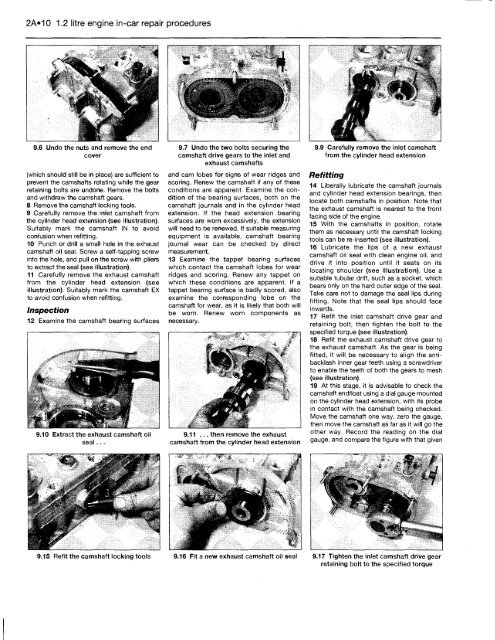
9.6 Undo the nuts and remove the end<br />
cover<br />
(which should still be in place) are sufficient to<br />
prevent the camshafts rotating while the gear<br />
retaining bolts are undone. Remove the bolts<br />
and withdraw the camshaft gears.<br />
8 Remove the camshaft locking tools.<br />
9 Carefully remove the inlet camshaft from<br />
the cylinder head extension (see illustration).<br />
Suitably mark the camshaft IN to avoid<br />
confusion when refitting.<br />
10 Punch or drill a small hole in the exhaust<br />
camshaft oil seal. Screw a self-tapping screw<br />
into the hole, and pull on the screw with pliers<br />
to extract the seal (see illustration).<br />
11 Carefully remove the exhaust camshaft<br />
from the cylinder head extension (see<br />
illustration). Suitably mark the camshaft EX<br />
to avoid confusion when refitting.<br />
Inspection<br />
12 Examine the camshaft bearing surfaces<br />
9.10 Extract the exhaust camshaft oil<br />
seal...<br />
9.7 Undo the two bolts securing the<br />
camshaft drive gears to the inlet and<br />
exhaust camshafts<br />
and cam lobes for signs of wear ridges and<br />
scoring. Renew the camshaft if any of these<br />
conditions are apparent. Examine the condition<br />
of the bearing surfaces, both on the<br />
camshaft journals and in the cylinder head<br />
extension. If the head extension bearing<br />
surfaces are worn excessively, the extension<br />
will need to be renewed. If suitable measuring<br />
equipment is available, camshaft bearing<br />
journal wear can be checked by direct<br />
measurement.<br />
13 Examine the tappet bearing surfaces<br />
which contact the camshaft lobes for wear<br />
ridges and scoring. Renew any tappet on<br />
which these conditions are apparent. If a<br />
tappet bearing surface is badly scored, also<br />
examine the corresponding lobe on the<br />
camshaft for wear, as it is likely that both will<br />
be worn. Renew worn components as<br />
necessary.<br />
9.11 ... then remove the exhaust<br />
camshaft from the cylinder head extension<br />
9.9 Carefully remove the inlet camshaft<br />
from the cylinder head extension<br />
Refitting<br />
14 Liberally lubricate the camshaft journals<br />
and cylinder head extension bearings, then<br />
locate both camshafts in position. Note that<br />
the exhaust camshaft is nearest to the front<br />
facing side of the engine.<br />
15 With the camshafts in position, rotate<br />
them as necessary until the camshaft locking<br />
tools can be re-inserted (see illustration).<br />
16 Lubricate the lips of a new exhaust<br />
camshaft oil seal with clean engine oil, and<br />
drive it into position until it seats on its<br />
locating shoulder (see illustration). Use a<br />
suitable tubular drift, such as a socket, which<br />
bears only on the hard outer edge of the seal.<br />
Take care not to damage the seal lips during<br />
fitting. Note that the seal lips should face<br />
inwards.<br />
17 Refit the inlet camshaft drive gear and<br />
retaining bolt, then tighten the bolt to the<br />
specified torque (see illustration).<br />
18 Refit the exhaust camshaft drive gear to<br />
the exhaust camshaft. As the gear is being<br />
fitted, it will be necessary to align the antibacklash<br />
inner gear teeth using a screwdriver<br />
to enable the teeth of both the gears to mesh<br />
(see illustration).<br />
19 At this stage, it is advisable to check the<br />
camshaft endfloat using a dial gauge mounted<br />
on the cylinder head extension, with its probe<br />
in contact with the camshaft being checked.<br />
Move the camshaft one way, zero the gauge,<br />
then move the camshaft as far as it will go the<br />
other way. Record the reading on the dial<br />
gauge, and compare the figure with that given<br />
9.15 Refit the camshaft locking tools 9.16 Fit a new exhaust camshaft oil seal 9.17 Tighten the inlet camshaft drive gear<br />
retaining bolt to the specified torque


