

Bravo & Brava • 1995 To 2000
Bravo & Brava • 1995 To 2000
Bravo & Brava • 1995 To 2000

Create successful ePaper yourself
Turn your PDF publications into a flip-book with our unique Google optimized e-Paper software.
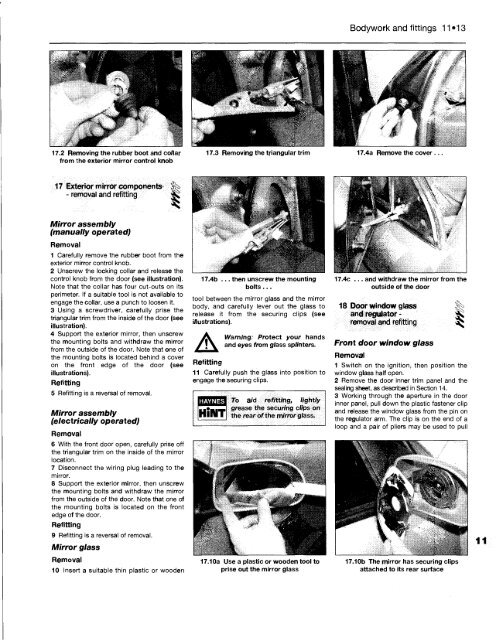
17.2 Removing the rubber boot and collar<br />
from the exterior mirror control knob<br />
17 Exterior mirror components ^<br />
- removal and refitting ^<br />
Mirror assembly<br />
(manually operated)<br />
Removal<br />
1 Carefully remove the rubber boot from the<br />
exterior mirror control knob.<br />
2 Unscrew the locking collar and release the<br />
control knob from the door (see illustration).<br />
Note that the collar has four cut-outs on its<br />
perimeter. If a suitable tool is not available to<br />
engage the collar, use a punch to loosen it.<br />
3 Using a screwdriver, carefully prise the<br />
triangular trim from the inside of the door (see<br />
illustration).<br />
4 Support the exterior mirror, then unscrew<br />
the mounting bolts and withdraw the mirror<br />
from the outside of the door. Note that one of<br />
the mounting bolts is located behind a cover<br />
on the front edge of the door (see<br />
illustrations).<br />
Refitting<br />
5 Refitting is a reversal of removal.<br />
Mirror assembly<br />
(electrically operated)<br />
Removal<br />
6 With the front door open, carefully prise off<br />
the triangular trim on the inside of the mirror<br />
location.<br />
7 Disconnect the wiring plug leading to the<br />
mirror.<br />
8 Support the exterior mirror, then unscrew<br />
the mounting bolts and withdraw the mirror<br />
from the outside of the door. Note that one of<br />
the mounting bolts is located on the front<br />
edge of the door.<br />
Refitting<br />
9 Refitting is a reversal of removal.<br />
Mirror glass<br />
Removal<br />
10 Insert a suitable thin plastic or wooden<br />
Bodywork and fittings 11*13<br />
17.3 Removing the triangular trim 17.4a Remove the cover ..<br />
17.4b ... then unscrew the mounting<br />
bolts...<br />
tool between the mirror glass and the mirror<br />
body, and carefully lever out the glass to<br />
release it from the securing clips (see<br />
illustrations).<br />
A<br />
Warning: Protect your hands<br />
and eyes from glass splinters.<br />
Refitting<br />
11 Carefully push the glass into position to<br />
engage the securing clips.<br />
HAYNES <strong>To</strong> aid refitting, lightly<br />
grease the securing clips on<br />
the rear of the mirror glass.<br />
17.10a Use a plastic or wooden tool to<br />
prise out the mirror glass<br />
-.Pi<br />
****-h^l;Vn<br />
' - 7 if' .<br />
if*<br />
17.4c ... and withdraw the mirror from the<br />
outside of the door<br />
18 Door window glass<br />
and regulator -<br />
removal and refitting<br />
Front door window glass<br />
Removal<br />
1 Switch on the ignition, then position the<br />
window glass half open.<br />
2 Remove the door inner trim panel and the<br />
sealing sheet, as described in Section 14.<br />
3 Working through the aperture in the door<br />
inner panel, pull down the plastic fastener clip<br />
and release the window glass from the pin on<br />
the regulator arm. The clip is on the end of a<br />
loop and a pair of pliers may be used to pull<br />
17.10b The mirror has securing clips<br />
attached to its rear surface<br />
I


