

Bravo & Brava • 1995 To 2000
Bravo & Brava • 1995 To 2000
Bravo & Brava • 1995 To 2000

Create successful ePaper yourself
Turn your PDF publications into a flip-book with our unique Google optimized e-Paper software.
404 Exhaust and emission control systems<br />
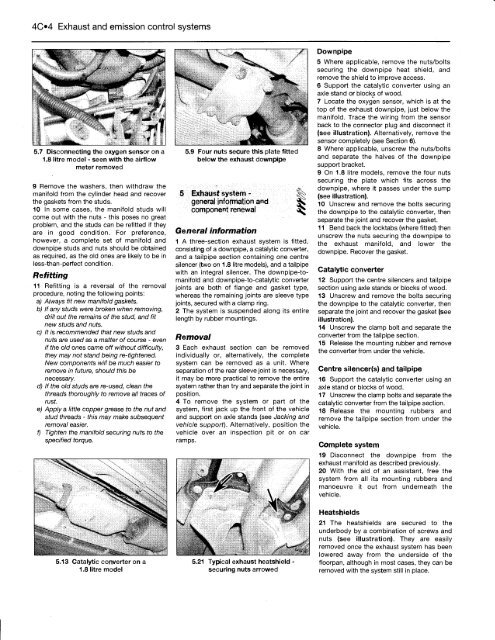
5.7 Disconnecting the oxygen sensor on a<br />
1.8 litre model - seen with the airflow<br />
meter removed<br />
9 Remove the washers, then withdraw the<br />
manifold from the cylinder head and recover<br />
the gaskets from the studs.<br />
10 In some cases, the manifold studs will<br />
come out with the nuts - this poses no great<br />
problem, and the studs can be refitted if they<br />
are in good condition. For preference,<br />
however, a complete set of manifold and<br />
downpipe studs and nuts should be obtained<br />
as required, as the old ones are likely to be in<br />
less-than-perfect condition.<br />
Refitting<br />
11 Refitting is a reversal of the removal<br />
procedure, noting the following points:<br />
a) Always fit new manifold gaskets.<br />
b) If any studs were broken when removing,<br />
drill out the remains of the stud, and fit<br />
new studs and nuts.<br />
c) It is recommended that new studs and<br />
nuts are used as a matter of course - even<br />
if the old ones came off without difficulty,<br />
they may not stand being re-tightened.<br />
New components will be much easier to<br />
remove in future, should this be<br />
necessary.<br />
d) If the old studs are re-used, clean the<br />
threads thoroughly to remove all traces of<br />
rust.<br />
e) Apply a little copper grease to the nut and<br />
stud threads - this may make subsequent<br />
removal easier.<br />
f) Tighten the manifold securing nuts to the<br />
specified torque.<br />
5.13 Catalytic converter on a<br />
1.8 litre model<br />
5.9 Four nuts secure this plate fitted<br />
below the exhaust downpipe<br />
5 Exhaust system - 1^<br />
general information and<br />
component renewal 3^<br />
General information<br />
1 A three-section exhaust system is fitted,<br />
consisting of a downpipe, a catalytic converter,<br />
and a tailpipe section containing one centre<br />
silencer (two on 1.8 litre models), and a tailpipe<br />
with an integral silencer. The downpipe-tomanifold<br />
and downpipe-to-catalytic converter<br />
joints are both of flange and gasket type,<br />
whereas the remaining joints are sleeve type<br />
joints, secured with a clamp ring.<br />
2 The system is suspended along its entire<br />
length by rubber mountings.<br />
Removal<br />
3 Each exhaust section can be removed<br />
individually or, alternatively, the complete<br />
system can be removed as a unit. Where<br />
separation of the rear sleeve joint is necessary,<br />
it may be more practical to remove the entire<br />
system rather than try and separate the joint in<br />
position.<br />
4 <strong>To</strong> remove the system or part of the<br />
system, first jack up the front of the vehicle<br />
and support on axle stands (see Jacking and<br />
vehicle support). Alternatively, position the<br />
vehicle over an inspection pit or on car<br />
ramps.<br />
5.21 Typical exhaust heatshield -<br />
securing nuts arrowed<br />
Downpipe<br />
5 Where applicable, remove the nuts/bolts<br />
securing the downpipe heat shield, and<br />
remove the shield to improve access.<br />
6 Support the catalytic converter using an<br />
axle stand or blocks of wood.<br />
7 Locate the oxygen sensor, which is at the<br />
top of the exhaust downpipe, just below the<br />
manifold. Trace the wiring from the sensor<br />
back to the connector plug and disconnect it<br />
(see illustration). Alternatively, remove the<br />
sensor completely (see Section 6).<br />
8 Where applicable, unscrew the nuts/bolts<br />
and separate the halves of the downpipe<br />
support bracket.<br />
9 On 1.8 litre models, remove the four nuts<br />
securing the plate which fits across the<br />
downpipe, where it passes under the sump<br />
(see illustration).<br />
10 Unscrew and remove the bolts securing<br />
the downpipe to the catalytic converter, then<br />
separate the joint and recover the gasket.<br />
11 Bend back the locktabs (where fitted) then<br />
unscrew the nuts securing the downpipe to<br />
the exhaust manifold, and lower the<br />
downpipe. Recover the gasket.<br />
Catalytic converter<br />
12 Support the centre silencers and tailpipe<br />
section using axle stands or blocks of wood.<br />
13 Unscrew and remove the bolts securing<br />
the downpipe to the catalytic converter, then<br />
separate the joint and recover the gasket (see<br />
illustration).<br />
14 Unscrew the clamp bolt and separate the<br />
converter from the tailpipe section.<br />
15 Release the mounting rubber and remove<br />
the converter from under the vehicle.<br />
Centre silencer(s) and tailpipe<br />
16 Support the catalytic converter using an<br />
axle stand or blocks of wood.<br />
17 Unscrew the clamp bolts and separate the<br />
catalytic converter from the tailpipe section.<br />
18 Release the mounting rubbers and<br />
remove the tailpipe section from under the<br />
vehicle.<br />
Complete system<br />
19 Disconnect the downpipe from the<br />
exhaust manifold as described previously.<br />
20 With the aid of an assistant, free the<br />
system from all its mounting rubbers and<br />
manoeuvre it out from underneath the<br />
vehicle.<br />
Heatshields<br />
21 The heatshields are secured to the<br />
underbody by a combination of screws and<br />
nuts (see illustration). They are easily<br />
removed once the exhaust system has been<br />
lowered away from the underside of the<br />
floorpan, although in most cases, they can be<br />
removed with the system still in place.


