

Bravo & Brava • 1995 To 2000
Bravo & Brava • 1995 To 2000
Bravo & Brava • 1995 To 2000

Create successful ePaper yourself
Turn your PDF publications into a flip-book with our unique Google optimized e-Paper software.
Lie Every 24 000 miles (40 000 km)<br />
It is very often difficult to insert spark<br />
plugs into their holes without crossthreading<br />
them. <strong>To</strong> avoid this<br />
possibility, fit a short length of 5/16 inch<br />
internal diameter rubber hose over the<br />
end of the spark plug. The flexible hose<br />
acts as a universal joint to help align<br />
the plug with the plug hole. Should the<br />
plug begin to cross-thread, the hose<br />
will slip on the spark plug, preventing<br />
thread damage to the aluminium<br />
cylinder head<br />
gap can be adjusted, it should be set to the<br />
value specified at the start of this Chapter.<br />
Note: Spark plugs with multiple earth electrodes<br />
are becoming an increasingly common<br />
fitment, especially to vehicles equipped with<br />
catalytic converters. Unless there is clear<br />
information to the contrary, no attempt should<br />
be made to adjust the plug gap on a spark plug<br />
with more than one earth electrode.<br />
18 <strong>To</strong> set the gap, measure it with a feeler<br />
blade and then bend open, or closed, the<br />
outer plug electrode until the correct gap is<br />
achieved. The centre electrode should never<br />
be bent, as this may crack the insulator and<br />
cause plug failure, if nothing worse. If using<br />
feeler blades, the gap is correct when the<br />
appropriate-size blade is a firm sliding fit.<br />
19 Special spark plug electrode gap<br />
adjusting tools are available from most motor<br />
accessory shops, or from some spark plug<br />
manufacturers.<br />
20 Before fitting the spark plugs, check that<br />
the threaded connector sleeves are tight, and<br />
that the plug exterior surfaces and threads are<br />
clean. It's often difficult to screw in new spark<br />
plugs without cross-threading them - this can<br />
be avoided using a piece of rubber hose (see<br />
Haynes Hint).<br />
21 Remove the rubber hose (if used), and<br />
tighten the plug to the specified torque using<br />
the spark plug socket and a torque wrench. If<br />
a torque wrench is not available, tighten the<br />
plug by hand until it just seats, then tighten it<br />
by no more than a quarter of a turn further<br />
with the plug socket and handle. Refit the<br />
remaining spark plugs in the same manner.<br />
22 Refit the HT leads (or ignition coils)<br />
securely in their correct order.<br />
23 Where applicable, refit the engine top<br />
cover, using a reversal of the removal<br />
procedure.<br />
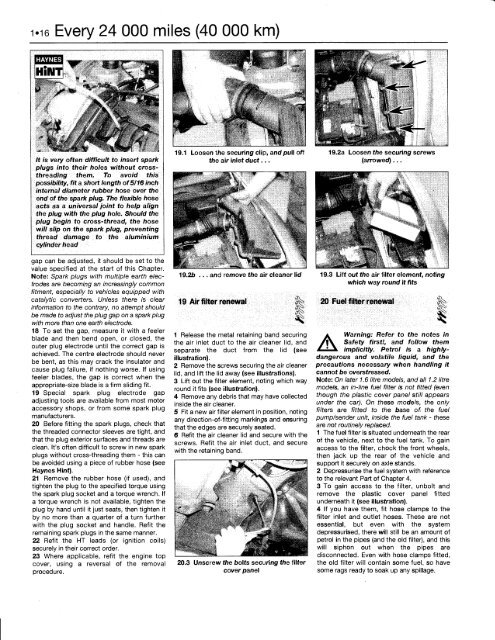
19.1 Loosen the securing clip, and pull off<br />
the air inlet duct...<br />
19.2b ... and remove the air cleaner lid<br />
19 Air filter renewal<br />
1 Release the metal retaining band securing<br />
the air inlet duct to the air cleaner lid, and<br />
separate the duct from the lid (see<br />
illustration).<br />
2 Remove the screws securing the air cleaner<br />
lid, and lift the lid away (see illustrations).<br />
3 Lift out the filter element, noting which way<br />
round it fits (see illustration).<br />
4 Remove any debris that may have collected<br />
inside the air cleaner.<br />
5 Fit a new air filter element in position, noting<br />
any direction-of-fitting markings and ensuring<br />
that the edges are securely seated.<br />
6 Refit the air cleaner lid and secure with the<br />
screws. Refit the air inlet duct, and secure<br />
with the retaining band.<br />
20.3 Unscrew the bolts securing the filter<br />
cover panel<br />
I<br />
19.2a Loosen the securing screws<br />
(arrowed)...<br />
<<br />
19.3 Lift out the air filter element, noting<br />
which way round it fits<br />
20 Fuel filter renewal<br />
A<br />
Warning: Refer to the notes in<br />
Safety first!, and follow them<br />
implicitly. Petrol is a highlydangerous<br />
and volatile liquid, and the<br />
precautions necessary when handling it<br />
cannot be overstressed.<br />
Note: On later 1.6 litre models, and all 1.2 litre<br />
models, an in-line fuel filter is not fitted (even<br />
though the plastic cover panel still appears<br />
under the car). On these models, the only<br />
filters are fitted to the base of the fuel<br />
pump/sender unit, inside the fuel tank - these<br />
are not routinely replaced.<br />
1 The fuel filter is situated underneath the rear<br />
of the vehicle, next to the fuel tank. <strong>To</strong> gain<br />
access to the filter, chock the front wheels,<br />
then jack up the rear of the vehicle and<br />
support it securely on axle stands.<br />
2 Depressurise the fuel system with reference<br />
to the relevant Part of Chapter 4.<br />
3 <strong>To</strong> gain access to the filter, unbolt and<br />
remove the plastic cover panel fitted<br />
underneath it (see illustration).<br />
4 If you have them, fit hose clamps to the<br />
filter inlet and outlet hoses. These are not<br />
essential, but even with the system<br />
depressurised, there will still be an amount of<br />
petrol in the pipes (and the old filter), and this<br />
will siphon out when the pipes are<br />
disconnected. Even with hose clamps fitted,<br />
the old filter will contain some fuel, so have<br />
some rags ready to soak up any spillage.


