

Bravo & Brava • 1995 To 2000
Bravo & Brava • 1995 To 2000
Bravo & Brava • 1995 To 2000

You also want an ePaper? Increase the reach of your titles
YUMPU automatically turns print PDFs into web optimized ePapers that Google loves.
7B»4 Automatic transmission<br />
4.7 Disconnecting the selector cable end<br />
from the transmission<br />
mounting bracket, then undo the bolt and<br />
remove the relay box cover. Unscrew the nuts<br />
and remove the relay box from the mounting<br />
bracket - position the box to one side.<br />
5 Disconnect the wiring from the engine<br />
management ECU by unclipping the<br />
connector. Unscrew the nuts and remove the<br />
ECU mounting bracket from the battery<br />
mounting bracket. The nuts also secure the<br />
starter motor and fuel injection wiring.<br />
6 Unbolt and remove the battery mounting<br />
bracket and unclip the remaining wiring<br />
supports.<br />
7 Remove the spring clip and washer, and<br />
disconnect the selector cable end from the<br />
lever on the transmission (see illustration).<br />
8 Pull out the spring clip and disconnect the<br />
outer cable from the cable mounting bracket.<br />
9 Unscrew the bolt from the front of the gear<br />
lever knob, then withdraw the knob upwards.<br />
Carefully prise the indicator panel from the<br />
floor and remove over the gear lever.<br />
10 Carefully prise the driving mode panel from<br />
the floor and disconnect the switch wiring.<br />
11 Release the handbrake lever gaiter from<br />
the floor, then back off the handbrake lever<br />
adjustment nut. Also disconnect the wiring<br />
from the handbrake-on warning switch.<br />
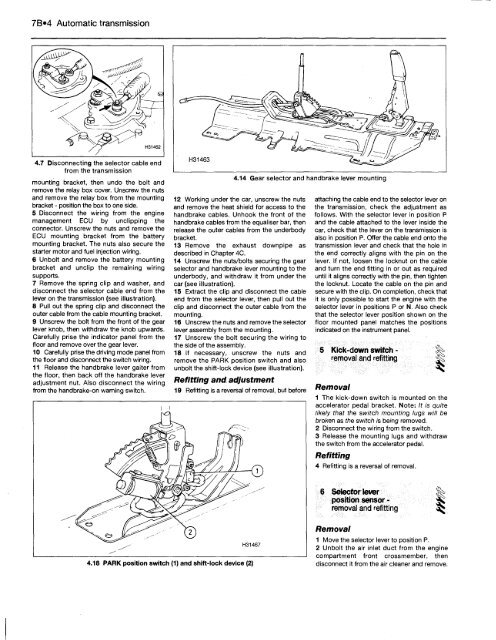
4.14 Gear selector and handbrake lever mounting<br />
12 Working under the car, unscrew the nuts<br />
and remove the heat shield for access to the<br />
handbrake cables. Unhook the front of the<br />
handbrake cables from the equaliser bar, then<br />
release the outer cables from the underbody<br />
bracket.<br />
13 Remove the exhaust downpipe as<br />
described in Chapter AC.<br />
14 Unscrew the nuts/bolts securing the gear<br />
selector and handbrake lever mounting to the<br />
underbody, and withdraw it from under the<br />
car (see illustration).<br />
15 Extract the clip and disconnect the cable<br />
end from the selector lever, then pull out the<br />
clip and disconnect the outer cable from the<br />
mounting.<br />
16 Unscrew the nuts and remove the selector<br />
lever assembly from the mounting.<br />
17 Unscrew the bolt securing the wiring to<br />
the side of the assembly.<br />
18 If necessary, unscrew the nuts and<br />
remove the PARK position switch and also<br />
unbolt the shift-lock device (see illustration).<br />
Refitting and adjustment<br />
19 Refitting is a reversal of removal, but before<br />
attaching the cable end to the selector lever on<br />
the transmission, check the adjustment as<br />
follows. With the selector lever in position P<br />
and the cable attached to the lever inside the<br />
car, check that the lever on the transmission is<br />
also in position P. Offer the cable end onto the<br />
transmission lever and check that the hole in<br />
the end correctly aligns with the pin on the<br />
lever. If not, loosen the locknut on the cable<br />
and turn the end fitting in or out as required<br />
until it aligns correctly with the pin, then tighten<br />
the locknut. Locate the cable on the pin and<br />
secure with the clip. On completion, check that<br />
it is only possible to start the engine with the<br />
selector lever in positions P or N. Also check<br />
that the selector lever position shown on the<br />
floor mounted panel matches the positions<br />
indicated on the instrument panel.<br />
5 Kick-down switch - |^<br />
removal and refitting ^<br />
Removal<br />
1 The kick-down switch is mounted on the<br />
accelerator pedal bracket. Note: It is quite<br />
likely that the switch mounting lugs will be<br />
broken as the switch is being removed.<br />
2 Disconnect the wiring from the switch.<br />
3 Release the mounting lugs and withdraw<br />
the switch from the accelerator pedal.<br />
Refitting<br />
4 Refitting is a reversal of removal.<br />
6 Selector lever Imposition<br />
sensor -<br />
removal and refitting >a£<br />
Removal<br />
1 Move the selector lever to position P.<br />
2 Unbolt the air inlet duct from the engine<br />
compartment front crossmember, then<br />
disconnect it from the air cleaner and remove.


