

Bravo & Brava • 1995 To 2000
Bravo & Brava • 1995 To 2000
Bravo & Brava • 1995 To 2000

Create successful ePaper yourself
Turn your PDF publications into a flip-book with our unique Google optimized e-Paper software.
206 1.6 litre engine in-car repair procedures<br />
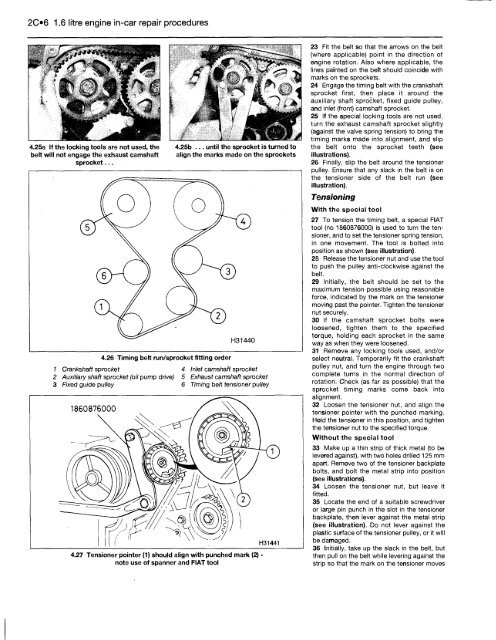
4.25a If the locking tools are not used, the<br />
belt will not engage the exhaust camshaft<br />
sprocket...<br />
4.26 Timing belt run/sprocket fitting order<br />
1 Crankshaft sprocket<br />
2 Auxiliary shaft sprocket (oil pump drive)<br />
3 Fixed guide pulley<br />
1860876000<br />
4.25b ... until the sprocket is turned to<br />
align the marks made on the sprockets<br />
4 Inlet camshaft sprocket<br />
5 Exhaust camshaft sprocket<br />
6 Timing belt tensioner pulley<br />
4.27 Tensioner pointer (1) should align with punched mark (2)<br />
note use of spanner and FIAT tool<br />
H31441<br />
23 Fit the belt so that the arrows on the belt<br />
(where applicable) point in the direction of<br />
engine rotation. Also where applicable, the<br />
lines painted on the belt should coincide with<br />
marks on the sprockets.<br />
24 Engage the timing belt with the crankshaft<br />
sprocket first, then place it around the<br />
auxiliary shaft sprocket, fixed guide pulley,<br />
and inlet (front) camshaft sprocket.<br />
25 If the special locking tools are not used,<br />
turn the exhaust camshaft sprocket slightly<br />
(against the valve spring tension) to bring the<br />
timing marks made into alignment, and slip<br />
the belt onto the sprocket teeth (see<br />
illustrations).<br />
26 Finally, slip the belt around the tensioner<br />
pulley. Ensure that any slack in the belt is on<br />
the tensioner side of the belt run (see<br />
illustration).<br />
Tensioning<br />
With the special tool<br />
27 <strong>To</strong> tension the timing belt, a special FIAT<br />
tool (no 1860876000) is used to turn the tensioner,<br />
and to set the tensioner spring tension,<br />
in one movement. The tool is bolted into<br />
position as shown (see illustration).<br />
28 Release the tensioner nut and use the tool<br />
to push the pulley anti-clockwise against the<br />
belt.<br />
29 Initially, the belt should be set to the<br />
maximum tension possible using reasonable<br />
force, indicated by the mark on the tensioner<br />
moving past the pointer. Tighten the tensioner<br />
nut securely.<br />
30 If the camshaft sprocket bolts were<br />
loosened, tighten them to the specified<br />
torque, holding each sprocket in the same<br />
way as when they were loosened.<br />
31 Remove any locking tools used, and/or<br />
select neutral. Temporarily fit the crankshaft<br />
pulley nut, and turn the engine through two<br />
complete turns in the normal direction of<br />
rotation. Check (as far as possible) that the<br />
sprocket timing marks come back into<br />
alignment.<br />
32 Loosen the tensioner nut, and align the<br />
tensioner pointer with the punched marking.<br />
Hold the tensioner in this position, and tighten<br />
the tensioner nut to the specified torque.<br />
Without the special tool<br />
33 Make up a thin strip of thick metal (to be<br />
levered against), with two holes drilled 125 mm<br />
apart. Remove two of the tensioner backplate<br />
bolts, and bolt the metal strip into position<br />
(see illustrations).<br />
34 Loosen the tensioner nut, but leave it<br />
fitted.<br />
35 Locate the end of a suitable screwdriver<br />
or large pin punch in the slot in the tensioner<br />
backplate, then lever against the metal strip<br />
(see illustration). Do not lever against the<br />
plastic surface of the tensioner pulley, or it will<br />
be damaged.<br />
36 Initially, take up the slack in the belt, but<br />
then pull on the belt while levering against the<br />
strip so that the mark on the tensioner moves


