

Bravo & Brava • 1995 To 2000
Bravo & Brava • 1995 To 2000
Bravo & Brava • 1995 To 2000

Create successful ePaper yourself
Turn your PDF publications into a flip-book with our unique Google optimized e-Paper software.
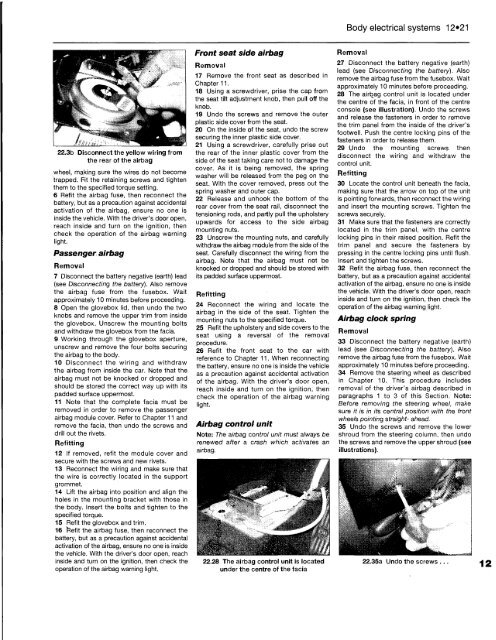
22.3b Disconnect the yellow wiring from<br />
the rear of the airbag<br />
wheel, making sure the wires do not become<br />
trapped. Fit the retaining screws and tighten<br />
them to the specified torque setting.<br />
6 Refit the airbag fuse, then reconnect the<br />
battery, but as a precaution against accidental<br />
activation of the airbag, ensure no one is<br />
inside the vehicle. With the driver's door open,<br />
reach inside and turn on the ignition, then<br />
check the operation of the airbag warning<br />
light.<br />
Passenger airbag<br />
Removal<br />
7 Disconnect the battery negative (earth) lead<br />
(see Disconnecting the battery). Also remove<br />
the airbag fuse from the fusebox. Wait<br />
approximately 10 minutes before proceeding.<br />
8 Open the glovebox lid, then undo the two<br />
knobs and remove the upper trim from inside<br />
the glovebox. Unscrew the mounting bolts<br />
and withdraw the glovebox from the facia.<br />
9 Working through the glovebox aperture,<br />
unscrew and remove the four bolts securing<br />
the airbag to the body.<br />
10 Disconnect the wiring and withdraw<br />
the airbag from inside the car. Note that the<br />
airbag must not be knocked or dropped and<br />
should be stored the correct way up with its<br />
padded surface uppermost.<br />
11 Note that the complete facia must be<br />
removed in order to remove the passenger<br />
airbag module cover. Refer to Chapter 11 and<br />
remove the facia, then undo the screws and<br />
drill out the rivets.<br />
Refitting<br />
12 If removed, refit the module cover and<br />
secure with the screws and new rivets.<br />
13 Reconnect the wiring and make sure that<br />
the wire is correctly located in the support<br />
grommet.<br />
14 Lift the airbag into position and align the<br />
holes in the mounting bracket with those in<br />
the body. Insert the bolts and tighten to the<br />
specified torque.<br />
15 Refit the glovebox and trim.<br />
16 Fiefit the airbag fuse, then reconnect the<br />
battery, but as a precaution against accidental<br />
activation of the airbag, ensure no one is inside<br />
the vehicle. With the driver's door open, reach<br />
inside and turn on the ignition, then check the<br />
operation of the airbag warning light.<br />
Front seat side airbag<br />
Removal<br />
17 Remove the front seat as described in<br />
Chapter 11.<br />
18 Using a screwdriver, prise the cap from<br />
the seat tilt adjustment knob, then pull off the<br />
knob.<br />
19 Undo the screws and remove the outer<br />
plastic side cover from the seat.<br />
20 On the inside of the seat, undo the screw<br />
securing the inner plastic side cover.<br />
21 Using a screwdriver, carefully prise out<br />
the rear of the inner plastic cover from the<br />
side of the seat taking care not to damage the<br />
cover. As it is being removed, the spring<br />
washer will be released from the peg on the<br />
seat. With the cover removed, press out the<br />
spring washer and outer cap.<br />
22 Release and unhook the bottom of the<br />
rear cover from the seat rail, disconnect the<br />
tensioning rods, and partly pull the upholstery<br />
upwards for access to the side airbag<br />
mounting nuts.<br />
23 Unscrew the mounting nuts, and carefully<br />
withdraw the airbag module from the side of the<br />
seat. Carefully disconnect the wiring from the<br />
airbag. Note that the airbag must not be<br />
knocked or dropped and should be stored with<br />
its padded surface uppermost.<br />
Refitting<br />
24 Reconnect the wiring and locate the<br />
airbag in the side of the seat. Tighten the<br />
mounting nuts to the specified torque.<br />
25 Refit the upholstery and side covers to the<br />
seat using a reversal of the removal<br />
procedure.<br />
26 Refit the front seat to the car with<br />
reference to Chapter 11. When reconnecting<br />
the battery, ensure no one is inside the vehicle<br />
as a precaution against accidental activation<br />
of the airbag. With the driver's door open,<br />
reach inside and turn on the ignition, then<br />
check the operation of the airbag warning<br />
light.<br />
Airbag control unit<br />
Note: The airbag control unit must always be<br />
renewed after a crash which activates an<br />
airbag.<br />
22.28 The airbag control unit is located<br />
under the centre of the facia<br />
Body electrical systems 12*21<br />
Removal<br />
27 Disconnect the battery negative (earth)<br />
lead (see Disconnecting the battery). Also<br />
remove the airbag fuse from the fusebox. Wait<br />
approximately 10 minutes before proceeding.<br />
28 The airbag control unit is located under<br />
the centre of the facia, in front of the centre<br />
console (see illustration). Undo the screws<br />
and release the fasteners in order to remove<br />
the trim panel from the inside of the driver's<br />
footwell. Push the centre locking pins of the<br />
fasteners in order to release them.<br />
29 Undo the mounting screws then<br />
disconnect the wiring and withdraw the<br />
control unit.<br />
Refitting<br />
30 Locate the control unit beneath the facia,<br />
making sure that the arrow on top of the unit<br />
is pointing forwards, then reconnect the wiring<br />
and insert the mounting screws. Tighten the<br />
screws securely.<br />
31 Make sure that the fasteners are correctly<br />
located in the trim panel, with the centre<br />
locking pins in their raised position. Refit the<br />
trim panel and secure the fasteners by<br />
pressing in the centre locking pins until flush.<br />
Insert and tighten the screws.<br />
32 Refit the airbag fuse, then reconnect the<br />
battery, but as a precaution against accidental<br />
activation of the airbag, ensure no one is inside<br />
the vehicle. With the driver's door open, reach<br />
inside and turn on the ignition, then check the<br />
operation of the airbag warning light.<br />
Airbag clock spring<br />
Removal<br />
33 Disconnect the battery negative (earth)<br />
lead (see Disconnecting the battery). Also<br />
remove the airbag fuse from the fusebox. Wait<br />
approximately 10 minutes before proceeding.<br />
34 Remove the steering wheel as described<br />
in Chapter 10. This procedure includes<br />
removal of the driver's airbag described in<br />
paragraphs 1 to 3 of this Section. Note:<br />
Before removing the steering wheel, make<br />
sure it is in its central position with the front<br />
wheels pointing straight- ahead.<br />
35 Undo the screws and remove the lower<br />
shroud from the steering column, then undo<br />
the screws and remove the upper shroud (see<br />
illustrations).<br />
22.35a Undo the screws ...


