

Bravo & Brava • 1995 To 2000
Bravo & Brava • 1995 To 2000
Bravo & Brava • 1995 To 2000

Create successful ePaper yourself
Turn your PDF publications into a flip-book with our unique Google optimized e-Paper software.
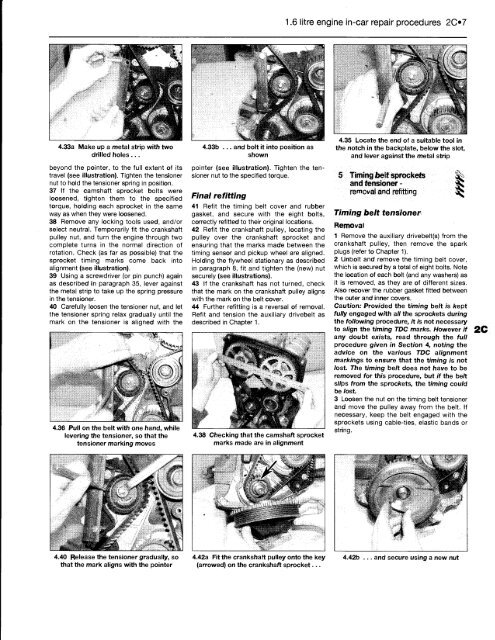
4.33a Make up a metal strip with two<br />
drilled holes ...<br />
beyond the pointer, to the full extent of its<br />
travel (see illustration). Tighten the tensioner<br />
nut to hold the tensioner spring in position.<br />
37 If the camshaft sprocket bolts were<br />
loosened, tighten them to the specified<br />
torque, holding each sprocket in the same<br />
way as when they were loosened.<br />
38 Remove any locking tools used, and/or<br />
select neutral. Temporarily fit the crankshaft<br />
pulley nut, and turn the engine through two<br />
complete turns in the normal direction of<br />
rotation. Check (as far as possible) that the<br />
sprocket timing marks come back into<br />
alignment (see illustration).<br />
39 Using a screwdriver (or pin punch) again<br />
as described in paragraph 35, lever against<br />
the metal strip to take up the spring pressure<br />
in the tensioner.<br />
40 Carefully loosen the tensioner nut, and let<br />
the tensioner spring relax gradually until the<br />
mark on the tensioner is aligned with the<br />
4.36 Pull on the belt with one hand, while<br />
levering the tensioner, so that the<br />
tensioner marking moves<br />
<strong>•</strong>A<br />
4.40 Release the tensioner gradually, so<br />
that the mark aligns with the pointer<br />
4.33b ... and bolt it into position as<br />
shown<br />
pointer (see illustration). Tighten the tensioner<br />
nut to the specified torque.<br />
Final refitting<br />
41 Refit the timing belt cover and rubber<br />
gasket, and secure with the eight bolts,<br />
correctly refitted to their original locations.<br />
42 Refit the crankshaft pulley, locating the<br />
pulley over the crankshaft sprocket and<br />
ensuring that the marks made between the<br />
timing sensor and pickup wheel are aligned.<br />
Holding the flywheel stationary as described<br />
in paragraph 8, fit and tighten the (new) nut<br />
securely (see illustrations).<br />
43 If the crankshaft has not turned, check<br />
that the mark on the crankshaft pulley aligns<br />
with the mark on the belt cover.<br />
44 Further refitting is a reversal of removal.<br />
Refit and tension the auxiliary drivebelt as<br />
described in Chapter 1.<br />
4.38 Checking that the camshaft sprocket<br />
marks made are in alignment<br />
4.42a Fit the crankshaft pulley onto the key<br />
(arrowed) on the crankshaft sprocket...<br />
1.6 litre engine in-car repair procedures 207<br />
4.35 Locate the end of a suitable tool in<br />
the notch in the backplate, below the slot,<br />
and lever against the metal strip<br />
5 Timing belt sprockets<br />
and tensioner -<br />
removal and refitting<br />
Timing belt tensioner<br />
Removal<br />
1 Remove the auxiliary drivebelt(s) from the<br />
crankshaft pulley, then remove the spark<br />
plugs (refer to Chapter 1).<br />
2 Unbolt and remove the timing belt cover,<br />
which is secured by a total of eight bolts. Note<br />
the location of each bolt (and any washers) as<br />
it is removed, as they are of different sizes.<br />
Also recover the rubber gasket fitted between<br />
the outer and inner covers.<br />
Caution: Provided the timing belt is kept<br />
fully engaged with all the sprockets during<br />
the following procedure, it is not necessary<br />
to align the timing TDC marks. However if<br />
any doubt exists, read through the full<br />
procedure given in Section 4, noting the<br />
advice on the various TDC alignment<br />
markings to ensure that the timing is not<br />
lost. The timing belt does not have to be<br />
removed for this procedure, but if the belt<br />
slips from the sprockets, the timing could<br />
be lost.<br />
3 Loosen the nut on the timing belt tensioner<br />
and move the pulley away from the belt. If<br />
necessary, keep the belt engaged with the<br />
sprockets using cable-ties, elastic bands or<br />
string.<br />
4.42b ... and secure using a new nut<br />
2C


