

Bravo & Brava • 1995 To 2000
Bravo & Brava • 1995 To 2000
Bravo & Brava • 1995 To 2000

You also want an ePaper? Increase the reach of your titles
YUMPU automatically turns print PDFs into web optimized ePapers that Google loves.
warped, and must be renewed. However, it is<br />
worth checking first that the hub bearing is in<br />
good condition.<br />
5 Check the disc for cracks, especially<br />
around the wheel bolt holes, and any other<br />
wear or damage, and renew if necessary.<br />
Removal<br />
6 Remove the brake pads (Section 4) then<br />
unbolt and remove the caliper mounting<br />
bracket from the hub carrier. Alternatively,<br />
leave the caliper attached to the mounting<br />
bracket and unbolt the bracket from the hub<br />
carrier (see illustrations).<br />
7 Unscrew and remove the two disc retaining<br />
studs and withdraw the disc from the hub<br />
(see illustrations). If it is tight, lightly tap its<br />
rear face with a hide or plastic mallet to free it<br />
from the hub.<br />
Refitting<br />
8 Refitting is the reverse of the removal<br />
procedure, noting the following points:<br />
a) Ensure that the mating surfaces of the<br />
disc and hub are clean.<br />
b) If a new disc has been fitted, use a<br />
suitable solvent to wipe any preservative<br />
coating from the disc, before refitting the<br />
caliper. Note that new brake pads should<br />
be fitted when the disc is renewed.<br />
c) Tighten all bolts to the specified torque<br />
where given.<br />
7 Rear brake drum -<br />
removal, inspection<br />
and refitting<br />
A Warning:<br />
Removal<br />
I<br />
Before starting work,<br />
refer to the warning at the<br />
beginning of Section 4 concerning<br />
the dangers of asbestos dust.<br />
1 Apply the handbrake, then jack up the front<br />
of the vehicle and support it on axle stands<br />
(see Jacking and vehicle support). Remove<br />
both rear roadwheels. Fully release the<br />
handbrake.<br />
2 Unscrew and remove the two studs and<br />
pull the drum from the hub. If the drum is<br />
binding on the brake shoes, back off the<br />
handbrake adjustment nut located on the<br />
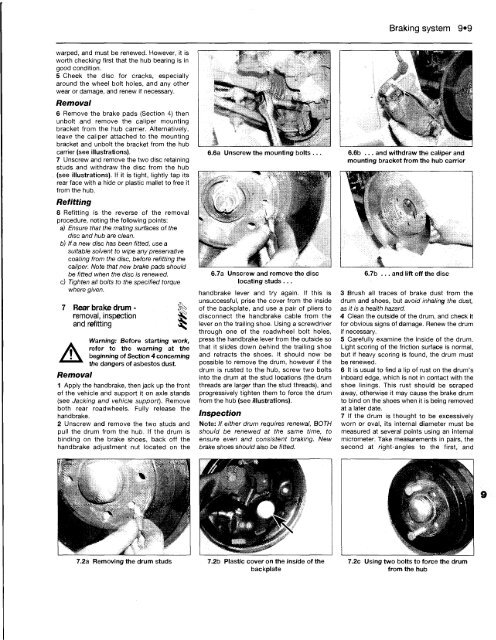
6.6a Unscrew the mounting bolts ...<br />
6.7a Unscrew and remove the disc<br />
locating studs ...<br />
handbrake lever and try again. If this is<br />
unsuccessful, prise the cover from the inside<br />
of the backplate, and use a pair of pliers to<br />
disconnect the handbrake cable from the<br />
lever on the trailing shoe. Using a screwdriver<br />
through one of the roadwheel bolt holes,<br />
press the handbrake lever from the outside so<br />
that it slides down behind the trailing shoe<br />
and retracts the shoes. It should now be<br />
possible to remove the drum, however if the<br />
drum is rusted to the hub, screw two bolts<br />
into the drum at the stud locations (the drum<br />
threads are larger than the stud threads), and<br />
progressively tighten them to force the drum<br />
from the hub (see illustrations).<br />
Inspection<br />
Note: If either drum requires renewal, BOTH<br />
should be renewed at the same time, to<br />
ensure even and consistent braking. New<br />
brake shoes should also be fitted.<br />
7.2a Removing the drum studs 7.2b Plastic cover on the inside of the<br />
backplate<br />
Braking system 9»9<br />
6.6b ... and withdraw the caliper and<br />
mounting bracket from the hub carrier<br />
6.7b ... and lift off the disc<br />
3 Brush all traces of brake dust from the<br />
drum and shoes, but avoid inhaling the dust,<br />
as it is a health hazard.<br />
4 Clean the outside of the drum, and check it<br />
for obvious signs of damage. Renew the drum<br />
if necessary.<br />
5 Carefully examine the inside of the drum.<br />
Light scoring of the friction surface is normal,<br />
but if heavy scoring is found, the drum must<br />
be renewed.<br />
6 It is usual to find a lip of rust on the drum's<br />
inboard edge, which is not in contact with the<br />
shoe linings. This rust should be scraped<br />
away, otherwise it may cause the brake drum<br />
to bind on the shoes when it is being removed<br />
at a later date.<br />
7 If the drum is thought to be excessively<br />
worn or oval, its internal diameter must be<br />
measured at several points using an internal<br />
micrometer. Take measurements in pairs, the<br />
second at right-angles to the first, and<br />
7.2c Using two bolts to force the drum<br />
from the hub


