

Bravo & Brava • 1995 To 2000
Bravo & Brava • 1995 To 2000
Bravo & Brava • 1995 To 2000

You also want an ePaper? Increase the reach of your titles
YUMPU automatically turns print PDFs into web optimized ePapers that Google loves.
6 Slacken and withdraw the securing screws<br />
and remove the air cleaner from the engine<br />
compartment (see illustrations).<br />
Refitting<br />
7 Refitting is a reversal of removal.<br />
3 Inlet air temperature %<br />
regulator - Js;<br />
removal and refitting gQ<br />
Flap valve<br />
Checking<br />
1 The flap valve is located in the section of<br />
intake ducting that runs between the intake<br />
scoop, at the front of the engine<br />
compartment, and the front of the air cleaner.<br />
2 <strong>To</strong> check the operation of the valve,<br />
disconnect the hot-air inlet hose with the<br />
engine cold, and use a mirror to check that<br />
the flap is positioned horizontally, to admit<br />
only air from the hot-air inlet hose exhaust<br />
manifold.<br />
3 Next, warm up the engine and check that<br />
the flap moves to admit a mixture of cold air<br />
and hot air from the inlet ducts. If no<br />
movement is observed, apply vacuum directly<br />
to the flap valve vacuum hose and check for<br />
movement. If the valve now operates, the<br />
thermostatic vacuum valve may be faulty.<br />
Removal<br />
4 Remove the front intake duct from the air<br />
cleaner lid as described in Section 2.<br />
5 Unscrew the retaining screw and remove<br />
the flap valve unit from the air duct.<br />
Refitting<br />
6 Refitting is a reversal of removal.<br />
Temperature control valve<br />
Removal<br />
7 Remove the lid from the air cleaner, as<br />
described in the air filter renewal procedure in<br />
Chapter 1 (see illustration).<br />
8 Disconnect the vacuum hoses from the valve<br />
ports (see illustration). Make a careful note of<br />
their order of fitment - on the project car, the<br />
brown end fitting was the lower connection.<br />
9 Carefully prise off the metal retaining clip<br />
and release the valve from the air cleaner lid<br />
(see illustration). Recover the gasket and<br />
renew it.<br />
Refitting<br />
10 Refitting is a reversal of removal.<br />
4 Accelerator cable - §|<br />
removal, refitting |S<br />
*and adjustment<br />
Removal<br />
1 Disconnect the battery negative cable and<br />
position it away from the terminal.<br />
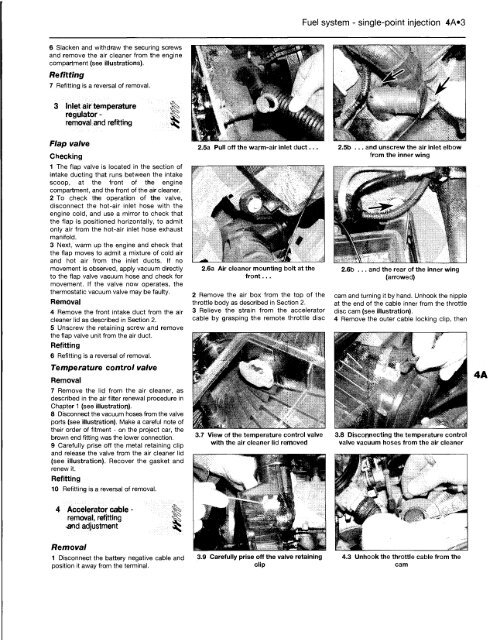
2.5a Pull off the warm-air inlet duct...<br />
2.6a Air cleaner mounting bolt at the<br />
front...<br />
2 Remove the air box from the top of the<br />
throttle body as described in Section 2.<br />
3 Relieve the strain from the accelerator<br />
cable by grasping the remote throttle disc<br />
3.7 View of the temperature control valve<br />
with the air cleaner lid removed<br />
Fuel system - single-point injection 4A«3<br />
2.5b ... and unscrew the air inlet elbow<br />
from the inner wing<br />
2.6b ... and the rear of the inner wing<br />
(arrowed)<br />
cam and turning it by hand. Unhook the nipple<br />
at the end of the cable inner from the throttle<br />
disc cam (see illustration).<br />
4 Remove the outer cable locking clip, then<br />
3.8 Disconnecting the temperature control<br />
valve vacuum hoses from the air cleaner<br />
4.3 Unhook the throttle cable from the<br />
cam


