

Bravo & Brava • 1995 To 2000
Bravo & Brava • 1995 To 2000
Bravo & Brava • 1995 To 2000

Create successful ePaper yourself
Turn your PDF publications into a flip-book with our unique Google optimized e-Paper software.
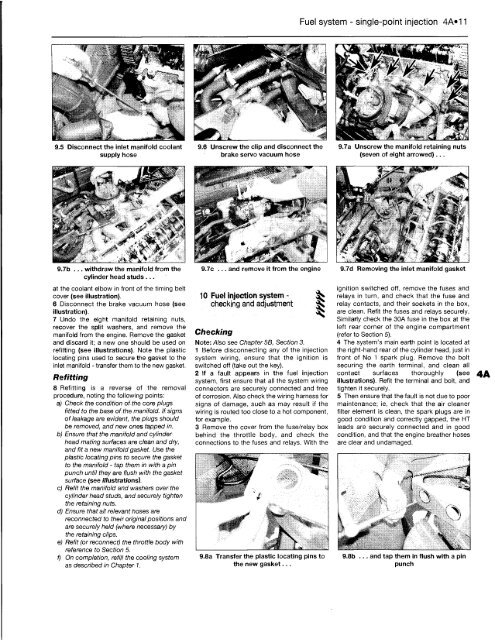
Disconnect the inlet manifold coolant<br />
supply hose<br />
, ' X \ v ' !<br />
9.7b ... withdraw the manifold from the<br />
cylinder head studs...<br />
at the coolant elbow in front of the tinning belt<br />
cover (see illustration).<br />
6 Disconnect the brake vacuum hose (see<br />
illustration).<br />
7 Undo the eight manifold retaining nuts,<br />
recover the split washers, and remove the<br />
manifold from the engine. Remove the gasket<br />
and discard it; a new one should be used on<br />
refitting (see illustrations). Note the plastic<br />
locating pins used to secure the gasket to the<br />
inlet manifold - transfer them to the new gasket.<br />
Refitting<br />
8 Refitting is a reverse of the removal<br />
procedure, noting the following points:<br />
a) Check the condition of the core plugs<br />
fitted to the base of the manifold. If signs<br />
of leakage are evident, the plugs should<br />
be removed, and new ones tapped in.<br />
b) Ensure that the manifold and cylinder<br />
head mating surfaces are clean and dry,<br />
and fit a new manifold gasket. Use the<br />
plastic locating pins to secure the gasket<br />
to the manifold - tap them in with a pin<br />
punch until they are flush with the gasket<br />
surface (see illustrations).<br />
c) Refit the manifold and washers over the<br />
cylinder head studs, and securely tighten<br />
the retaining nuts.<br />
d) Ensure that all relevant hoses are<br />
reconnected to their original positions and<br />
are securely held (where necessary) by<br />
the retaining clips.<br />
e) Refit (or reconnect) the throttle body with<br />
reference to Section 5.<br />
f) On completion, refill the cooling system<br />
as described in Chapter 1.<br />
Fuel system - single-point injection 4A»11<br />
9.6 Unscrew the clip and disconnect the 9.7a Unscrew the manifold retaining nuts<br />
brake servo vacuum hose<br />
(seven of eight arrowed)...<br />
m<br />
9.7c ... and remove it from the engine<br />
10 Fuel injection system -<br />
checking and adjustment<br />
Checking<br />
Note: Also see Chapter 56, Section 3.<br />
1 Before disconnecting any of the injection<br />
system wiring, ensure that the ignition is<br />
switched off (take out the key).<br />
2 If a fault appears in the fuel injection<br />
system, first ensure that all the system wiring<br />
connectors are securely connected and free<br />
of corrosion. Also check the wiring harness for<br />
signs of damage, such as may result if the<br />
wiring is routed too close to a hot component,<br />
for example.<br />
3 Remove the cover from the fuse/relay box<br />
behind the throttle body, and check the<br />
connections to the fuses and relays. With the<br />
9.8a Transfer the plastic locating pins to<br />
the new gasket...<br />
9.7d Removing the inlet manifold gasket<br />
ignition switched off, remove the fuses and<br />
relays in turn, and check that the fuse and<br />
relay contacts, and their sockets in the box,<br />
are clean. Refit the fuses and relays securely.<br />
Similarly check the 30A fuse in the box at the<br />
left rear corner of the engine compartment<br />
(refer to Section 5).<br />
4 The system's main earth point is located at<br />
the right-hand rear of the cylinder head, just in<br />
front of No 1 spark plug. Remove the bolt<br />
securing the earth terminal, and clean all<br />
contact surfaces thoroughly (see<br />
illustrations). Refit the terminal and bolt, and<br />
tighten it securely.<br />
5 Then ensure that the fault is not due to poor<br />
maintenance; ie, check that the air cleaner<br />
filter element is clean, the spark plugs are in<br />
good condition and correctly gapped, the HT<br />
leads are securely connected and in good<br />
condition, and that the engine breather hoses<br />
are clear and undamaged.<br />
9.8b ... and tap them in flush with a pin<br />
punch


