

Bravo & Brava • 1995 To 2000
Bravo & Brava • 1995 To 2000
Bravo & Brava • 1995 To 2000

You also want an ePaper? Increase the reach of your titles
YUMPU automatically turns print PDFs into web optimized ePapers that Google loves.
2O10 1.6 litre engine in-car repair procedures<br />
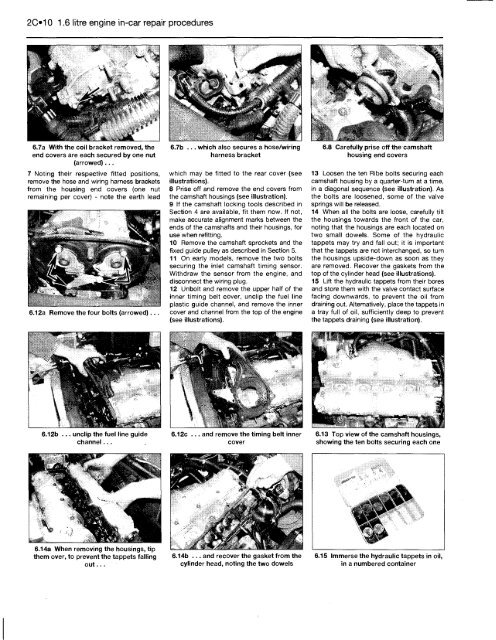
6.7a With the coil bracket removed, the<br />
end covers are each secured by one nut<br />
(arrowed)...<br />
7 Noting their respective fitted positions,<br />
remove the hose and wiring harness brackets<br />
from the housing end covers (one nut<br />
remaining per cover) - note the earth lead<br />
6.12a Remove the four bolts (arrowed)...<br />
6.12b ... unclip the fuel line guide<br />
channel...<br />
6.14a When removing the housings, tip<br />
them over, to prevent the tappets falling<br />
out...<br />
6.7b ... which also secures a hose/wiring<br />
harness bracket<br />
which may be fitted to the rear cover (see<br />
illustrations).<br />
8 Prise off and remove the end covers from<br />
the camshaft housings (see illustration).<br />
9 If the camshaft locking tools described in<br />
Section 4 are available, fit them now. If not,<br />
make accurate alignment marks between the<br />
ends of the camshafts and their housings, for<br />
use when refitting.<br />
10 Remove the camshaft sprockets and the<br />
fixed guide pulley as described in Section 5.<br />
11 On early models, remove the two bolts<br />
securing the inlet camshaft timing sensor.<br />
Withdraw the sensor from the engine, and<br />
disconnect the wiring plug.<br />
12 Unbolt and remove the upper half of the<br />
inner timing belt cover, unclip the fuel line<br />
plastic guide channel, and remove the inner<br />
cover and channel from the top of the engine<br />
(see illustrations).<br />
6.12c ... and remove the timing belt inner<br />
cover<br />
6.14b ... and recover the gasket from the<br />
cylinder head, noting the two dowels<br />
6.8 Carefully prise off the camshaft<br />
housing end covers<br />
13 Loosen the ten Ribe bolts securing each<br />
camshaft housing by a quarter-turn at a time,<br />
in a diagonal sequence (see illustration). As<br />
the bolts are loosened, some of the valve<br />
springs will be released.<br />
14 When all the bolts are loose, carefully tilt<br />
the housings towards the front of the car,<br />
noting that the housings are each located on<br />
two small dowels. Some of the hydraulic<br />
tappets may try and fall out; it is important<br />
that the tappets are not interchanged, so turn<br />
the housings upside-down as soon as they<br />
are removed. Recover the gaskets from the<br />
top of the cylinder head (see illustrations).<br />
15 Lift the hydraulic tappets from their bores<br />
and store them with the valve contact surface<br />
facing downwards, to prevent the oil from<br />
draining out. Alternatively, place the tappets in<br />
a tray full of oil, sufficiently deep to prevent<br />
the tappets draining (see illustration).<br />
6.13 <strong>To</strong>p view of the camshaft housings,<br />
showing the ten bolts securing each one<br />
6.15 Immerse the hydraulic tappets in oil,<br />
in a numbered container


