

Bravo & Brava • 1995 To 2000
Bravo & Brava • 1995 To 2000
Bravo & Brava • 1995 To 2000

Create successful ePaper yourself
Turn your PDF publications into a flip-book with our unique Google optimized e-Paper software.
2B«8 1.4 litre engine in-car repair procedures<br />
7.4 Lubricate the new seal, then fit over<br />
the camshaft<br />
7 Camshaft oil seal<br />
renewal<br />
I<br />
1 Remove the timing belt and camshaft<br />
sprocket as described in Sections 4 and 5.<br />
2 Using a suitable hooked instrument,<br />
remove the oil seal from the cylinder head,<br />
taking care not to damage the surface of the<br />
camshaft.<br />
3 Clean the seating in the cylinder head and<br />
the end of the camshaft. <strong>To</strong> prevent damage<br />
to the new oil seal as it is being fitted, wrap<br />
some adhesive tape around the end of the<br />
camshaft and lightly oil it.<br />
4 Dip the new oil seal in oil then locate it over<br />
the camshaft, making sure that the sealing<br />
lips are facing inwards (see illustration).<br />
5 Using a suitable tubular drift, drive the oil<br />
seal squarely into the cylinder head (see<br />
illustration). Remove the adhesive tape from<br />
the camshaft.<br />
6 Refit the camshaft sprocket and timing belt<br />
with reference to Sections 5 and 4.<br />
8 Crankshaft oil seals -<br />
renewal<br />
Front (right-hand side) oil seal<br />
1 The front oil seal is located in the oil pump<br />
on the front of the crankshaft. Remove the<br />
timing belt as described in Section 4 and the<br />
crankshaft sprocket as described in Section 5.<br />
i<br />
» "TV-<br />
7.5 Tap the camshaft seal home using a<br />
large socket<br />
2 Using a hooked instrument, remove the oil<br />
seal from the oil pump housing, taking care<br />
not to damage the surface of the crankshaft.<br />
3 Clean the seating in the housing and the<br />
surface of the crankshaft. <strong>To</strong> prevent damage<br />
to the new oil seal as it is being fitted, wrap<br />
some adhesive tape around the end of the<br />
crankshaft and lightly oil it.<br />
4 Dip the new oil seal in oil then offer it up to<br />
the oil pump casing making sure that the<br />
sealing lips are facing inwards.<br />
5 Using a suitable tubular drift, drive the oil<br />
seal squarely into the casing. Remove the<br />
adhesive tape.<br />
6 Refit the crankshaft sprocket and timing<br />
belt with reference to Sections 5 and 4.<br />
Rear (left-hand side) oil seal<br />
Note: The following paragraphs describe<br />
renewal of the rear oil seal leaving the housing<br />
in position. Refer to Chapter 2E for details of<br />
removing the housing.<br />
7 Remove the flywheel as described in<br />
Section 10.<br />
8 Using a suitable hooked instrument,<br />
remove the oil seal from the rear oil seal<br />
housing, taking care not to damage the<br />
surface of the crankshaft.<br />
9 Clean the seating in the housing and the<br />
surface of the crankshaft, Check the<br />
crankshaft for burrs which may damage the oil<br />
seal lip of the new seal, and if necessary use a<br />
fine file to remove them.<br />
10 Dip the new seal in clean engine oil and<br />
carefully locate it over the crankshaft rear<br />
flange, making sure that it is the correct way<br />
round (lips facing inwards). Take care not to<br />
V<br />
damage the oil seal lips as it passes over the<br />
crankshaft flange.<br />
11 Progressively tap the oil seal into the<br />
housing, keeping it square to prevent<br />
distortion. A block of wood is useful for this<br />
purpose.<br />
12 Refit the flywheel with reference to<br />
Section 10.<br />
9 Cylinder head -<br />
removal and refitting<br />
JO<br />
Note: The cylinder head is secured by Ribe<br />
bolts, which are similar in appearance to <strong>To</strong>rx<br />
types, but require different tools. A set of Ribe<br />
sockets can be obtained from good tool<br />
stockists - Ribe bolts are also used on other<br />
parts of the engine.<br />
Removal<br />
1 Depressurise the fuel system, and remove<br />
the air cleaner cover, air inlet duct and airbox<br />
as described in Chapter 4A.<br />
2 Disconnect the battery negative terminal<br />
(refer to Disconnecting the battery).<br />
3 Drain the cooling system as described in<br />
Chapter 1.<br />
4 Remove the auxiliary drivebelt as described<br />
in Chapter 1.<br />
5 Remove the spark plugs as described in<br />
Chapter 1.<br />
6 Remove the timing belt from the camshaft<br />
sprocket, using the information in Section 4.<br />
Unless the belt has been changed recently,<br />
remove it completely and fit a new one on<br />
reassembly.<br />
7 Disconnect the accelerator cable from the<br />
throttle body as described in Chapter 4A.<br />
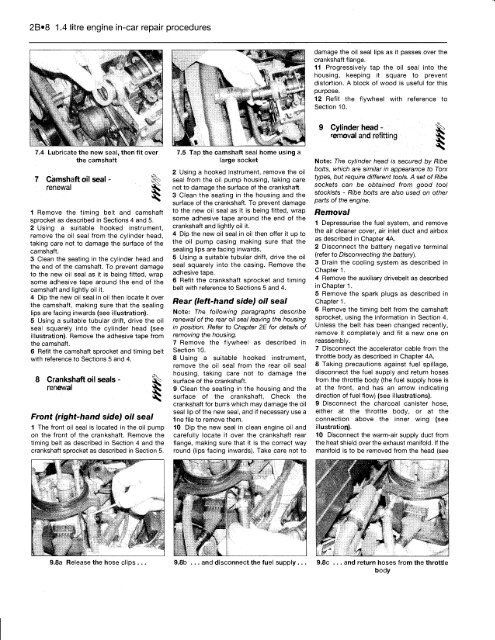
8 Taking precautions against fuel spillage,<br />
disconnect the fuel supply and return hoses<br />
from the throttle body (the fuel supply hose is<br />
at the front, and has an arrow indicating<br />
direction of fuel flow) (see illustrations).<br />
9 Disconnect the charcoal canister hose,<br />
either at the throttle body, or at the<br />
connection above the inner wing (see<br />
illustration).<br />
10 Disconnect the warm-air supply duct from<br />
the heat shield over the exhaust manifold. If the<br />
manifold is to be removed from the head (see<br />
9.8a Release the hose clips ... 9.8b ... and disconnect the fuel supply ... 9.8c ... and return hoses from the throttle<br />
body


