

Bravo & Brava • 1995 To 2000
Bravo & Brava • 1995 To 2000
Bravo & Brava • 1995 To 2000

Create successful ePaper yourself
Turn your PDF publications into a flip-book with our unique Google optimized e-Paper software.
2 Gearchange lever<br />
and linkage<br />
removal, overhaul and refitting ^<br />
1.2 litre models<br />
Removal<br />
1 Apply the handbrake, then jack up the front<br />
of the vehicle and support it on axle stands<br />
(see Jacking and vehicle support).<br />
2 Remove the battery and mounting tray as<br />
described in Chapter 5A.<br />
3 Release the wiring from the rear of the<br />
battery mounting bracket, then undo the bolt<br />
and remove the relay box cover. Unscrew the<br />
nuts and remove the relay box from the<br />
mounting bracket - position the box to one<br />
side.<br />
4 Unbolt and remove the battery mounting<br />
bracket.<br />
5 Inside the car, release the gear lever gaiter<br />
2.17 <strong>To</strong>ol for removing the knob from the<br />
gear lever<br />
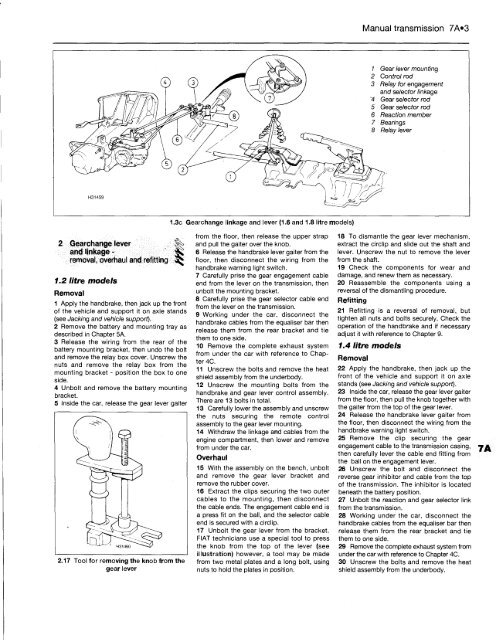
1.3c Gearchange linkage and lever (1.6 and 1.8 litre models)<br />
from the floor, then release the upper strap<br />
and pull the gaiter over the knob.<br />
6 Release the handbrake lever gaiter from the<br />
floor, then disconnect the wiring from the<br />
handbrake warning light switch.<br />
7 Carefully prise the gear engagement cable<br />
end from the lever on the transmission, then<br />
unbolt the mounting bracket.<br />
8 Carefully prise the gear selector cable end<br />
from the lever on the transmission.<br />
9 Working under the car, disconnect the<br />
handbrake cables from the equaliser bar then<br />
release them from the rear bracket and tie<br />
them to one side.<br />
10 Remove the complete exhaust system<br />
from under the car with reference to Chapter<br />
4C.<br />
11 Unscrew the bolts and remove the heat<br />
shield assembly from the underbody.<br />
12 Unscrew the mounting bolts from the<br />
handbrake and gear lever control assembly.<br />
There are 13 bolts in total.<br />
13 Carefully lower the assembly and unscrew<br />
the nuts securing the remote control<br />
assembly to the gear lever mounting.<br />
14 Withdraw the linkage and cables from the<br />
engine compartment, then lower and remove<br />
from under the car.<br />
Overhaul<br />
15 With the assembly on the bench, unbolt<br />
and remove the gear lever bracket and<br />
remove the rubber cover.<br />
16 Extract the clips securing the two outer<br />
cables to the mounting, then disconnect<br />
the cable ends. The engagement cable end is<br />
a press fit on the ball, and the selector cable<br />
end is secured with a circlip.<br />
17 Unbolt the gear lever from the bracket.<br />
FIAT technicians use a special tool to press<br />
the knob from the top of the lever (see<br />
illustration) however, a tool may be made<br />
from two metal plates and a long bolt, using<br />
nuts to hold the plates in position.<br />
Manual transmission 7A»3<br />
Gear lever mounting<br />
Control rod<br />
Relay for engagement<br />
and selector linkage<br />
Gear selector rod<br />
Gear selector rod<br />
Reaction member<br />
Bearings<br />
Relay lever<br />
18 <strong>To</strong> dismantle the gear lever mechanism,<br />
extract the circlip and slide out the shaft and<br />
lever. Unscrew the nut to remove the lever<br />
from the shaft.<br />
19 Check the components for wear and<br />
damage, and renew them as necessary.<br />
20 Reassemble the components using a<br />
reversal of the dismantling procedure.<br />
Refitting<br />
21 Refitting is a reversal of removal, but<br />
tighten all nuts and bolts securely. Check the<br />
operation of the handbrake and if necessary<br />
adjust it with reference to Chapter 9.<br />
1.4 litre models<br />
Removal<br />
22 Apply the handbrake, then jack up the<br />
front of the vehicle and support it on axle<br />
stands (see Jacking and vehicle support).<br />
23 Inside the car, release the gear lever gaiter<br />
from the floor, then pull the knob together with<br />
the gaiter from the top of the gear lever.<br />
24 Release the handbrake lever gaiter from<br />
the floor, then disconnect the wiring from the<br />
handbrake warning light switch.<br />
25 Remove the clip securing the gear<br />
engagement cable to the transmission casing,<br />
then carefully lever the cable end fitting from<br />
the ball on the engagement lever.<br />
26 Unscrew the bolt and disconnect the<br />
reverse gear inhibitor and cable from the top<br />
of the transmission. The inhibitor is located<br />
beneath the battery position.<br />
27 Unbolt the reaction and gear selector link<br />
from the transmission.<br />
28 Working under the car, disconnect the<br />
handbrake cables from the equaliser bar then<br />
release them from the rear bracket and tie<br />
them to one side.<br />
29 Remove the complete exhaust system from<br />
under the car with reference to Chapter 4C.<br />
30 Unscrew the bolts and remove the heat<br />
shield assembly from the underbody.


