

Bravo & Brava • 1995 To 2000
Bravo & Brava • 1995 To 2000
Bravo & Brava • 1995 To 2000

Create successful ePaper yourself
Turn your PDF publications into a flip-book with our unique Google optimized e-Paper software.
12*20 Body electrical systems<br />
it is required for making copies in the event of<br />
the loss of the duplicate keys.<br />
3 Most models are fitted with an electronic<br />
alarm system which enables remote control of<br />
the central locking system, together with<br />
monitoring of door/tailgate/bonnet opening,<br />
movement inside the car, and any hard<br />
knocks to the car body. The system is<br />
activated when the ignition key is removed<br />
from the STOP or PARK positions on the<br />
ignition switch. An LED warning light in the<br />
middle of the facia flashes for the complete<br />
period when the system is activated.<br />
4 The alarm system performs a self-test<br />
whenever it is switched on. Should a fault be<br />
detected, a second short beep will be heard<br />
after the main beep. If this occurs, check that<br />
the doors/tailgate/bonnet are closed<br />
correctly.<br />
5 When the system is switched on, a single<br />
beep will be heard and the direction indicators<br />
will light up for approximately three seconds.<br />
When the system is switched off, two beeps<br />
will be heard and the direction indicators will<br />
flash twice.<br />
6 Should the alarm system become faulty, the<br />
vehicle should be taken to a FIAT dealer for<br />
examination.<br />
7 If a new key is obtained, it will be necessary<br />
to transfer the transponder from the old key to<br />
the new one. <strong>To</strong> do this, prise open the old<br />
key fob using a small screwdriver. Note: Carry<br />
this out over a table, otherwise the<br />
transponder may be lost.<br />
8 Note its location, then use a screwdriver to<br />
carefully prise the transponder from the old<br />
key (see illustration).<br />
9 Carefully locate the transponder in the new<br />
key, then refit the fob halves, pressing the two<br />
halves together until they are engaged.<br />
21 Airbag system - precautions<br />
and general information<br />
A<br />
Warning: Note that the airbag<br />
must not be subjected to temperatures<br />
in excess of 100° C.<br />
When the airbag is removed,<br />
ensure that it is stored the correct way up<br />
to prevent possible inflation. Do not allow<br />
any solvents or cleaning agents to contact<br />
the airbag assembly. It must be cleaned<br />
using only a damp cloth. The airbag and<br />
control unit are both sensitive to impact. If<br />
either is dropped from a height of 50 cm or<br />
more or are damaged they should be<br />
renewed. Before working on the airbag<br />
components, disconnect the battery and<br />
wait approximately 10 minutes. Also<br />
remove the airbag fuse from the fusebox.<br />
1 A driver's airbag is fitted as standard on all<br />
models, and a passenger airbag is available<br />
as an option. Side airbags, fitted in the front<br />
seat backrests, are also available on certain<br />
models to protect the front seat occupants in<br />
20.8 Removing the transponder from the<br />
ignition key fob<br />
the event of a side impact of medium to high<br />
level.<br />
2 Where passenger and/or side airbags are<br />
fitted, the front passenger seat is fitted with a<br />
sensor to detect the presence of a person. If<br />
the sensor does not detect a person within<br />
approximately 30 seconds, the passenger<br />
airbag(s) are deactivated.<br />
3 The airbag system consists of the airbag<br />
units complete with gas generators, the<br />
control unit with integral deceleration sensor,<br />
and a warning light on the instrument panel.<br />
4 The airbag system is triggered in the event<br />
of a heavy frontal impact above a<br />
predetermined force, depending on the point<br />
of impact. The airbag is inflated within<br />
milliseconds and forms a safety cushion<br />
between the driver and steering wheel and,<br />
where fitted, between the passenger and<br />
facia. This prevents contact between the<br />
upper body and wheel/facia and therefore<br />
greatly reduces the risk of injury. The airbag<br />
then deflates almost immediately. Note that<br />
the front seat belt reels incorporate<br />
pretensioners which operate entirely separate<br />
to the airbag system and are not connected<br />
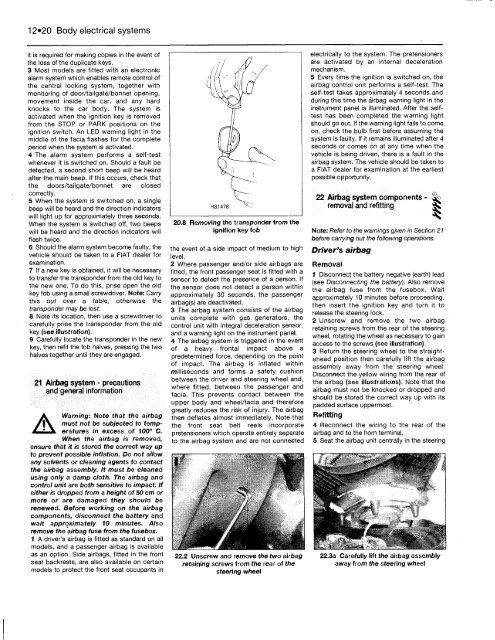
22.2 Unscrew and remove the two airbag<br />
retaining screws from the rear of the<br />
steering wheel<br />
electrically to the system. The pretensioners<br />
are activated by an internal deceleration<br />
mechanism.<br />
5 Every time the ignition is switched on, the<br />
airbag control unit performs a self-test. The<br />
self-test takes approximately 4 seconds and<br />
during this time the airbag warning light in the<br />
instrument panel is illuminated. After the selftest<br />
has been completed the warning light<br />
should go out. If the warning light fails to come<br />
on, check the bulb first before assuming the<br />
system is faulty. If it remains illuminated after 4<br />
seconds or comes on at any time when the<br />
vehicle is being driven, there is a fault in the<br />
airbag system. The vehicle should be taken to<br />
a FIAT dealer for examination at the earliest<br />
possible opportunity.<br />
22 Airbag system components -<br />
removal and refitting<br />
Note: Refer to the warnings given in Section 21<br />
before carrying out the following operations.<br />
Driver's airbag<br />
Removal<br />
1 Disconnect the battery negative (earth) lead<br />
(see Disconnecting the battery). Also remove<br />
the airbag fuse from the fusebox. Wait<br />
approximately 10 minutes before proceeding,<br />
then insert the ignition key and turn it to<br />
release the steering lock.<br />
2 Unscrew and remove the two airbag<br />
retaining screws from the rear of the steering<br />
wheel, rotating the wheel as necessary to gain<br />
access to the screws (see illustration).<br />
3 Return the steering wheel to the straightahead<br />
position then carefully lift the airbag<br />
assembly away from the steering wheel.<br />
Disconnect the yellow wiring from the rear of<br />
the airbag (see illustrations). Note that the<br />
airbag must not be knocked or dropped and<br />
should be stored the correct way up with its<br />
padded surface uppermost.<br />
Refitting<br />
4 Reconnect the wiring to the rear of the<br />
airbag and to the horn terminal.<br />
5 Seat the airbag unit centrally in the steering<br />
22.3a Carefully lift the airbag assembly<br />
away from the steering wheel


