- Page 1 and 2:
Test and Measurement Division Opera
- Page 3:
ESIB Tabbed Divider Overview Tabbed
- Page 6 and 7:
Safety Instructions Observing the s
- Page 8 and 9:
Safety Instructions 19. If a produc
- Page 10 and 11:
Informaciones de seguridad Tener en
- Page 12 and 13:
Informaciones de seguridad 12. No u
- Page 15:
EC Certificate of Conformity Certif
- Page 19 and 20:
ESIB Manuals Contents of Manuals fo
- Page 21:
Beiblatt B zum Datenblatt Signalana
- Page 24 and 25:
CISPR Average Detector (CISPR AV) T
- Page 26 and 27:
Weighting of pulsed sinusoidal sign
- Page 28 and 29:
Adjacent Channel Power Measurements
- Page 30 and 31:
:[SENSe:]AVERage:TYPE MAXimum | MIN
- Page 33 and 34:
ESIB Contents - Preparing for Opera
- Page 35 and 36:
ESIB Front View 1 Preparing for Ope
- Page 37 and 38:
ESIB Front View 6 LINES LINES D LIN
- Page 39 and 40:
ESIB Front View 9 10 DATA VARIATION
- Page 41 and 42:
ESIB Front View 14 PROBE/CODE PROBE
- Page 43 and 44:
ESIB Front View 19 PROBE POWER PROB
- Page 45 and 46:
ESIB Front View 25 STATUS STATUS SR
- Page 47 and 48:
ESIB Rear View Rear View 29 Power s
- Page 49 and 50:
ESIB Rear View 36 LOG VIDEO OUT LOG
- Page 51 and 52:
ESIB Rear View 43 EXT REF IN/OUT EX
- Page 53 and 54:
ESIB Start-Up 19" Rack Installation
- Page 55 and 56:
ESIB Functional Test Energy Saving
- Page 57 and 58:
ESIB Connecting an External Keyboar
- Page 59 and 60:
ESIB Connecting an External Monitor
- Page 61 and 62:
ESIB Connecting a Printer Connectin
- Page 63 and 64:
ESIB Connecting a Printer Select pr
- Page 65 and 66:
ESIB Connecting a Printer ½ Switch
- Page 67 and 68:
ESIB Connecting a Printer Installat
- Page 69 and 70:
ESIB Connecting a CD ROM Drive Conn
- Page 71 and 72:
ESIB Installing Windows NT Software
- Page 73 and 74:
ESIB Options Options This section d
- Page 75 and 76:
ESIB Options Setting the parameters
- Page 77 and 78:
ESIB Options AUI (Thick Ethernet; F
- Page 79 and 80:
ESIB Options Installation and Confi
- Page 81 and 82:
ESIB Options Examples of Configurat
- Page 83 and 84:
ESIB Options Only NOVELL network: C
- Page 85 and 86:
ESIB Options ½ Double-click line "
- Page 87:
ESIB Options FTP For a complete des
- Page 90 and 91:
Contents - Getting Started ESIB 108
- Page 92 and 93:
Example - Level and Frequency Measu
- Page 94 and 95:
Example - Level and Frequency Measu
- Page 96 and 97:
Example - Level and Frequency Measu
- Page 98 and 99:
Example - Level and Frequency Measu
- Page 100 and 101:
Example - Level and Frequency Measu
- Page 102 and 103:
Example - Level and Frequency Measu
- Page 104 and 105:
Example - Level and Frequency Measu
- Page 106 and 107:
Example - Level and Frequency Measu
- Page 108 and 109:
Contents - Manual Operation ESIB 10
- Page 110 and 111:
Screen ESIB The Screen The screen i
- Page 112 and 113:
Screen ESIB Displays in the Diagram
- Page 114 and 115:
Screen ESIB Instrument settings (En
- Page 116 and 117:
Screen ESIB Frequency axis labeling
- Page 118 and 119:
Screen ESIB In analyzer mode, the u
- Page 120 and 121:
Screen ESIB Changing the Menu With
- Page 122 and 123:
Setting the Parameters ESIB Setting
- Page 124 and 125:
Setting the Parameters ESIB Entry W
- Page 126 and 127:
Setting the Parameters ESIB Editing
- Page 128 and 129:
Disabling the Control Elements ESIB
- Page 130 and 131:
Mouse and External Keyboard Control
- Page 132 and 133:
Mouse and External Keyboard Control
- Page 134 and 135:
Menu Overview ESIB SYSTEM PRESET CA
- Page 136 and 137:
Menu Overview ESIB CONFIGURATION MO
- Page 138 and 139:
Menu Overview ESIB CONFIGURATION MO
- Page 140 and 141:
Menu Overview ESIB Frequency Key Gr
- Page 142 and 143:
Menu Overview ESIB Level Key Group,
- Page 144 and 145:
Menu Overview ESIB Marker Key Group
- Page 146 and 147:
Menu Overview ESIB MARKER NORMAL SE
- Page 148 and 149:
Menu Overview ESIB Lines Key Group
- Page 150 and 151:
Menu Overview ESIB Sweep Key Group
- Page 152 and 153:
Menu Overview ESIB SWEEP TRIGGER SW
- Page 154 and 155:
Menu Overview ESIB MEMORY SAVE RECA
- Page 157 and 158: ESIB Contents - "Instrument Functio
- Page 159 and 160: ESIB Contents - "Instrument Functio
- Page 161 and 162: ESIB Instrument Functions 4 Instrum
- Page 163 and 164: ESIB Display Configuration Display
- Page 165 and 166: ESIB Display Configuration EMI RECE
- Page 167 and 168: ESIB Display Configuration Display
- Page 169 and 170: ESIB Display Configuration SYSTEM D
- Page 171 and 172: ESIB Calibration Correction Functio
- Page 173 and 174: ESIB Calibration Results of System
- Page 175 and 176: ESIB Instrument Status and Measurem
- Page 177 and 178: ESIB Instrument Status and Measurem
- Page 179 and 180: ESIB Mode Selection Mode Selection
- Page 181 and 182: ESIB Configuration/Setup Preliminar
- Page 183 and 184: ESIB Configuration/Setup CONFIGURAT
- Page 185 and 186: ESIB Configuration/Setup EDIT TRD F
- Page 187 and 188: ESIB Configuration/Setup Fig. 4-3 L
- Page 189 and 190: ESIB Configuration/Setup An overwri
- Page 191 and 192: ESIB Configuration/Setup INSERT LIN
- Page 193 and 194: ESIB Configuration/Setup Preselecti
- Page 195 and 196: ESIB Configuration/Setup Control of
- Page 197 and 198: ESIB Configuration/Setup Enabling F
- Page 199 and 200: ESIB Configuration/Setup CONFIGURAT
- Page 201 and 202: ESIB Configuration/Setup Setting th
- Page 203 and 204: ESIB Configuration/Setup Serial Int
- Page 205 and 206: ESIB Configuration/Setup SW-Handsha
- Page 207: ESIB Configuration/Setup Firmware U
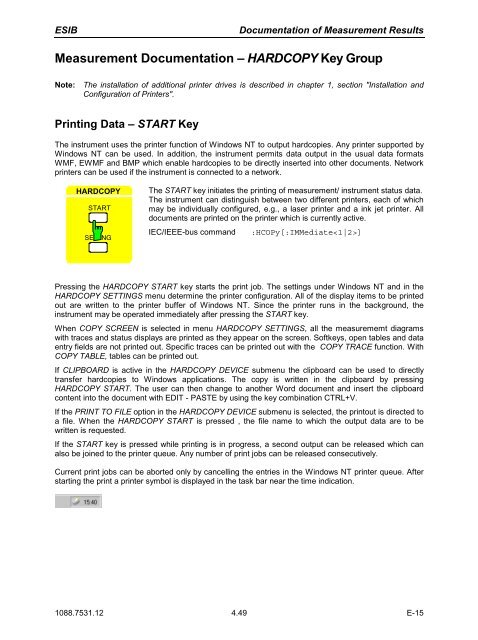
- Page 211 and 212: ESIB Documentation of Measurement R
- Page 213 and 214: ESIB Documentation of Measurement R
- Page 215 and 216: ESIB Documentation of Measurement R
- Page 217 and 218: ESIB Memory Configuration Saving an
- Page 219 and 220: ESIB Memory Configuration Configura
- Page 221 and 222: ESIB Saving Data Sets Saving Data S
- Page 223 and 224: ESIB Saving Data Sets DATA SET CLEA
- Page 225 and 226: ESIB Saving Data Sets SELECT ITEMS
- Page 227 and 228: ESIB Recalling Data Sets Selecting
- Page 229 and 230: ESIB Recalling Data Sets Building a
- Page 231 and 232: ESIB Macros Macros - USER Key The E
- Page 233 and 234: ESIB Macros Defining Macros In the
- Page 235 and 236: ESIB Receiver - Operation on a Disc
- Page 237 and 238: ESIB Receiver - Operation on a Disc
- Page 239 and 240: ESIB Receiver - Operation on a Disc
- Page 241 and 242: ESIB Receiver - Operation on a Disc
- Page 243 and 244: ESIB Receiver - Operation on a Disc
- Page 245 and 246: ESIB Receiver - Operation on a Disc
- Page 247 and 248: ESIB Receiver - Frequency Scan Freq
- Page 249 and 250: ESIB Receiver - Frequency Scan Entr
- Page 251 and 252: ESIB Receiver - Frequency Scan In t
- Page 253 and 254: ESIB Receiver - Frequency Scan ADJU
- Page 255 and 256: ESIB Receiver - Frequency Scan CISP
- Page 257 and 258: ESIB Receiver - Data Reduction and
- Page 259 and 260:
ESIB Receiver - Data Reduction and
- Page 261 and 262:
ESIB Receiver - Data Reduction and
- Page 263 and 264:
ESIB Receiver - Data Reduction and
- Page 265 and 266:
ESIB Receiver - Data Reduction and
- Page 267 and 268:
ESIB Receiver - Data Reduction and
- Page 269 and 270:
ESIB Receiver - Automatic Control o
- Page 271 and 272:
ESIB Receiver - Frequency and Span
- Page 273 and 274:
ESIB Receiver - Level Display/RF In
- Page 275 and 276:
ESIB Receiver - Level Display/RF In
- Page 277 and 278:
ESIB Receiver - Level Display/RF In
- Page 279 and 280:
ESIB Receiver - Main Markers Marker
- Page 281 and 282:
ESIB Receiver - Main Markers Pressi
- Page 283 and 284:
ESIB Receiver - Main Markers Marker
- Page 285 and 286:
ESIB Receiver - Delta Markers DELTA
- Page 287 and 288:
ESIB Receiver - Delta Markers Delta
- Page 289 and 290:
ESIB Receiver - Search Functions AC
- Page 291 and 292:
ESIB Receiver - Search Functions Th
- Page 293 and 294:
ESIB Receiver - Marker Å Menu Inst
- Page 295 and 296:
ESIB Receiver - Display and Limit L
- Page 297 and 298:
ESIB Receiver - Display and Limit L
- Page 299 and 300:
ESIB Receiver - Display and Limit L
- Page 301 and 302:
ESIB Receiver - Display and Limit L
- Page 303 and 304:
ESIB Receiver - Traces Trace Select
- Page 305 and 306:
ESIB Receiver - Traces VIEW The VIE
- Page 307 and 308:
ESIB Receiver - Traces AVERAGE The
- Page 309 and 310:
ESIB Receiver - Traces ASCII Export
- Page 311 and 312:
ESIB Receiver - Traces Content of f
- Page 313 and 314:
ESIB Receiver - Scan Control Scan C
- Page 315 and 316:
ESIB Analyzer - Frequency and Span
- Page 317 and 318:
ESIB Analyzer - Frequency and Span
- Page 319 and 320:
ESIB Analyzer - Frequency and Span
- Page 321 and 322:
ESIB Analyzer - Frequency and Span
- Page 323 and 324:
ESIB Analyzer - Frequency and Span
- Page 325 and 326:
ESIB Analyzer - Level Display/RF In
- Page 327 and 328:
ESIB Analyzer - Level Display/RF In
- Page 329 and 330:
ESIB Analyzer - Level Display/RF In
- Page 331 and 332:
ESIB Analyzer - Level Display/RF In
- Page 333 and 334:
ESIB Analyzer - Level Display/RF In
- Page 335 and 336:
ESIB Analyzer - Main Markers Marker
- Page 337 and 338:
ESIB Analyzer - Main Markers Pressi
- Page 339 and 340:
ESIB Analyzer - Main Markers MARKER
- Page 341 and 342:
ESIB Analyzer - Main Markers Freque
- Page 343 and 344:
ESIB Analyzer - Main Markers Channe
- Page 345 and 346:
ESIB Analyzer - Main Markers ACP ST
- Page 347 and 348:
ESIB Analyzer - Main Markers CHANNE
- Page 349 and 350:
ESIB Analyzer - Main Markers CP/ACP
- Page 351 and 352:
ESIB Analyzer - Main Markers Exampl
- Page 353 and 354:
ESIB Analyzer - Main Markers 0 -10
- Page 355 and 356:
ESIB Analyzer - Main Markers Parame
- Page 357 and 358:
ESIB Analyzer - Main Markers Marker
- Page 359 and 360:
ESIB Analyzer - Delta Markers DELTA
- Page 361 and 362:
ESIB Analyzer - Delta Markers Phase
- Page 363 and 364:
ESIB Analyzer - Search Functions Se
- Page 365 and 366:
ESIB Analyzer - Search Functions NE
- Page 367 and 368:
ESIB Analyzer - Search Functions Wh
- Page 369 and 370:
ESIB Analyzer - Search Functions MA
- Page 371 and 372:
ESIB Analyzer - Marker Å Menu Inst
- Page 373 and 374:
ESIB Analyzer - Display and Limit L
- Page 375 and 376:
ESIB Analyzer - Display and Limit L
- Page 377 and 378:
ESIB Analyzer - Display and Limit L
- Page 379 and 380:
ESIB Analyzer - Display and Limit L
- Page 381 and 382:
ESIB Analyzer - Display and Limit L
- Page 383 and 384:
ESIB Analyzer - Display and Limit L
- Page 385 and 386:
ESIB Analyzer - Display and Limit L
- Page 387 and 388:
ESIB Analyzer - Traces The TRACE ke
- Page 389 and 390:
ESIB Analyzer - Traces On completio
- Page 391 and 392:
ESIB Analyzer - Traces Detector Sel
- Page 393 and 394:
ESIB Analyzer - Traces TRACE 1-DETE
- Page 395 and 396:
ESIB Analyzer - Traces Quasi Analog
- Page 397 and 398:
ESIB Analyzer - Traces Trace Export
- Page 399 and 400:
ESIB Analyzer - Traces Example: Typ
- Page 401 and 402:
ESIB Analyzer - Coupled Settings Se
- Page 403 and 404:
ESIB Analyzer - Coupled Settings VI
- Page 405 and 406:
ESIB Analyzer - Coupled Settings RB
- Page 407 and 408:
ESIB Analyzer - Coupled Settings Sw
- Page 409 and 410:
ESIB Analyzer - Sweep Trigger Sweep
- Page 411 and 412:
ESIB Analyzer - Sweep Control Sweep
- Page 413 and 414:
ESIB Analyzer - Sweep Control Gated
- Page 415 and 416:
ESIB Analyzer - Sweep Control SWEEP
- Page 417 and 418:
ESIB Analyzer - Sweep Control Setti
- Page 419 and 420:
ESIB Analyzer - Sweep Control Sweep
- Page 421 and 422:
ESIB Analyzer - Sweep Control SWEEP
- Page 423 and 424:
ESIB Tracking generator Tracking Ge
- Page 425 and 426:
ESIB Tracking generator - Transmiss
- Page 427 and 428:
ESIB Tracking generator - Transmiss
- Page 429 and 430:
ESIB Tracking generator - Transmiss
- Page 431 and 432:
ESIB Frequency Converting Measureme
- Page 433 and 434:
ESIB Tracking generator - Frequency
- Page 435 and 436:
ESIB Tracking generator - External
- Page 437 and 438:
ESIB Contents - Remote Control - Ba
- Page 439 and 440:
ESIB Introduction 5 Remote Control
- Page 441 and 442:
ESIB Switchover to Remote Control R
- Page 443 and 444:
ESIB Switchover to Remote Control R
- Page 445 and 446:
ESIB Messages Device Messages (Comm
- Page 447 and 448:
ESIB Structure and Syntax of the De
- Page 449 and 450:
ESIB Structure and Syntax of the De
- Page 451 and 452:
ESIB Structure and Syntax of the De
- Page 453 and 454:
ESIB Instrument Model and Command P
- Page 455 and 456:
ESIB Status Reporting System Status
- Page 457 and 458:
ESIB Status Reporting System Overvi
- Page 459 and 460:
ESIB Status Reporting System IST Fl
- Page 461 and 462:
ESIB Status Reporting System STATus
- Page 463 and 464:
ESIB Status Reporting System STATus
- Page 465 and 466:
ESIB Status Reporting System STATus
- Page 467 and 468:
ESIB Status Reporting System STATus
- Page 469 and 470:
ESIB Status Reporting System Applic
- Page 471:
ESIB Status Reporting System Resett
- Page 474 and 475:
Contents - Description of Commands
- Page 476 and 477:
Notation ESIB Upper/lower case nota
- Page 478 and 479:
Common Commands ESIB Common Command
- Page 480 and 481:
Common Commands ESIB *PRE 0 to 255
- Page 482 and 483:
CALCulate Subsystem ESIB CALCulate:
- Page 484 and 485:
CALCulate Subsystem ESIB :CALCulate
- Page 486 and 487:
CALCulate Subsystem ESIB :CALCulate
- Page 488 and 489:
CALCulate Subsystem ESIB CALCulate:
- Page 490 and 491:
CALCulate Subsystem ESIB :CALCulate
- Page 492 and 493:
CALCulate Subsystem ESIB CALCulate:
- Page 494 and 495:
CALCulate Subsystem ESIB :CALCulate
- Page 496 and 497:
CALCulate Subsystem ESIB COMMAND PA
- Page 498 and 499:
CALCulate Subsystem ESIB :CALCulate
- Page 500 and 501:
CALCulate Subsystem ESIB :CALCulate
- Page 502 and 503:
CALCulate Subsystem ESIB :CALCulate
- Page 504 and 505:
CALCulate Subsystem ESIB :CALCulate
- Page 506 and 507:
CALCulate Subsystem ESIB COMMAND PA
- Page 508 and 509:
CALCulate Subsystem ESIB :CALCulate
- Page 510 and 511:
CALCulate Subsystem ESIB :CALCulate
- Page 512 and 513:
CALCulate Subsystem ESIB :CALCulate
- Page 514 and 515:
CALCulate Subsystem ESIB :CALCulate
- Page 516 and 517:
CALCulate Subsystem ESIB :CALCulate
- Page 518 and 519:
CALCulate Subsystem ESIB :CALCulate
- Page 520 and 521:
CALCulate Subsystem ESIB :CALCulate
- Page 522 and 523:
CALCulate Subsystem ESIB :CALCulate
- Page 524 and 525:
CALCulate Subsystem ESIB :CALCulate
- Page 526 and 527:
CALCulate Subsystem ESIB :CALCulate
- Page 528 and 529:
CALCulate Subsystem ESIB :CALCulate
- Page 530 and 531:
CALCulate Subsystem ESIB CALCulate:
- Page 532 and 533:
CALCulate Subsystem ESIB CALCulate:
- Page 534 and 535:
CALibration Subsystem ESIB :CALibra
- Page 536 and 537:
DIAGnostic Subsystem ESIB :DIAGnost
- Page 538 and 539:
DISPlay Subsystem ESIB DISPlay [:WI
- Page 540 and 541:
DISPlay Subsystem ESIB :DISPlay:CMA
- Page 542 and 543:
DISPlay Subsystem ESIB :DISPlay[:WI
- Page 544 and 545:
DISPlay Subsystem ESIB :DISPlay[:WI
- Page 546 and 547:
DISPlay Subsystem ESIB :DISPlay[:WI
- Page 548 and 549:
FORMat Subsystem ESIB FORMat Subsys
- Page 550 and 551:
HCOPy Subsystem ESIB HCOPy Subsyste
- Page 552 and 553:
HCOPy Subsystem ESIB :HCOPy[:IMMedi
- Page 554 and 555:
HCOPy Subsystem ESIB :HCOPy:PAGE:DI
- Page 556 and 557:
INPut Subsystem ESIB INPut Subsyste
- Page 558 and 559:
INPut Subsystem ESIB :INPut:LISN[:T
- Page 560 and 561:
INPut Subsystem ESIB :INPut:PRESele
- Page 562 and 563:
INSTrument Subsystem ESIB :INSTrume
- Page 564 and 565:
MMEMory Subsystem ESIB COMMAND PARA
- Page 566 and 567:
MMEMory Subsystem ESIB :MMEMory:INI
- Page 568 and 569:
MMEMory Subsystem ESIB :MMEMory:STO
- Page 570 and 571:
MMEMory Subsystem ESIB :MMEMory:SEL
- Page 572 and 573:
MMEMory Subsystem ESIB :MMEMory:SEL
- Page 574 and 575:
OUTPut Subsystem ESIB OUTPut Subsys
- Page 576 and 577:
SENSe Subsystem ESIB SENSe Subsyste
- Page 578 and 579:
SENSe Subsystem ESIB SENSe:AVERage
- Page 580 and 581:
SENSe Subsystem ESIB SENSe:BANDwidt
- Page 582 and 583:
SENSe Subsystem ESIB :[SENSe:]BANDw
- Page 584 and 585:
SENSe Subsystem ESIB :[SENSe:]CORRe
- Page 586 and 587:
SENSe Subsystem ESIB :[SENSe:]CORRe
- Page 588 and 589:
SENSe Subsystem ESIB :[SENSe:]CORRe
- Page 590 and 591:
SENSe Subsystem ESIB :[SENSe:]CORRe
- Page 592 and 593:
SENSe Subsystem ESIB :[SENSe:]CORRe
- Page 594 and 595:
SENSe Subsystem ESIB SENSe:DETector
- Page 596 and 597:
SENSe Subsystem ESIB SENSe:DDEMod S
- Page 598 and 599:
SENSe Subsystem ESIB :[SENSe:]DDEMo
- Page 600 and 601:
SENSe Subsystem ESIB :[SENSe:]DDEMo
- Page 602 and 603:
SENSe Subsystem ESIB :[SENSe:]DDEMo
- Page 604 and 605:
SENSe Subsystem ESIB SENSe:FILTer S
- Page 606 and 607:
SENSe Subsystem ESIB :[SENSe:]FILTe
- Page 608 and 609:
SENSe Subsystem ESIB :[SENSe:]FREQu
- Page 610 and 611:
SENSe Subsystem ESIB :[SENSe:]FREQu
- Page 612 and 613:
SENSe Subsystem ESIB :[SENSe:]MIXer
- Page 614 and 615:
SENSe Subsystem ESIB SENSe:MSUMmary
- Page 616 and 617:
SENSe Subsystem ESIB SENSe:POWer Su
- Page 618 and 619:
SENSe Subsystem ESIB :[SENSe:]POWer
- Page 620 and 621:
SENSe Subsystem ESIB SENSe:ROSCilla
- Page 622 and 623:
SENSe Subsystem ESIB :[SENSe:]SCAN:
- Page 624 and 625:
SENSe Subsystem ESIB SENSe:SWEep Su
- Page 626 and 627:
SENSe Subsystem ESIB :[SENSe:]SWEep
- Page 628 and 629:
SOURce Subsystem ESIB SOURce Subsys
- Page 630 and 631:
STATus Subsystem ESIB STATus Subsys
- Page 632 and 633:
STATus Subsystem ESIB :STATus:OPERa
- Page 634 and 635:
STATus Subsystem ESIB :STATus:QUESt
- Page 636 and 637:
STATus Subsystem ESIB :STATus:QUESt
- Page 638 and 639:
STATus Subsystem ESIB :STATus:QUESt
- Page 640 and 641:
STATus Subsystem ESIB :STATus:QUESt
- Page 642 and 643:
SYSTem Subsystem ESIB :SYSTem:COMMu
- Page 644 and 645:
SYSTem Subsystem ESIB :SYSTem:COMMu
- Page 646 and 647:
SYSTem Subsystem ESIB :SYSTem:SET
- Page 648 and 649:
TRACe Subsystem ESIB TRACe Subsyste
- Page 650 and 651:
TRACe Subsystem ESIB - 4 byte:trace
- Page 652 and 653:
TRIGger Subsystem ESIB :TRIGger[:SE
- Page 654 and 655:
Alphabetical List of Commands ESIB
- Page 656 and 657:
Alphabetical List of Commands ESIB
- Page 658 and 659:
Alphabetical List of Commands ESIB
- Page 660 and 661:
Alphabetical List of Commands ESIB
- Page 662 and 663:
Alphabetical List of Commands ESIB
- Page 664 and 665:
Alphabetical List of Commands ESIB
- Page 666 and 667:
Command Assignment - EMI Receiver E
- Page 668 and 669:
Command Assignment - EMI Receiver E
- Page 670 and 671:
Command Assignment - EMI Receiver E
- Page 672 and 673:
Command Assignment - EMI Receiver E
- Page 674 and 675:
Command Assignment - EMI Receiver E
- Page 676 and 677:
Command Assignment - EMI Receiver E
- Page 678 and 679:
Command Assignment - EMI Receiver E
- Page 680 and 681:
Command Assignment - Signal Analysi
- Page 682 and 683:
Command Assignment - Signal Analysi
- Page 684 and 685:
Command Assignment - Signal Analysi
- Page 686 and 687:
Command Assignment - Signal Analysi
- Page 688 and 689:
Command Assignment - Signal Analysi
- Page 690 and 691:
Command Assignment - Signal Analysi
- Page 692 and 693:
Command Assignment - Signal Analysi
- Page 694 and 695:
ESIB Command Assignment - General D
- Page 696 and 697:
ESIB Command Assignment - General D
- Page 698 and 699:
ESIB Command Assignment - General D
- Page 700 and 701:
ESIB Command Assignment - General D
- Page 702 and 703:
ESIB Command Assignment - General D
- Page 704 and 705:
Command Assignment - Vector Signal
- Page 706 and 707:
Command Assignment - Vector Signal
- Page 708 and 709:
Command Assignment - Vector Signal
- Page 710 and 711:
Command Assignment - Vector Signal
- Page 712 and 713:
Command Assignment - Vector Signal
- Page 714 and 715:
Command Assignment - Vector Signal
- Page 716 and 717:
Command Assignment - Vector Signal
- Page 718 and 719:
Command Assignment - External Mixer
- Page 721 and 722:
ESIB Contents - Programming Example
- Page 723 and 724:
ESIB Programming Examples 7 Program
- Page 725 and 726:
ESIB Programming Examples Command s
- Page 727 and 728:
ESIB Programming Examples Reading o
- Page 729 and 730:
ESIB Programming Examples Example:
- Page 731 and 732:
ESIB Programming Examples Visual Ba
- Page 733:
ESIB Programming Examples Programmi
- Page 736 and 737:
Contents - Maintenance and Instrume
- Page 738 and 739:
Contents - Maintenance and Instrume
- Page 740 and 741:
Contents - Maintenance and Instrume
- Page 742 and 743:
Contents - Maintenance and Instrume
- Page 744 and 745:
Contents - Maintenance and Instrume
- Page 746 and 747:
SYSTEM PRES ET CAL DISPLAY INFO CON
- Page 748 and 749:
Contents - Maintenance and Instrume
- Page 750 and 751:
Contents - Maintenance and Instrume
- Page 752 and 753:
Contents - Maintenance and Instrume
- Page 754 and 755:
Contents - Maintenance and Instrume
- Page 756 and 757:
Contents - Maintenance and Instrume
- Page 758 and 759:
Contents - Maintenance and Instrume
- Page 760 and 761:
Contents - Maintenance and Instrume
- Page 763 and 764:
ESIB Contents - Error Messages Cont
- Page 765 and 766:
ESIB List of Error Messages 9 List
- Page 767 and 768:
ESIB List of Error Messages Continu
- Page 769 and 770:
ESIB List of Error Messages Continu
- Page 771:
ESIB List of Error Messages Device
- Page 774 and 775:
Index ESIB recall .................
- Page 776 and 777:
Index ESIB line ...................
- Page 778 and 779:
Index ESIB ADJUST AXIS ............
- Page 780 and 781:
Index ESIB OCCUPIED PWR BANDW......
- Page 782:
Index ESIB free run................


