Attention! Your ePaper is waiting for publication!
By publishing your document, the content will be optimally indexed by Google via AI and sorted into the right category for over 500 million ePaper readers on YUMPU.
This will ensure high visibility and many readers!

Your ePaper is now published and live on YUMPU!
You can find your publication here:
Share your interactive ePaper on all platforms and on your website with our embed function

Server Alarms - Avaya Support
Server Alarms - Avaya Support
Server Alarms - Avaya Support
Create successful ePaper yourself
Turn your PDF publications into a flip-book with our unique Google optimized e-Paper software.
Communication Manager Maintenance Object Repair Procedures<br />
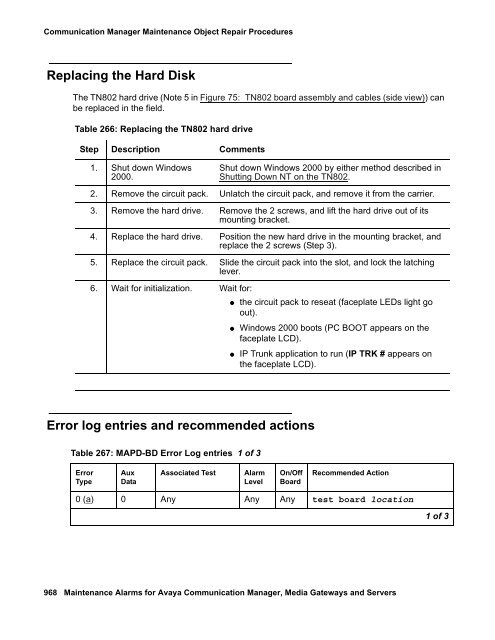
Replacing the Hard Disk<br />
The TN802 hard drive (Note 5 in Figure 75: TN802 board assembly and cables (side view)) can<br />
be replaced in the field.<br />
Table 266: Replacing the TN802 hard drive<br />
Step Description Comments<br />
1. Shut down Windows<br />
2000.<br />
Error log entries and recommended actions<br />
Shut down Windows 2000 by either method described in<br />
Shutting Down NT on the TN802.<br />
2. Remove the circuit pack. Unlatch the circuit pack, and remove it from the carrier.<br />
3. Remove the hard drive. Remove the 2 screws, and lift the hard drive out of its<br />
mounting bracket.<br />
4. Replace the hard drive. Position the new hard drive in the mounting bracket, and<br />
replace the 2 screws (Step 3).<br />
5. Replace the circuit pack. Slide the circuit pack into the slot, and lock the latching<br />
lever.<br />
6. Wait for initialization. Wait for:<br />
Table 267: MAPD-BD Error Log entries 1 of 3<br />
Error<br />
Type<br />
Aux<br />
Data<br />
Associated Test Alarm<br />
Level<br />
● the circuit pack to reseat (faceplate LEDs light go<br />
out).<br />
● Windows 2000 boots (PC BOOT appears on the<br />
faceplate LCD).<br />
● IP Trunk application to run (IP TRK # appears on<br />
the faceplate LCD).<br />
On/Off<br />
Board<br />
Recommended Action<br />
0 (a) 0 Any Any Any test board location<br />
968 Maintenance <strong>Alarms</strong> for <strong>Avaya</strong> Communication Manager, Media Gateways and <strong>Server</strong>s<br />
1 of 3
Communication Manager Maintenance Object Repair Procedures Replacing the Hard Disk The TN802 hard drive (Note 5 in Figure 75: TN802 board assembly and cables (side view)) can be replaced in the field. Table 266: Replacing the TN802 hard drive Step Description Comments 1. Shut down Windows 2000. Error log entries and recommended actions Shut down Windows 2000 by either method described in Shutting Down NT on the TN802. 2. Remove the circuit pack. Unlatch the circuit pack, and remove it from the carrier. 3. Remove the hard drive. Remove the 2 screws, and lift the hard drive out of its mounting bracket. 4. Replace the hard drive. Position the new hard drive in the mounting bracket, and replace the 2 screws (Step 3). 5. Replace the circuit pack. Slide the circuit pack into the slot, and lock the latching lever. 6. Wait for initialization. Wait for: Table 267: MAPD-BD Error Log entries 1 of 3 Error Type Aux Data Associated Test Alarm Level ● the circuit pack to reseat (faceplate LEDs light go out). ● Windows 2000 boots (PC BOOT appears on the faceplate LCD). ● IP Trunk application to run (IP TRK # appears on the faceplate LCD). On/Off Board Recommended Action 0 (a) 0 Any Any Any test board location 968 Maintenance <strong>Alarms</strong> for <strong>Avaya</strong> Communication Manager, Media Gateways and <strong>Server</strong>s 1 of 3
Table 267: MAPD-BD Error Log entries 2 of 3 Error Type 1 (b) 0 Circuit pack removed or SAKI Test failed (#53) 2 (c) Aux Data MIN ON 1 WRN MAPD-BD (MAPD Interface Circuit Pack) 18 (d) 0 busyout board location WRN OFF release board location 23 (e) 0 WRN OFF add ds1 location 125 (f) MIN 2 WRN ON 257 (g) 65535 Control Channel Looparound Test (#52) MIN ON test board location l r 20 257 (g) Any Associated Test Alarm Level 513 (h) Any MIN 3 WRN ON 514 (i) 46086 MIN WRN3 ON 769 (j) 46085 MIN 3 WRN ON 770 (k) 46096 MIN 3 WRN ON 1025 (e) 4363 NPE Audit Test (#50) 1281 Any Loss of Signal Alarm Inquiry (#138) 1537 (l) 46082 MIN WRN3 ON 1538 (m) Any MIN 3 WRN ON 1793 Any Blue Alarm Inquiry test (#139) MIN OFF test board location 3 WRN MAJ MIN WRN 3 On/Off Board Recommended Action OFF test board location 2 of 3 Communication Manager Release 5.0 Issue 4 January 2008 969
- Page 1 and 2:
Maintenance Alarms for Avaya Commun
- Page 3 and 4:
Contents About this book . . . . .
- Page 5 and 6:
S8730 Server LEDs . . . . . . . . .
- Page 7 and 8:
CAB-MTCE (Media Gateway Maintenance
- Page 9 and 10:
MEDPRO (Media Processor MAPD Circui
- Page 11 and 12:
TBRI-PT (ISDN Trunk-Side BRI Port)
- Page 13 and 14:
External Device Alarm Query Test (#
- Page 15 and 16:
Maintenance/Test Circuit Pack Query
- Page 17 and 18:
VC DSP Port NPE Crosstalk Test (#11
- Page 19 and 20:
Power Supply Fan Test (#1538) . . .
- Page 21 and 22:
About this book Overview This docum
- Page 23 and 24:
How to use this Document How to use
- Page 25 and 26:
Conventions used in this document A
- Page 27 and 28:
Other conventions used in this book
- Page 29 and 30:
Table 3: Additional document resour
- Page 31 and 32:
Downloading this book and updates f
- Page 33 and 34:
Chapter 1: Server Alarms During nor
- Page 35 and 36:
Background Terms ● MINOR alarms i
- Page 37 and 38:
Alarms in Linux Servers Note: Note:
- Page 39 and 40:
● DAJ1/DAL1/DAL2 (Duplication Mem
- Page 41 and 42:
Table 5: ARB Alarms 1 of 10 Event I
- Page 43 and 44:
Table 5: ARB Alarms 3 of 10 Event I
- Page 45 and 46:
Table 5: ARB Alarms 5 of 10 Event I
- Page 47 and 48:
Table 5: ARB Alarms 7 of 10 Event I
- Page 49 and 50:
Table 5: ARB Alarms 9 of 10 Event I
- Page 51 and 52:
CMG (Common Media Gateway) See Medi
- Page 53 and 54:
Table 6: DAJ1/DAL1/DAL2 Alarms 2 of
- Page 55 and 56:
Table 7: testdupboard command synta
- Page 57 and 58:
Duplication Memory Board Local Loop
- Page 59 and 60:
Table 10: DUP Alarms 2 of 4 Event I
- Page 61 and 62:
Table 10: DUP Alarms 4 of 4 Event I
- Page 63 and 64:
Table 11: ENV Alarms 2 of 14 Event
- Page 65 and 66:
Table 11: ENV Alarms 4 of 14 Event
- Page 67 and 68:
Table 11: ENV Alarms 6 of 14 Event
- Page 69 and 70:
Table 11: ENV Alarms 8 of 14 Event
- Page 71 and 72:
Table 11: ENV Alarms 10 of 14 Event
- Page 73 and 74:
Table 11: ENV Alarms 12 of 14 Event
- Page 75 and 76:
Table 11: ENV Alarms 14 of 14 Event
- Page 77 and 78:
Table 12: ESS Alarms 2 of 2 Event I
- Page 79 and 80:
GAM (Global Alarm Manager) GAM (Glo
- Page 81 and 82:
Server Type Hard Disk Drive Alarm T
- Page 83 and 84:
Table 17: S8400 Hard Disk Drive Ala
- Page 85 and 86:
Table 18: S8730 Hard Disk Drive Ala
- Page 87 and 88:
Table 19: SMART Alarms 3 of 5 Event
- Page 89 and 90:
Table 19: SMART Alarms 5 of 5 Event
- Page 91 and 92:
Login Alarms Login Alarms The syste
- Page 93 and 94:
Table 22: S8300 Login Alarms 2 of 2
- Page 95 and 96:
NIC (Network Interface Card) NIC (N
- Page 97 and 98:
Table 26: RMB Alarms in the S8500 S
- Page 99 and 100:
Table 26: RMB Alarms in the S8500 S
- Page 101 and 102:
SME (Server Maintenance Engine) SME
- Page 103 and 104:
SVC_MON (Service Monitor) SVC_MON (
- Page 105 and 106:
Table 30: SVC_MON Alarms 3 of 8 Eve
- Page 107 and 108:
Table 30: SVC_MON Alarms 5 of 8 Eve
- Page 109 and 110:
Table 30: SVC_MON Alarms 7 of 8 Eve
- Page 111 and 112:
_TM (Translation Manager) _TM (Tran
- Page 113 and 114:
UPG (Upgrade) UPG (Upgrade) The UPG
- Page 115 and 116:
Table 34: Enterprise-Specific UPS T
- Page 117 and 118:
UPS Alarms to the Server UPS (Unint
- Page 119 and 120:
Table 35: UPS Alarms 3 of 3 Event I
- Page 121 and 122:
Table 37: testmodem command usage U
- Page 123 and 124:
Table 39: Off-Hook Test 2 of 2 Erro
- Page 125 and 126:
_WD (Watchdog) The Watchdog is a se
- Page 127 and 128:
Table 41: _WD Alarms 2 of 16 Event
- Page 129 and 130:
Table 41: _WD Alarms 4 of 16 Event
- Page 131 and 132:
Table 41: _WD Alarms 6 of 16 Event
- Page 133 and 134:
Table 41: _WD Alarms 8 of 16 Event
- Page 135 and 136:
Table 41: _WD Alarms 10 of 16 Event
- Page 137 and 138:
Table 41: _WD Alarms 12 of 16 Event
- Page 139 and 140:
Table 41: _WD Alarms 14 of 16 Event
- Page 141 and 142:
Table 41: _WD Alarms 16 of 16 Event
- Page 143 and 144:
3. Use the descriptions in Table 42
- Page 145 and 146:
Chapter 2: Denial Events The follow
- Page 147 and 148:
Table 44: Acronyms 3 of 4 Acronym M
- Page 149 and 150:
Event Type number ranges Event Type
- Page 151 and 152:
Cause Values and their meanings/int
- Page 153 and 154:
. Event Data See Table 56: ISDN, IP
- Page 155 and 156:
Table 50: Country Codes and Transmi
- Page 157 and 158:
Table 51: Cause Value Classes and R
- Page 159 and 160:
Troubleshooting Cause Value 03 Even
- Page 161 and 162:
Cause Value 05 Event Data - AAR/ARS
- Page 163 and 164:
Troubleshooting Wait and try the ca
- Page 165 and 166:
Cause Value 18 Event Data ● Check
- Page 167 and 168:
Cause Value 23 [0x17/0x97] - Redire
- Page 169 and 170:
Troubleshooting Cause Value 30 Even
- Page 171 and 172:
Troubleshooting Cause Value 35 Even
- Page 173 and 174:
This Cause Value is usually deliver
- Page 175 and 176:
Cause Value 50 Event Data [0x32/0xB
- Page 177 and 178:
Cause Value 56 Event Data [0x38/0xB
- Page 179 and 180:
Cause Value 59 Event Data [0x3B/0xB
- Page 181 and 182:
Service or Option not Implemented C
- Page 183 and 184:
Cause Value 70 Event Data [0x46/0xC
- Page 185 and 186:
Cause Value 83 Event Data ● Commu
- Page 187 and 188:
Cause Value 89 Event Data - A data
- Page 189 and 190:
Troubleshooting Event Data ● Chec
- Page 191 and 192:
This Cause Value has local signific
- Page 193 and 194:
Cause Value 99 Event Data Problems
- Page 195 and 196:
Cause Value 102 Event Data ● Call
- Page 197 and 198:
Event Data ● the far end never sa
- Page 199 and 200:
Event Data Cause Value 111 (NI-2) i
- Page 201 and 202:
Table 55: Call Process denial event
- Page 203 and 204:
Table 55: Call Process denial event
- Page 205 and 206:
Table 55: Call Process denial event
- Page 207 and 208:
Table 55: Call Process denial event
- Page 209 and 210:
Table 55: Call Process denial event
- Page 211 and 212:
Table 55: Call Process denial event
- Page 213 and 214:
Table 56: ISDN, IP, and SIP-generat
- Page 215 and 216:
Table 56: ISDN, IP, and SIP-generat
- Page 217 and 218:
Table 57: Call Process denial event
- Page 219 and 220:
Table 57: Call Process denial event
- Page 221 and 222:
Table 57: Call Process denial event
- Page 223 and 224:
Table 57: Call Process denial event
- Page 225 and 226:
Table 57: Call Process denial event
- Page 227 and 228:
Table 57: Call Process denial event
- Page 229 and 230:
Table 57: Call Process denial event
- Page 231 and 232:
Table 57: Call Process denial event
- Page 233 and 234:
Table 57: Call Process denial event
- Page 235 and 236:
Table 57: Call Process denial event
- Page 237 and 238:
Table 57: Call Process denial event
- Page 239 and 240:
Table 57: Call Process denial event
- Page 241 and 242:
Table 57: Call Process denial event
- Page 243 and 244:
Table 57: Call Process denial event
- Page 245 and 246:
Table 57: Call Process denial event
- Page 247 and 248:
Table 57: Call Process denial event
- Page 249 and 250:
Table 57: Call Process denial event
- Page 251 and 252:
Table 59: IP Denial Events (1907 -
- Page 253 and 254:
Table 59: IP Denial Events (1907 -
- Page 255 and 256:
Table 59: IP Denial Events (1907 -
- Page 257 and 258:
Table 59: IP Denial Events (1907 -
- Page 259 and 260:
Table 59: IP Denial Events (1907 -
- Page 261 and 262:
Table 60: Call Process denial event
- Page 263 and 264:
Table 60: Call Process denial event
- Page 265 and 266:
Table 60: Call Process denial event
- Page 267 and 268:
Table 60: Call Process denial event
- Page 269 and 270:
Table 60: Call Process denial event
- Page 271 and 272:
Table 60: Call Process denial event
- Page 273 and 274:
Table 60: Call Process denial event
- Page 275 and 276:
Table 60: Call Process denial event
- Page 277 and 278:
Table 60: Call Process denial event
- Page 279 and 280:
Connection Manager Denial Events De
- Page 281 and 282:
Table 61: Connection Manager denial
- Page 283 and 284:
Dial Plan Manager Denial Events Den
- Page 285 and 286:
Table 65: Meet Me Conference denial
- Page 287 and 288:
Table 67: Data Error denial events
- Page 289 and 290:
ESS Denial Events ESS-generated den
- Page 291 and 292:
Chapter 3: LEDs LEDs are important
- Page 293 and 294:
Circuit Pack LEDs After a circuit p
- Page 295 and 296:
Circuit Pack LEDs The second group
- Page 297 and 298:
Figure 2: TN767/TN464 LEDs Circuit
- Page 299 and 300:
Table 75: TN767/TN464 circuit pack
- Page 301 and 302:
Circuit Pack LEDs The yellow LED in
- Page 303 and 304:
Circuit Pack LEDs The yellow LED in
- Page 305 and 306:
Circuit Pack LEDs Table 78: Switch
- Page 307 and 308:
Avaya Ethernet Switch LEDs Avaya Et
- Page 309 and 310:
IPSI LEDs IPSI LEDs There are four
- Page 311 and 312:
Figure 8: IPSI Board Display using
- Page 313 and 314:
Figure 10: TN2501AP faceplate LEDs
- Page 315 and 316:
Table 81: TN2501AP LEDs 2 of 2 LED
- Page 317 and 318:
Duplication Memory Board LEDs LED i
- Page 319 and 320:
Duplication Memory Board LEDs ● L
- Page 321 and 322:
Figure 14: S8300/S8300B Server S830
- Page 323 and 324:
S8300 LED lighting sequence S8300/S
- Page 325 and 326:
S8500 Server LEDs S8500 Server LEDs
- Page 327 and 328:
Figure 17: S8500C Server (front) Fi
- Page 329 and 330:
S8700 Server LEDs During the test,
- Page 331 and 332:
Figure 20: LEDs on front panel of t
- Page 333 and 334:
Figure 21: LEDs on back panel of S8
- Page 335 and 336:
1. DVD/CD-ROM Drive 2. Video connec
- Page 337 and 338:
Figure 24: S8730 Systems Insight Di
- Page 339 and 340:
Figure 25: S8730 Server Rear Panel
- Page 341 and 342:
Table 90: Hard Drive LED Combinatio
- Page 343 and 344:
MM710 E1/T1 Media Module LEDs The M
- Page 345 and 346:
MM314 LAN Media Module LEDs MM314 A
- Page 347 and 348:
MM340 E1/T1 Data WAN Media Module L
- Page 349 and 350:
G250-Analog Figure 27: G250-Analog
- Page 351 and 352:
Analog Port LEDs The analog ports a
- Page 353 and 354:
DCP Port LEDs These LEDS represent
- Page 355 and 356:
G350 LEDs Follow the links in the F
- Page 357 and 358:
See Table 3.1: Avaya P333T LED Desc
- Page 359 and 360:
G700 Front panel LEDs G700 LEDs The
- Page 361 and 362:
Red ALM or Alarm LED G700 LEDs The
- Page 363 and 364:
Table 94: LED Definitions 2 of 2 No
- Page 365 and 366:
Chapter 4: Media Gateway Traps This
- Page 367 and 368:
Add INADS Phone Numbers and Enable
- Page 369 and 370:
G250/G350 Traps This command is use
- Page 371 and 372:
Table 97: G250/G350 pre-configured
- Page 373 and 374:
Table 98: G250/G350 Traps and Resol
- Page 375 and 376:
Table 98: G250/G350 Traps and Resol
- Page 377 and 378:
Table 98: G250/G350 Traps and Resol
- Page 379 and 380:
Table 98: G250/G350 Traps and Resol
- Page 381 and 382:
Table 98: G250/G350 Traps and Resol
- Page 383 and 384:
Table 98: G250/G350 Traps and Resol
- Page 385 and 386:
Table 98: G250/G350 Traps and Resol
- Page 387 and 388:
G700 Traps Configure the G700 to se
- Page 389 and 390:
G700 Traps resolution procedures in
- Page 391 and 392:
Table 99: Media Gateway Traps and R
- Page 393 and 394:
Table 99: Media Gateway Traps and R
- Page 395 and 396:
Table 99: Media Gateway Traps and R
- Page 397 and 398:
Table 99: Media Gateway Traps and R
- Page 399 and 400:
Table 99: Media Gateway Traps and R
- Page 401 and 402:
Table 99: Media Gateway Traps and R
- Page 403 and 404:
Table 99: Media Gateway Traps and R
- Page 405 and 406:
Table 99: Media Gateway Traps and R
- Page 407 and 408:
Table 99: Media Gateway Traps and R
- Page 409 and 410:
Table 99: Media Gateway Traps and R
- Page 411 and 412:
Chapter 5: Communication Manager Ma
- Page 413 and 414:
G700 Subsystems Displaying MOs Main
- Page 415 and 416:
Table 101: Media Module Types 2 of
- Page 417 and 418:
Abort Code 1412 ● Off-Board probl
- Page 419 and 420:
4. G650 MGs have power supply in sl
- Page 421 and 422:
AC-POWER AC Power for AC-Powered Sy
- Page 423 and 424:
Note: The Note: following tests app
- Page 425 and 426:
Demand test descriptions and error
- Page 427 and 428:
ADJ-IP (ASAI Adjunct TCP/IP Link) c
- Page 429 and 430:
Table 107: Administered Connection
- Page 431 and 432:
ADX8D-BD (AUDIX Circuit Pack) ADX8D
- Page 433 and 434:
Table 108: ADX8D-PT Error Log Entri
- Page 435 and 436:
ADX8D-RS (AUDIX Reserve Slots) See
- Page 437 and 438:
ADX16A-P (AUDIX Analog Line/Control
- Page 439 and 440:
ADX16A-P (AUDIX Analog Line/Control
- Page 441 and 442:
ADX16D-P (16-Port AUDIX Digital Por
- Page 443 and 444:
ADX16D-P (16-Port AUDIX Digital Por
- Page 445 and 446:
AESV-LNK (AE Services Link) MO Name
- Page 447 and 448:
Aux Data Description AESV-LNK (AE S
- Page 449 and 450:
AESV-SES (AE Services Session) Link
- Page 451 and 452:
Demand test descriptions and error
- Page 453 and 454:
Table 114: AN-LN-PT Error log entri
- Page 455 and 456:
Demand test descriptions and error
- Page 457 and 458:
Ringing Caused by Maintenance Testi
- Page 459 and 460:
Demand test descriptions and error
- Page 461 and 462:
ANL-LINE (8-Port Analog Line) MO Na
- Page 463 and 464:
ANL-LINE (8-Port Analog Line) a low
- Page 465 and 466:
ANN-BD (Announcement circuit pack)
- Page 467 and 468:
ANN-BD (Announcement circuit pack)
- Page 469 and 470:
ANN-BD (Announcement circuit pack)
- Page 471 and 472:
WARNING: Reseating ANN-BD (Announce
- Page 473 and 474:
Order of investigation Short Test S
- Page 475 and 476:
Error log entries and recommended a
- Page 477 and 478:
ANNOUNCE (Announcement) ANNOUNCE (A
- Page 479 and 480:
Table 120: Aux data error codes and
- Page 481 and 482:
ASAI-BD (Multi-Application Platform
- Page 483 and 484:
Table 121: ASAI-EPT Error Log Entri
- Page 485 and 486:
ASAI-EPT (ASAI Endpoint) g. Error T
- Page 487 and 488:
Table 122: ASAI cause values 2 of 2
- Page 489 and 490:
ASAI-PT (ASAI Port) ASAI-PT (ASAI P
- Page 491 and 492:
ASAI-PT (ASAI Port) d. Error Type 1
- Page 493 and 494:
ATM-BCH (ATM B-Channel Trunk) ATM-B
- Page 495 and 496:
B-Channel Alarms ATM-BCH (ATM B-Cha
- Page 497 and 498:
ATM-BCH (ATM B-Channel Trunk) ● O
- Page 499 and 500:
Demand test descriptions and error
- Page 501 and 502:
Error log entries and recommended a
- Page 503 and 504:
LEDs The ATM Interface circuit pack
- Page 505 and 506:
Critical Reliability ATM-EI (Expans
- Page 507 and 508:
B-side ATM-EI—Critical Reliabilit
- Page 509 and 510:
Table 130: ATM-EI Error Log Entries
- Page 511 and 512:
● Some other ATM-EI board is not
- Page 513 and 514:
Table 131: ATM Error Types 1024 - 1
- Page 515 and 516:
Table 133: Error type 1281 Aux Data
- Page 517 and 518:
Table 133: Error type 1281 Aux Data
- Page 519 and 520:
CAUTION: If CAUTION: If ATM-EI (Exp
- Page 521 and 522:
ATM-EI (Expansion Interface Circuit
- Page 523 and 524:
ATM-INTF (ATM Interface) Notes: a.
- Page 525 and 526:
If ATM-NTWK receives more than 6 er
- Page 527 and 528:
Table 136: Error codes and Aux Data
- Page 529 and 530:
Table 136: Error codes and Aux Data
- Page 531 and 532:
ATM-NTWK (ATM Network Error) Notes:
- Page 533 and 534:
ATM-NTWK (ATM Network Error) Possib
- Page 535 and 536:
ATM PNC-DUP (ATM PNC Duplication) S
- Page 537 and 538:
Enabling and Removing PNC Duplicati
- Page 539 and 540:
PNC State-of-Health Indexes ATM PNC
- Page 541 and 542:
PNC Interchanges ATM PNC-DUP (ATM P
- Page 543 and 544:
● The global refresh from releasi
- Page 545 and 546:
Table 141: Error Log Encode Field D
- Page 547 and 548:
Error log entries and recommended a
- Page 549 and 550:
ATM-SGRP (ATM Signaling Group) g. E
- Page 551 and 552:
3890 A request to use a network ser
- Page 553 and 554:
3928 A call was denied because of a
- Page 555 and 556:
Stratum 4 Synchronization ATM-SYNC
- Page 557 and 558:
ATM-SYNC Commands ATM-SYNC (ATM Syn
- Page 559 and 560:
ATM-SYNC (ATM Synchronization) 2. T
- Page 561 and 562:
LEDs Virtual D-Channels ATM-TRK (Ci
- Page 563 and 564:
Table 150: ATM-TRK Error Log entrie
- Page 565 and 566:
ATM-TRK (Circuit Emulation Service
- Page 567 and 568:
Table 151: Error type 1281 Aux Data
- Page 569 and 570:
ATM-TRK (Circuit Emulation Service
- Page 571 and 572:
If Then There are no packet bus ala
- Page 573 and 574:
Order of Investigation Short Test S
- Page 575 and 576:
ATTE-AJ (Ethernet Avaya Adjunct) Se
- Page 577 and 578:
AUX-TRK (Auxiliary Trunk) AUX-TRK (
- Page 579 and 580:
Table 152: AUX-TRK Error Log Entrie
- Page 581 and 582:
AXA12-BD (AUDIX Circuit Pack) MO Na
- Page 583 and 584:
AXD12-BD (AUDIX circuit pack) MO Na
- Page 585 and 586:
BRI-BD (ISDN-BRI Line Circuit Pack)
- Page 587 and 588:
BRI-BD (ISDN-BRI Line Circuit Pack)
- Page 589 and 590:
BRI-BD (ISDN-BRI Line Circuit Pack)
- Page 591 and 592:
BRI-PORT (ISDN-BRI Port) MO Name in
- Page 593 and 594:
Figure 39: ISDN-BRI Port Interactio
- Page 595 and 596:
BRI-PORT (ISDN-BRI Port) ● 40988
- Page 597 and 598:
Order of Investigation Short Test S
- Page 599 and 600:
BRI-SET, Various Adjuncts context,
- Page 601 and 602:
Table 155: BRI-SET/Adjunct Error Lo
- Page 603 and 604:
BRI-SET, Various Adjuncts e. Error
- Page 605 and 606:
BRI-SET, Various Adjuncts Table 156
- Page 607 and 608:
BRI-SET, Various Adjuncts Table 157
- Page 609 and 610:
Table 158: SPID Facility Test Test
- Page 611 and 612:
CAB-CALM (Customer alarm) G650 MO N
- Page 613 and 614:
Error log entries and recommended a
- Page 615 and 616:
Table 161: CAB-MTCE Error Log Entri
- Page 617 and 618:
Demand test descriptions and error
- Page 619 and 620:
Table 163: CAB-TEMP Error Log Entri
- Page 621 and 622:
Variable-Speed Fans A variable-spee
- Page 623 and 624:
Note: An CABINET (Cabinet Sensors)
- Page 625 and 626:
CMC1 Order of Investigation Short T
- Page 627 and 628:
Cycling Power Supplies CARR-POW (Ca
- Page 629 and 630:
Figure 42: Battery Charger (Optiona
- Page 631 and 632:
J58890CH-1 CARR-POW (Carrier Power
- Page 633 and 634:
Figure 46: Small Battery Assembly F
- Page 635 and 636:
Figure 48: Typical Multicarrier Cab
- Page 637 and 638:
Demand test descriptions and error
- Page 639 and 640:
CLAN-BD (Control LAN Circuit Pack)
- Page 641 and 642:
Error log entries and recommended a
- Page 643 and 644:
CLAN-BD (Control LAN Circuit Pack)
- Page 645 and 646:
CLAN-BD (Control LAN Circuit Pack)
- Page 647 and 648:
CLAN-BD (Control LAN Circuit Pack)
- Page 649 and 650:
CLSFY-PT (Call Classifier Port) CLS
- Page 651 and 652:
CO-BD (Central Office Trunk Circuit
- Page 653 and 654:
CO-DS1 (DS1 CO Trunk) The DS1 Inter
- Page 655 and 656:
CO-DS1 (DS1 CO Trunk) i. Error Type
- Page 657 and 658:
Interactions between switch and CO
- Page 659 and 660:
Error log entries and recommended a
- Page 661 and 662:
CO-TRK (Analog CO Trunk) Call Seizu
- Page 663 and 664:
Demand test descriptions and error
- Page 665 and 666:
CONFIG (System Configuration) Type
- Page 667 and 668:
CONFIG (System Configuration) Table
- Page 669 and 670:
CONFIG (System Configuration) Table
- Page 671 and 672:
DAT-LINE (Data Line Port) DAT-LINE
- Page 673 and 674:
Demand test descriptions and error
- Page 675 and 676:
DC-POWER (Single-Carrier Cabinet En
- Page 677 and 678:
DID-BD (Direct Inward Dial Trunk Ci
- Page 679 and 680:
Error log entries and recommended a
- Page 681 and 682:
Demand test descriptions and error
- Page 683 and 684:
DID Trunk Testing DID-TRK (Direct I
- Page 685 and 686:
DID-TRK (Direct Inward Dial Trunk)
- Page 687 and 688:
DIG-BD (Digital Line Circuit Pack)
- Page 689 and 690:
Table 179: DIG-IP-S Error Log Entri
- Page 691 and 692:
DIG-LINE (Digital Line) DIG-LINE (D
- Page 693 and 694:
DIG-LINE (Digital Line) Only 2-wire
- Page 695 and 696:
Programmable Terminals The followin
- Page 697 and 698:
Audits DIG-LINE (Digital Line) As p
- Page 699 and 700:
Table 182: DIG-LINE Error Log Entri
- Page 701 and 702:
DIG-LINE (Digital Line) k. Error Ty
- Page 703 and 704:
DIG-RES (TN800 reserve slot) See AS
- Page 705 and 706:
DIOD-DS1 (DS1 DIOD Trunk) DIOD-DS1
- Page 707 and 708:
Table 183: DIOD-DS1 Error Log Entri
- Page 709 and 710:
Demand test descriptions and error
- Page 711 and 712:
Incoming Call 1. CO Applies Ringing
- Page 713 and 714:
DIOD-TRK (DIOD Trunk) e. Error Type
- Page 715 and 716:
Daily Maintenance Interference DLY-
- Page 717 and 718:
DS1-BD (DS1 Interface Circuit Pack)
- Page 719 and 720:
Figure 52: High-Level Overview Of L
- Page 721 and 722:
Table 187: DS1-BD Error Log Entries
- Page 723 and 724:
DS1-BD (DS1 Interface Circuit Pack)
- Page 725 and 726:
DS1-BD (DS1 Interface Circuit Pack)
- Page 727 and 728:
Order of Investigation Short Test S
- Page 729 and 730:
DS1-FAC (DS1 Facility) The DS1 conv
- Page 731 and 732:
DS1-FAC (DS1 Facility) For a critic
- Page 733 and 734:
Table 188: DS1 Interface Options ad
- Page 735 and 736:
Table 189: DS1 Facility Line Signal
- Page 737 and 738:
DS1-FAC (DS1 Facility) Notes: When
- Page 739 and 740:
DS1-FAC (DS1 Facility) external-loo
- Page 741 and 742:
DS1-FAC (DS1 Facility) facility is
- Page 743 and 744:
Figure 54: DS1 Facility Connections
- Page 745 and 746:
DS1C-BD (DS1 Converter Circuit Pack
- Page 747 and 748:
Figure 57: DS1 converter Complex in
- Page 749 and 750:
DS1C-BD (DS1 Converter Circuit Pack
- Page 751 and 752:
Clear Firmware-Counters Command DS1
- Page 753 and 754:
Replacing a DS1 Converter Circuit P
- Page 755 and 756:
Upgrading TN574 DS1 Converter Circu
- Page 757 and 758:
DS1C-BD (DS1 Converter Circuit Pack
- Page 759 and 760:
Table 192: Convert from DS1-CONV to
- Page 761 and 762:
Table 193: Removing Fiber Connectiv
- Page 763 and 764:
Error log entries and recommended a
- Page 765 and 766:
DS1C-BD (DS1 Converter Circuit Pack
- Page 767 and 768:
DS1C-BD (DS1 Converter Circuit Pack
- Page 769 and 770:
Demand test descriptions and error
- Page 771 and 772:
DTMR-PT (Dual-Tone Multifrequency R
- Page 773 and 774:
Demand test descriptions and error
- Page 775 and 776:
E-DIG-ST (Emulated Digital Line) E-
- Page 777 and 778:
Demand test descriptions and error
- Page 779 and 780:
Table 198: EMG-XFER Error Log Entri
- Page 781 and 782:
EPN-SNTY (PN Sanity Audit) EPN-SNTY
- Page 783 and 784:
ERR-LOG (Error Log) ERR-LOG (Error
- Page 785 and 786:
Table 200: ESS Error Log Entries 2
- Page 787 and 788:
CAUTION: In ESS (Enterprise Surviva
- Page 789 and 790:
ESS (Enterprise Survivable Server)
- Page 791 and 792:
ETH-PT (Control LAN Ethernet) ETH-P
- Page 793 and 794:
. d. Error Type 769: Port received
- Page 795 and 796:
ETR-PT (Enhanced Tone Receiver Port
- Page 797 and 798:
ETR-PT (Enhanced Tone Receiver Port
- Page 799 and 800:
EXP-INTF (Expansion Interface Circu
- Page 801 and 802:
EXP-INTF (Expansion Interface Circu
- Page 803 and 804:
Figure 63: Center Stage Switch Conf
- Page 805 and 806:
Survivable Remote EPN EXP-INTF (Exp
- Page 807 and 808:
EXP-INTF (Expansion Interface Circu
- Page 809 and 810:
EXP-INTF (Expansion Interface Circu
- Page 811 and 812:
CAUTION: Before EXP-INTF (Expansion
- Page 813 and 814:
Replacing an EI Circuit Pack—Undu
- Page 815 and 816:
Note: The Note: Make EXP-INTF (Expa
- Page 817 and 818:
Table 205: EXP-INTF Error Log Entri
- Page 819 and 820:
EXP-INTF (Expansion Interface Circu
- Page 821 and 822:
EXP-INTF (Expansion Interface Circu
- Page 823 and 824:
EXP-PN (Expansion Port Network) S87
- Page 825 and 826:
Error log entries and recommended a
- Page 827 and 828:
EXT-DEV (External Device Alarm) G65
- Page 829 and 830:
EXT-DEV ADMIN? N (External Device A
- Page 831 and 832:
EXT-DEV ADMIN? Y (External Device A
- Page 833 and 834:
FIBER-LK (Fiber Link) MO Name in Lo
- Page 835 and 836:
Table 212: Expansion Interface Circ
- Page 837 and 838:
FIBER-LK (Fiber Link) c. Error Type
- Page 839 and 840:
Table 218: Tests Run for an SNI-to-
- Page 841 and 842:
Table 219: FW-DWNLD Error Log Entri
- Page 843 and 844:
Table 221: Aux Data for Error Type
- Page 845 and 846:
Table 221: Aux Data for Error Type
- Page 847 and 848:
FW-DWNLD (Firmware Download) c. Err
- Page 849 and 850:
Table 223: Error Type 513 Aux Data
- Page 851 and 852:
Downloading firmware to DCP station
- Page 853 and 854:
Schedule the download FW-STDL (Firm
- Page 855 and 856:
Table 224: FW-STDL Error Log entrie
- Page 857 and 858:
Table 226: Error Type 513 Aux Data
- Page 859 and 860:
Table 228: Reason Codes for status
- Page 861 and 862:
GPTD-PT (General-Purpose Tone Detec
- Page 863 and 864:
System Commands The following comma
- Page 865 and 866:
Table 231: H323-SGR Error Log Entri
- Page 867 and 868:
H323-SGR (H.323 Signaling Group) Ta
- Page 869 and 870:
H323-SGR (H.323 Signaling Group) Ta
- Page 871 and 872:
H323-STN (H.323 IP Station) H323-ST
- Page 873 and 874:
HYB-BD (Hybrid Line Circuit Pack) S
- Page 875 and 876:
Table 234: HYB-LINE Error Log Entri
- Page 877 and 878:
Order of Investigation Short Test S
- Page 879 and 880:
INADS (INADS Link) ● If the initi
- Page 881 and 882:
Table 235: INADS Link Test Error Lo
- Page 883 and 884:
IPMEDPRO (TN2302 IP Media Processor
- Page 885 and 886:
Table 236: TN2302 IPMEDPRO Error Lo
- Page 887 and 888:
IPMEDPRO (TN2302 IP Media Processor
- Page 889 and 890:
IPMEDPRO (TN2602AP IP Media Resourc
- Page 891 and 892:
Table 237: TN2602AP IPMEDPRO Error
- Page 893 and 894:
IPMEDPRO (TN2602AP IP Media Resourc
- Page 895 and 896:
IPMEDPRO (TN2602AP IP Media Resourc
- Page 897 and 898:
IPSV-CTL (IP Server Interface Contr
- Page 899 and 900:
Table 239: IPSI A is Active Functio
- Page 901 and 902:
IPSV-CTL (IP Server Interface Contr
- Page 903 and 904:
Error Log Entries IPSV-CTL (IP Serv
- Page 905 and 906:
IPSI Interchange (Duplicated IPSIs)
- Page 907 and 908:
IP-SVR (IP Server Interface) S8700
- Page 909 and 910:
TN2312AP IP Server Interface (IPSI)
- Page 911 and 912:
IP-SVR (IP Server Interface) The TN
- Page 913 and 914:
IPSI Circuit Pack Faceplate IP-SVR
- Page 915 and 916:
4-Character LED IP-SVR (IP Server I
- Page 917 and 918: ISDN-PLK (ISDN-PRI Signaling Link P
- Page 919 and 920: Demand test descriptions and error
- Page 921 and 922: ISDN-SGR (ISDN-PRI Signaling Group)
- Page 923 and 924: ISDN-SGR (ISDN-PRI Signaling Group)
- Page 925 and 926: 3878 The far-end switch has indicat
- Page 927 and 928: ISDN-SGR (ISDN-PRI Signaling Group)
- Page 929 and 930: ISDN-TRK (DS1 ISDN Trunk) On 24-cha
- Page 931 and 932: ISDN-TRK (DS1 ISDN Trunk) ● Maint
- Page 933 and 934: ISDN-PRI Trunk Service States ISDN-
- Page 935 and 936: Table 255: ISDN-TRK Error Log Entri
- Page 937 and 938: The meanings of Aux Data values are
- Page 939 and 940: JNL-PRNT (Journal Printer Link) MO
- Page 941 and 942: LGATE-BD (ISDN-BRI Line Circuit Pac
- Page 943 and 944: LIC-ERR (License Error Mode) LIC-ER
- Page 945 and 946: Error Type Aux Data Associated Test
- Page 947 and 948: Troubleshooting License File errors
- Page 949 and 950: Initialization and Periodic Checkin
- Page 951 and 952: LOG-SVN (Login Security Violation)
- Page 953 and 954: MAINT (PN Maintenance Circuit Pack)
- Page 955 and 956: TN775D Maintenance Circuit Pack Use
- Page 957 and 958: Demand test descriptions and error
- Page 959 and 960: MAPD-BD (MAPD Interface Circuit Pac
- Page 961 and 962: Figure 72: TN802 faceplate Figure n
- Page 963 and 964: MAPD-BD (MAPD Interface Circuit Pac
- Page 965 and 966: MAPD-BD (MAPD Interface Circuit Pac
- Page 967: Figure 75: TN802 board assembly and
- Page 971 and 972: MAPD-BD (MAPD Interface Circuit Pac
- Page 973 and 974: MAPD-BD (MAPD Interface Circuit Pac
- Page 975 and 976: Figure 77: TN802 faceplate Figure n
- Page 977 and 978: Demand test descriptions and error
- Page 979 and 980: Error log entries and recommended a
- Page 981 and 982: MEDPRO (Media Processor MAPD Circui
- Page 983 and 984: Table 271: MEDPRO-C Error Log Entri
- Page 985 and 986: MEDPRO-C (Media Processor Control)
- Page 987 and 988: Error log entries and recommended a
- Page 989 and 990: MED-GTWY (MEDIA GATEWAY) MED-GTWY (
- Page 991 and 992: MET-BD (MET Line Circuit Pack) MET-
- Page 993 and 994: Table 275: MET-LINE Error Log Entri
- Page 995 and 996: Order of Investigation Short Test S
- Page 997 and 998: Table 276: MG-ANA Error Log Entries
- Page 999 and 1000: MG-ANN (Voice Announcements) MG-ANN
- Page 1001 and 1002: Table 278: MG-BRI Error Log Entries
- Page 1003 and 1004: MG-DCP (Digital Line Media Module)
- Page 1005 and 1006: MG-DCP (Digital Line Media Module)
- Page 1007 and 1008: Table 280: MG-DS1 Error Log Entries
- Page 1009 and 1010: ● Be administered using the add d
- Page 1011 and 1012: ● The tests run on the ports of t
- Page 1013 and 1014: MG-IAMM (Integrated Analog Media Mo
- Page 1015 and 1016: MG-IAMM (Integrated Analog Media Mo
- Page 1017 and 1018: MG-IBRI (Integrated BRI Trunk Media
- Page 1019 and 1020:
MIS (Management Information System)
- Page 1021 and 1022:
Figure 78: TN787 Multimedia Interfa
- Page 1023 and 1024:
Table 284: MMI-BD Error Log Entries
- Page 1025 and 1026:
MMI-LEV (Multimedia Interface Resou
- Page 1027 and 1028:
MMI-PT (Multimedia Interface Port)
- Page 1029 and 1030:
Table 286: MMI-PT Error Log Entries
- Page 1031 and 1032:
MMI-SYNC (MMI Synchronization) MO N
- Page 1033 and 1034:
MODEM-BD (Modem Pool Circuit Pack)
- Page 1035 and 1036:
MODEM-PT (Modem Pool Port) Figure 8
- Page 1037 and 1038:
Troubleshooting Modem-Pool Symptoms
- Page 1039 and 1040:
Demand test descriptions and error
- Page 1041 and 1042:
Error log entries and recommended a
- Page 1043 and 1044:
M/T-BD (Maintenance/Test Circuit Pa
- Page 1045 and 1046:
M/T-BD (Maintenance/Test Circuit Pa
- Page 1047 and 1048:
M/T-DIG (Maintenance/Test Digital P
- Page 1049 and 1050:
Table 291: M/T-DIG Error Log Entrie
- Page 1051 and 1052:
M/T-PKT (Maintenance/Test Packet Bu
- Page 1053 and 1054:
M/T-PKT (Maintenance/Test Packet Bu
- Page 1055 and 1056:
Figure 85: License mode algorithm F
- Page 1057 and 1058:
NO-LIC (No License) g. Error Type 2
- Page 1059 and 1060:
Error log entries and recommended a
- Page 1061 and 1062:
Error log entries and recommended a
- Page 1063 and 1064:
Error log entries and recommended a
- Page 1065 and 1066:
PDMODULE (Processor Data Module) PD
- Page 1067 and 1068:
Configurations and Maintenance PDMO
- Page 1069 and 1070:
Error log entries and recommended a
- Page 1071 and 1072:
PDMODULE (Processor Data Module) k.
- Page 1073 and 1074:
● Use standard ISDN-PRI signaling
- Page 1075 and 1076:
PE-BCHL (PRI Endpoint Port) ports i
- Page 1077 and 1078:
Figure 89: Common Progressions in P
- Page 1079 and 1080:
PE-BCHL (PRI Endpoint Port) e. Erro
- Page 1081 and 1082:
PKT-BUS (Packet Bus) MO Name in Log
- Page 1083 and 1084:
Table 302: PKT-BUS Error Log Entrie
- Page 1085 and 1086:
Demand test descriptions and error
- Page 1087 and 1088:
PKT-INT (Packet Interface) The link
- Page 1089 and 1090:
Executing a PKT-INT Interchange The
- Page 1091 and 1092:
Figure 91: IP-PNC Duplex Reliabilit
- Page 1093 and 1094:
Figure 92: Duplex-Reliability Confi
- Page 1095 and 1096:
Critical-Reliability Configuration
- Page 1097 and 1098:
S8700 | S8710 | S8720 PKT-INT (Pack
- Page 1099 and 1100:
PKT-INT (Packet Interface) For a ca
- Page 1101 and 1102:
PKT-INT (Packet Interface) an out-o
- Page 1103 and 1104:
PKT-INT (Packet Interface) m. Error
- Page 1105 and 1106:
PLAT-ALM (Platform Alarms) PLAT-ALM
- Page 1107 and 1108:
Procedures for Restoring the PMS Li
- Page 1109 and 1110:
PMS-LINK (Property Management Syste
- Page 1111 and 1112:
Demand test descriptions and error
- Page 1113 and 1114:
PMS-PRNT (PMS Printer Link) PMS Pri
- Page 1115 and 1116:
PMS-PRNT (PMS Printer Link) e. Erro
- Page 1117 and 1118:
PNC-DUP Related Commands PNC-DUP (P
- Page 1119 and 1120:
Figure 97: Duplicated PNC with Cent
- Page 1121 and 1122:
PNC-DUP (PNC Duplication) 4. Remove
- Page 1123 and 1124:
PNC-DUP (PNC Duplication) The Inter
- Page 1125 and 1126:
PNC Interchanges PNC-DUP (PNC Dupli
- Page 1127 and 1128:
PNC-DUP (PNC Duplication) 3. At thi
- Page 1129 and 1130:
Error Type PNC-DUP (PNC Duplication
- Page 1131 and 1132:
PNC-DUP (PNC Duplication) m. Error
- Page 1133 and 1134:
PNC-DUP (PNC Duplication) aa. Error
- Page 1135 and 1136:
POWER anything go wrong with the ba
- Page 1137 and 1138:
Error log entries and recommended a
- Page 1139 and 1140:
POW-SUP (Power Supply) G650 MO name
- Page 1141 and 1142:
Error log entries and recommended a
- Page 1143 and 1144:
i. Error Type 1793: operational fai
- Page 1145 and 1146:
Table 310: PPP-PT Error Log Entries
- Page 1147 and 1148:
PPP-PT (Control LAN Packet/Port) j.
- Page 1149 and 1150:
PRI-CDR (Call Detail Recording Link
- Page 1151 and 1152:
PRI-CDR (Call Detail Recording Link
- Page 1153 and 1154:
PS-RGEN (Power Supply Ring Generato
- Page 1155 and 1156:
Demand test descriptions and error
- Page 1157 and 1158:
Table 314: RANL-STA Error Log Entri
- Page 1159 and 1160:
RC-BD (Radio Controller Board) MO N
- Page 1161 and 1162:
RC-BD (Radio Controller Board) 1. R
- Page 1163 and 1164:
RDIG-STA (Remote Digital Station) M
- Page 1165 and 1166:
Nonvolatile Memory RDIG-STA (Remote
- Page 1167 and 1168:
Demand Download Actions RDIG-STA (R
- Page 1169 and 1170:
RDIG-STA (Remote Digital Station) N
- Page 1171 and 1172:
REM-OFF (Remote Office) REM-OFF (Re
- Page 1173 and 1174:
Demand test descriptions and error
- Page 1175 and 1176:
Figure 99: Fan Removal Error log en
- Page 1177 and 1178:
RSCL-PT (Remote Socket Control Link
- Page 1179 and 1180:
S-SYN-PT (Speech Synthesis Port) S-
- Page 1181 and 1182:
Demand test descriptions and error
- Page 1183 and 1184:
SER-BUS (Serial Communication Bus)
- Page 1185 and 1186:
Figure 101: G650 Cabinet Environmen
- Page 1187 and 1188:
SER-BUS (Serial Communication Bus)
- Page 1189 and 1190:
SIP-BCH (SIP B-Channel) SIP-BCH (SI
- Page 1191 and 1192:
Table 324: SIP-SGRP Error Log Entri
- Page 1193 and 1194:
SIP-SGRP (SIP Signaling Group) o. E
- Page 1195 and 1196:
SIP-SGRP (SIP Signaling Group) Tabl
- Page 1197 and 1198:
SIP-SGRP (SIP Signaling Group) Tabl
- Page 1199 and 1200:
SIP-SGRP (SIP Signaling Group) Tabl
- Page 1201 and 1202:
SIP-SGRP (SIP Signaling Group) Tabl
- Page 1203 and 1204:
SN-CONF (Switch Node Configuration)
- Page 1205 and 1206:
SN-CONF (Switch Node Configuration)
- Page 1207 and 1208:
SNC-BD (Switch Node Clock Circuit P
- Page 1209 and 1210:
SNC LEDs SNC-BD (Switch Node Clock
- Page 1211 and 1212:
Error log entries and recommended a
- Page 1213 and 1214:
SNC-BD (Switch Node Clock Circuit P
- Page 1215 and 1216:
Table 328: SNC-LINK Error Log Entri
- Page 1217 and 1218:
SNC-LINK (Switch Node Clock Link) 3
- Page 1219 and 1220:
Table 329: SNC-REF Error Log Entrie
- Page 1221 and 1222:
SNI-BD (SNI Circuit Pack) S8700-ser
- Page 1223 and 1224:
SNI-BD (SNI Circuit Pack) Figure 10
- Page 1225 and 1226:
SNI Administration and SNI Board In
- Page 1227 and 1228:
Replacing an SNI Circuit Pack— Du
- Page 1229 and 1230:
Note: Note Note: Make SNI-BD (SNI C
- Page 1231 and 1232:
Table 331: SNI-BD Error Log Entries
- Page 1233 and 1234:
SNI-BD (SNI Circuit Pack) Procedure
- Page 1235 and 1236:
SNI-PEER (SNI Peer Link) S8700-seri
- Page 1237 and 1238:
Procedure 1 SNI-PEER (SNI Peer Link
- Page 1239 and 1240:
SP-REG-M (Survivable Processor-Main
- Page 1241 and 1242:
SP-REG-S (Survivable Processor) SP-
- Page 1243 and 1244:
STRAT-3 (Stratum-3 Clock) S8700-ser
- Page 1245 and 1246:
Stratum-3 Clock LED Strategy STRAT-
- Page 1247 and 1248:
Error log entries and recommended a
- Page 1249 and 1250:
If the alarm is MAJOR: ● Check co
- Page 1251 and 1252:
SVC-SLOT (Service Slot) SVC-SLOT (S
- Page 1253 and 1254:
SYNC (Port Network Synchronization)
- Page 1255 and 1256:
SYNC (Port Network Synchronization)
- Page 1257 and 1258:
SYNC (Port Network Synchronization)
- Page 1259 and 1260:
Figure 111: Synchronization Trouble
- Page 1261 and 1262:
Figure 113: Synchronization Trouble
- Page 1263 and 1264:
Figure 115: Synchronization Trouble
- Page 1265 and 1266:
Figure 117: Synchronization Trouble
- Page 1267 and 1268:
Figure 119: Synchronization Trouble
- Page 1269 and 1270:
SYNC (Port Network Synchronization)
- Page 1271 and 1272:
SYNC (Port Network Synchronization)
- Page 1273 and 1274:
Notes to Facility Fault Sectionaliz
- Page 1275 and 1276:
SYNC (Port Network Synchronization)
- Page 1277 and 1278:
SYNC (Port Network Synchronization)
- Page 1279 and 1280:
SYNC (Port Network Synchronization)
- Page 1281 and 1282:
SYNC (Port Network Synchronization)
- Page 1283 and 1284:
SYNC (Port Network Synchronization)
- Page 1285 and 1286:
Identifying a System Link SYS-LINK
- Page 1287 and 1288:
SYS-LINK (System Links) b. Error Ty
- Page 1289 and 1290:
SYS-PRNT (System Printer) SYS-PRNT
- Page 1291 and 1292:
The Aux Data field indicates the fo
- Page 1293 and 1294:
Table 347: SYSTEM Error Log Entries
- Page 1295 and 1296:
S8400-BD (S8400 Server) c. Error Ty
- Page 1297 and 1298:
Table 349: TBRI-BD Error Log Entrie
- Page 1299 and 1300:
TBRI-BD (ISDN Trunk-Side BRI Circui
- Page 1301 and 1302:
TBRI-PT (ISDN Trunk-Side BRI Port)
- Page 1303 and 1304:
Table 350: TBRI-PT Error Log Entrie
- Page 1305 and 1306:
TBRI-PT (ISDN Trunk-Side BRI Port)
- Page 1307 and 1308:
Demand test descriptions and error
- Page 1309 and 1310:
Error log entries and recommended a
- Page 1311 and 1312:
TDM-BUS (TDM Bus) Description MO Na
- Page 1313 and 1314:
Procedure 1: Isolating TDM-Bus Faul
- Page 1315 and 1316:
TDM-BUS (TDM Bus) Procedure 3: Remo
- Page 1317 and 1318:
Part 3 TDM-BUS (TDM Bus) Use Part 3
- Page 1319 and 1320:
Part 1 TDM-BUS (TDM Bus) 1. If spar
- Page 1321 and 1322:
Table 353: TDM-BUS Error Log Entrie
- Page 1323 and 1324:
TDM-CLK (TDM Bus Clock) MO Name in
- Page 1325 and 1326:
Table 355: TDM-CLK Error Log Entrie
- Page 1327 and 1328:
TDM-CLK (TDM Bus Clock) h. Error Ty
- Page 1329 and 1330:
TDM-CLK (TDM Bus Clock) c. If not,
- Page 1331 and 1332:
TIE-BD (Tie Trunk Circuit Pack) TIE
- Page 1333 and 1334:
TIE-DS1 (DS1 Tie Trunk) Note: Note:
- Page 1335 and 1336:
TIE-DS1 (DS1 Tie Trunk) b. Error Ty
- Page 1337 and 1338:
Demand test descriptions and error
- Page 1339 and 1340:
TIE-TRK (Analog Tie Trunk) connecti
- Page 1341 and 1342:
Table 359: TIE-TRK Error Log Entrie
- Page 1343 and 1344:
TIE-TRK (Analog Tie Trunk) p. Error
- Page 1345 and 1346:
TONE-BD (Tone-Clock Circuit Pack) T
- Page 1347 and 1348:
Figure 123: S8700 IP-PNC Duplex Rel
- Page 1349 and 1350:
Figure 124: Duplex-Reliability Conf
- Page 1351 and 1352:
Critical Reliability TONE-BD (Tone-
- Page 1353 and 1354:
TONE-BD (Tone-Clock Circuit Pack) I
- Page 1355 and 1356:
Stratum 3 TONE-BD (Tone-Clock Circu
- Page 1357 and 1358:
5. Restart the affected port networ
- Page 1359 and 1360:
CAUTION: If TONE-BD (Tone-Clock Cir
- Page 1361 and 1362:
Table 363: TONE-BD Error Log Entrie
- Page 1363 and 1364:
Note: Replacing TONE-BD (Tone-Clock
- Page 1365 and 1366:
TONE-BD (Tone-Clock Circuit Pack) 2
- Page 1367 and 1368:
TONE-BD (Tone-Clock Circuit Pack) n
- Page 1369 and 1370:
TONE-PT (Tone Generator) TONE-PT (T
- Page 1371 and 1372:
TONE-PT (Tone Generator) g. Error T
- Page 1373 and 1374:
TR-LN-BD (Analog Trunk/Line Board)
- Page 1375 and 1376:
The two maintenance commands for AD
- Page 1377 and 1378:
TTR-LEV (TTR Level) Typical causes
- Page 1379 and 1380:
TTR-LEV (TTR Level) c. Error Type 3
- Page 1381 and 1382:
UDS1-BD (UDS1 Interface Circuit Pac
- Page 1383 and 1384:
UDS1-BD (UDS1 Interface Circuit Pac
- Page 1385 and 1386:
UDS1-BD (UDS1 Interface Circuit Pac
- Page 1387 and 1388:
Table 368: UDS1-BD Error Log Entrie
- Page 1389 and 1390:
Table 368: UDS1-BD Error Log Entrie
- Page 1391 and 1392:
UDS1-BD (UDS1 Interface Circuit Pac
- Page 1393 and 1394:
UDS1-BD (UDS1 Interface Circuit Pac
- Page 1395 and 1396:
UDS1-BD (UDS1 Interface Circuit Pac
- Page 1397 and 1398:
Note: G700: UDS1-BD (UDS1 Interface
- Page 1399 and 1400:
VAL-BD (Voice Announcements over LA
- Page 1401 and 1402:
VAL-BD (Voice Announcements over LA
- Page 1403 and 1404:
Note: 2561-2668 VAL-BD (Voice Annou
- Page 1405 and 1406:
VAL-BD (Voice Announcements over LA
- Page 1407 and 1408:
VAL-PT (Voice Announcements over LA
- Page 1409 and 1410:
3. Clear the alarm (test port locat
- Page 1411 and 1412:
VC-BD (Voice Conditioner Circuit Pa
- Page 1413 and 1414:
VC-DSPPT (Voice Conditioner DSP Por
- Page 1415 and 1416:
VC-LEV (Voice Conditioner Resource
- Page 1417 and 1418:
VC-LEV (Voice Conditioner Resource
- Page 1419 and 1420:
Demand test descriptions and error
- Page 1421 and 1422:
WAE-PORT (Wideband Access Endpoint
- Page 1423 and 1424:
XXX-BD (Common Port Circuit Pack/Me
- Page 1425 and 1426:
Error log entries and recommended a
- Page 1427 and 1428:
XXX-BD (Common Port Circuit Pack/Me
- Page 1429 and 1430:
Chapter 6: Maintenance Demand Tests
- Page 1431 and 1432:
Table 377: Dial Tone Test (#0) 3 of
- Page 1433 and 1434:
CO Port Diagnostic Test (#3) CO Por
- Page 1435 and 1436:
Battery and Power Supply Query Test
- Page 1437 and 1438:
Table 379: Battery and Power Supply
- Page 1439 and 1440:
Table 379: Battery and Power Supply
- Page 1441 and 1442:
Table 379: Battery and Power Supply
- Page 1443 and 1444:
Table 380: NPE Crosstalk Test (#6)
- Page 1445 and 1446:
Table 380: NPE Crosstalk Test (#6)
- Page 1447 and 1448:
Table 380: NPE Crosstalk Test (#6)
- Page 1449 and 1450:
Table 380: NPE Crosstalk Test (#6)
- Page 1451 and 1452:
Table 381: Conference Circuit Test
- Page 1453 and 1454:
Table 381: Conference Circuit Test
- Page 1455 and 1456:
Table 381: Conference Circuit Test
- Page 1457 and 1458:
Table 382: GPP NPE Crosstalk Test (
- Page 1459 and 1460:
Table 382: GPP NPE Crosstalk Test (
- Page 1461 and 1462:
Table 382: GPP NPE Crosstalk Test (
- Page 1463 and 1464:
Digital Line Electronic Power Feed
- Page 1465 and 1466:
Local Loop Test (#13) This test is
- Page 1467 and 1468:
Table 384: Local Loop Test (#13) 3
- Page 1469 and 1470:
Table 384: Local Loop Test (#13) 5
- Page 1471 and 1472:
Table 384: Local Loop Test (#13) 7
- Page 1473 and 1474:
Table 384: Local Loop Test (#13) 9
- Page 1475 and 1476:
Digital Station Audits Test (#17) D
- Page 1477 and 1478:
Table 386: Digital Station Audits T
- Page 1479 and 1480:
Table 386: Digital Station Audits T
- Page 1481 and 1482:
Table 387: Looparound and Conferenc
- Page 1483 and 1484:
Table 387: Looparound and Conferenc
- Page 1485 and 1486:
Table 388: Port Diagnostic Test (#3
- Page 1487 and 1488:
Table 388: Port Diagnostic Test (#3
- Page 1489 and 1490:
● AN-LN-PT (Analog Line Port) ●
- Page 1491 and 1492:
Table 389: Port Audit and Update Te
- Page 1493 and 1494:
Tone Generator Transmission Test (#
- Page 1495 and 1496:
Table 390: Tone Generator Transmiss
- Page 1497 and 1498:
Table 391: Tone Generator Update/Au
- Page 1499 and 1500:
Table 392: Tone Detection Verificat
- Page 1501 and 1502:
Table 393: Tone Detector Audit/Upda
- Page 1503 and 1504:
Table 394: Clock Health Inquiry Tes
- Page 1505 and 1506:
This test is run for ANL-LINE (8-Po
- Page 1507 and 1508:
Table 395: Looparound and Conferenc
- Page 1509 and 1510:
Table 395: Looparound and Conferenc
- Page 1511 and 1512:
Table 396: ONS Ringer Application T
- Page 1513 and 1514:
Table 397: NPE Audit Test (#50) 2 o
- Page 1515 and 1516:
Table 398: Ringing Application Test
- Page 1517 and 1518:
● XXX-BD (Common Port Circuit Pac
- Page 1519 and 1520:
Table 400: SAKI Sanity Test (#53) 2
- Page 1521 and 1522:
Table 401: Analog Electronic Power
- Page 1523 and 1524:
Table 402: Hybrid Circuit and Confe
- Page 1525 and 1526:
Hybrid Line Local Digital Looparoun
- Page 1527 and 1528:
This test is run on HYB-LINE (Hybri
- Page 1529 and 1530:
Table 405: Analog Line Station Lamp
- Page 1531 and 1532:
Table 406: Analog Line Audits Test
- Page 1533 and 1534:
Table 407: Analog Line Ringer Updat
- Page 1535 and 1536:
Table 408: Tie Trunk Seizure Test (
- Page 1537 and 1538:
Table 409: Tie Trunk EPF Test (#74)
- Page 1539 and 1540:
Table 410: RMC Power/Fan Query Test
- Page 1541 and 1542:
Table 411: AC Power Query Test (#78
- Page 1543 and 1544:
Single-Carrier Cabinet Power Query
- Page 1545 and 1546:
● TONE-PT (Tone Generator) Table
- Page 1547 and 1548:
Table 414: Modem Pool NPE Crosstalk
- Page 1549 and 1550:
Modem Pool Conference Test (#97) Mo
- Page 1551 and 1552:
Table 415: Modem Pool Conference Te
- Page 1553 and 1554:
Modem Pool Conversion Resource Loop
- Page 1555 and 1556:
2312 2312 2314 2323 2324 Modem Pool
- Page 1557 and 1558:
Table 416: Modem Pool Conversion Re
- Page 1559 and 1560:
Table 418: Sanity Handshake Test (#
- Page 1561 and 1562:
Auxiliary Trunk Diagnostic Test (#1
- Page 1563 and 1564:
Table 420: Customer-Provided Alarmi
- Page 1565 and 1566:
Table 421: OLS Recycle Test (#116)
- Page 1567 and 1568:
● EMG-XFER (Emergency Transfer)
- Page 1569 and 1570:
Table 423: Ring Generator Query Tes
- Page 1571 and 1572:
External Device Alarm Query Test (#
- Page 1573 and 1574:
Cabinet Temperature Query Test (#12
- Page 1575 and 1576:
Table 425: Cabinet Temperature Quer
- Page 1577 and 1578:
Table 425: Cabinet Temperature Quer
- Page 1579 and 1580:
This test runs on the following mai
- Page 1581 and 1582:
OLS Recycle Test (#126) OLS Recycle
- Page 1583 and 1584:
● CABINET (Cabinet Sensors) ● C
- Page 1585 and 1586:
Table 429: OLS/Power Unit Query Tes
- Page 1587 and 1588:
Table 429: OLS/Power Unit Query Tes
- Page 1589 and 1590:
Table 430: Internal Looparound Test
- Page 1591 and 1592:
DS1 Tie Trunk Seizure Test (#136) D
- Page 1593 and 1594:
Table 431: DS1 Tie Trunk Seizure Te
- Page 1595 and 1596:
Loss of Signal Alarm Inquiry Test (
- Page 1597 and 1598:
Table 432: Loss of Signal Alarm Inq
- Page 1599 and 1600:
Table 432: Loss of Signal Alarm Inq
- Page 1601 and 1602:
Table 432: Loss of Signal Alarm Inq
- Page 1603 and 1604:
Red Alarm Inquiry Test (#140) Since
- Page 1605 and 1606:
Table 434: Red Alarm Inquiry Test (
- Page 1607 and 1608:
Table 435: Yellow Alarm Inquiry Tes
- Page 1609 and 1610:
Minor Alarm Inquiry Test (#143) Min
- Page 1611 and 1612:
Table 438: Slip Alarm Inquiry Test
- Page 1613 and 1614:
Table 439: Misframe Alarm Inquiry T
- Page 1615 and 1616:
Table 441: TDM Bus Clock Circuit St
- Page 1617 and 1618:
TDM Bus Clock Slip Inquiry Test (#1
- Page 1619 and 1620:
● TDM-CLK (TDM Bus Clock) ● TON
- Page 1621 and 1622:
Table 444: TDM Bus Clock Parameter
- Page 1623 and 1624:
Table 445: Analog Looparound Test (
- Page 1625 and 1626:
This test runs on S-SYN-PT (Speech
- Page 1627 and 1628:
Table 448: Speech Synthesis DSP Ton
- Page 1629 and 1630:
Table 449: Speech Synthesis Memory
- Page 1631 and 1632:
Speech Synthesis Parameter Update T
- Page 1633 and 1634:
Table 453: Digital Looparound Test
- Page 1635 and 1636:
Table 453: Digital Looparound Test
- Page 1637 and 1638:
Table 454: Data Module Internal Loo
- Page 1639 and 1640:
Table 454: Data Module Internal Loo
- Page 1641 and 1642:
Playback Speech Memory Array Test (
- Page 1643 and 1644:
Table 456: Playback Speech Memory A
- Page 1645 and 1646:
Table 457: Angel Speech Processor H
- Page 1647 and 1648:
Table 458: Announcement Checksum Te
- Page 1649 and 1650:
Table 459: 140AY Looparound Test (#
- Page 1651 and 1652:
This test runs on ANN-BD (Announcem
- Page 1653 and 1654:
Table 461: Clock Match Inquiry Test
- Page 1655 and 1656:
Link Retry Test (#215) Link Retry T
- Page 1657 and 1658:
Neon Test (#220) another relay conn
- Page 1659 and 1660:
Table 464: Neon Test (#220) 3 of 3
- Page 1661 and 1662:
Table 466: MTP SAT Channel Local Lo
- Page 1663 and 1664:
Table 467: Serial Channel Local Loo
- Page 1665 and 1666:
Expansion Interface Fiber Out-of-Fr
- Page 1667 and 1668:
Expansion Interface Local Looparoun
- Page 1669 and 1670:
Table 470: Expansion Interface Loca
- Page 1671 and 1672:
Expansion Interface 2-Way Transmiss
- Page 1673 and 1674:
Expansion Interface 2-Way Transmiss
- Page 1675 and 1676:
Expansion Interface 2-Way Transmiss
- Page 1677 and 1678:
Expansion Interface Lightwave Trans
- Page 1679 and 1680:
Expansion Interface Lightwave Trans
- Page 1681 and 1682:
Expansion Interface Lightwave Trans
- Page 1683 and 1684:
Signaling Link State Audit Test (#2
- Page 1685 and 1686:
Table 474: Signaling Link State Aud
- Page 1687 and 1688:
Table 475: Service State Audit Test
- Page 1689 and 1690:
Table 476: Call State Audit Test (#
- Page 1691 and 1692:
ISDN Test Call Test (#258) Note: No
- Page 1693 and 1694:
Table 477: ISDN Test Call Test (#25
- Page 1695 and 1696:
Table 477: ISDN Test Call Test (#25
- Page 1697 and 1698:
Idle Time Slot Test (#294) Idle Tim
- Page 1699 and 1700:
Non-control Channel Test (#297) Non
- Page 1701 and 1702:
Expansion Interface Lock Query Test
- Page 1703 and 1704:
Table 484: PN Maintenance Circuit P
- Page 1705 and 1706:
Table 485: Battery Holdover Hardwar
- Page 1707 and 1708:
Table 486: DS1 OPS Switchhook Inqui
- Page 1709 and 1710:
Table 487: DS1 CO Trunk Dial Tone S
- Page 1711 and 1712:
Expansion Interface Control Channel
- Page 1713 and 1714:
4. Enter busyout board location 5.
- Page 1715 and 1716:
Table 489: Expansion Interface Rese
- Page 1717 and 1718:
● SYNC (Port Network Synchronizat
- Page 1719 and 1720:
Table 492: Digital Port Sanity Test
- Page 1721 and 1722:
Table 493: Hook State Inquiry Test
- Page 1723 and 1724:
Table 495: Maintenance/Test Circuit
- Page 1725 and 1726:
Table 495: Maintenance/Test Circuit
- Page 1727 and 1728:
Table 497: Board Type Check Test (#
- Page 1729 and 1730:
Expansion Interface Packet Interfac
- Page 1731 and 1732:
Table 498: Expansion Interface Pack
- Page 1733 and 1734:
Table 498: Expansion Interface Pack
- Page 1735 and 1736:
Circuit Pack Restart Test (#594) Ci
- Page 1737 and 1738:
Table 500: LANBIC Receive Parity Er
- Page 1739 and 1740:
Invalid LAPD Frame Error Counter Te
- Page 1741 and 1742:
Table 503: Packet Interface Test (#
- Page 1743 and 1744:
Table 504: Congestion Query Test (#
- Page 1745 and 1746:
Table 505: Link Status Test (#601)
- Page 1747 and 1748:
Table 506: TSC Heartbeat Inquiry Te
- Page 1749 and 1750:
Table 507: BRI NPE Crosstalk Test (
- Page 1751 and 1752:
Table 508: BRI Port Local LAN Loopa
- Page 1753 and 1754:
Table 509: BRI Port Local TDM Loopa
- Page 1755 and 1756:
This test runs on BRI-PORT (ISDN-BR
- Page 1757 and 1758:
Table 511: Level 1 Status Inquiry T
- Page 1759 and 1760:
Table 511: Level 1 Status Inquiry T
- Page 1761 and 1762:
Table 513: CRC Error Counter Test (
- Page 1763 and 1764:
● ASAI-PT (ASAI Port) ● BRI-POR
- Page 1765 and 1766:
Table 516: Signaling Link Status Te
- Page 1767 and 1768:
Table 517: BRI Remote Loopback Test
- Page 1769 and 1770:
Table 517: BRI Remote Loopback Test
- Page 1771 and 1772:
Table 518: BRI XID Test (#628) 2 of
- Page 1773 and 1774:
Table 518: BRI XID Test (#628) 4 of
- Page 1775 and 1776:
Table 519: BRI Layer 3 Query Test (
- Page 1777 and 1778:
BRI Set Audits Test (#630) BRI Set
- Page 1779 and 1780:
Primary Signaling Link Hardware Che
- Page 1781 and 1782:
Remote Layer 3 Query (#637) process
- Page 1783 and 1784:
Table 522: Remote Layer 3 Query (#6
- Page 1785 and 1786:
Table 524: Signaling Link Board Che
- Page 1787 and 1788:
Table 525: Layer 2 Status Query Tes
- Page 1789 and 1790:
Table 526: Stratum-3 Clock Alarm Qu
- Page 1791 and 1792:
Table 526: Stratum-3 Clock Alarm Qu
- Page 1793 and 1794:
Standby Reference Health Check Test
- Page 1795 and 1796:
Table 528: Tie Trunk Seizure Test (
- Page 1797 and 1798:
Table 529: SNI Circuit Path Test (#
- Page 1799 and 1800:
Table 529: SNI Circuit Path Test (#
- Page 1801 and 1802:
SNI Destructive Facility Off-Board
- Page 1803 and 1804:
Table 531: SNI Destructive Facility
- Page 1805 and 1806:
● FIBER-LK (Fiber Link) ● SNI-B
- Page 1807 and 1808:
Table 532: SNI Destructive Facility
- Page 1809 and 1810:
Configuration Audit (#759) 3. Run t
- Page 1811 and 1812:
Table 533: FIBER-LK Configuration A
- Page 1813 and 1814:
Table 533: FIBER-LK Configuration A
- Page 1815 and 1816:
Table 533: FIBER-LK Configuration A
- Page 1817 and 1818:
Table 533: FIBER-LK Configuration A
- Page 1819 and 1820:
SNC-BD Error codes and recommended
- Page 1821 and 1822:
Table 534: SNC-BD Configuration Aud
- Page 1823 and 1824:
Table 534: SNC-BD Configuration Aud
- Page 1825 and 1826:
Table 535: SNI-BD Configuration Aud
- Page 1827 and 1828:
Table 535: SNI-BD Configuration Aud
- Page 1829 and 1830:
Table 536: Processor Route Audit Te
- Page 1831 and 1832:
Switch Node Interface Reset Test (#
- Page 1833 and 1834:
Table 537: Switch Node Interface Re
- Page 1835 and 1836:
Table 538: Packet Neighbor Link Tes
- Page 1837 and 1838:
Table 538: Packet Neighbor Link Tes
- Page 1839 and 1840:
This test runs on FIBER-LK (Fiber L
- Page 1841 and 1842:
Table 540: Failure Audit Test (#777
- Page 1843 and 1844:
Table 541: SNC On-Board Test (#778)
- Page 1845 and 1846:
This test runs on the SNC-BD (Switc
- Page 1847 and 1848:
Table 542: TPN Test (#779) 3 of 3 E
- Page 1849 and 1850:
Table 543: Switch Node Clock Reset
- Page 1851 and 1852:
Table 544: Reset Board Test (#787)
- Page 1853 and 1854:
Far-End DS1 Converter Circuit Pack
- Page 1855 and 1856:
Figure 143: Far-End Lightwave Trans
- Page 1857 and 1858:
DS1 Facilities Connectivity Test (#
- Page 1859 and 1860:
Table 547: DS1 Facilities Connectiv
- Page 1861 and 1862:
Table 548: DS1C Board Options Audit
- Page 1863 and 1864:
Table 549: Far-End Internal Loopbac
- Page 1865 and 1866:
DS1 Interface Options Audit (#798)
- Page 1867 and 1868:
Figure 145: Loopback Points for Tes
- Page 1869 and 1870:
Automatic Transmission Test (#844-8
- Page 1871 and 1872:
Table 552: Automatic Transmission T
- Page 1873 and 1874:
Table 552: Automatic Transmission T
- Page 1875 and 1876:
Table 553: Packet Interface Memory
- Page 1877 and 1878:
Table 554: Packet Interface Private
- Page 1879 and 1880:
This test runs on PKT-INT (Packet I
- Page 1881 and 1882:
1-5 FAIL (cont’d) Packet Interfac
- Page 1883 and 1884:
256 512 768 Packet Interface Read a
- Page 1885 and 1886:
1024- 1096 Packet Interface Read an
- Page 1887 and 1888:
Table 557: Active-Standby Peer Link
- Page 1889 and 1890:
Table 558: Packet Interface Reset T
- Page 1891 and 1892:
Table 559: Signaling Port LAN Loopb
- Page 1893 and 1894:
PN Cold Restart Test (#955) A PN Co
- Page 1895 and 1896:
Analog Port Sanity Test (#963) Anal
- Page 1897 and 1898:
Table 564: SNI Sanity Timer Test (#
- Page 1899 and 1900:
Table 566: SNI Fiber Out of Frame Q
- Page 1901 and 1902:
Table 566: SNI Fiber Out of Frame Q
- Page 1903 and 1904:
Table 566: SNI Fiber Out of Frame Q
- Page 1905 and 1906:
VC Summer Port Local TDM Looparound
- Page 1907 and 1908:
VC Summer Port Local TDM Looparound
- Page 1909 and 1910:
Table 568: VC DSP Port NPE Crosstal
- Page 1911 and 1912:
Table 569: VC DSP Port Local TDM Lo
- Page 1913 and 1914:
Figure 148: VC DSP Port DSP Looparo
- Page 1915 and 1916:
Table 570: VC DSP Port DSP Looparou
- Page 1917 and 1918:
Table 572: TSI Looparound Test (#11
- Page 1919 and 1920:
Table 573: Resource Looparound Test
- Page 1921 and 1922:
Table 574: MMI Synchronization Stat
- Page 1923 and 1924:
This test runs on DIG-LINE (Digital
- Page 1925 and 1926:
Table 576: Digital Terminal Remote
- Page 1927 and 1928:
Table 577: DS1 Board Loopback Test
- Page 1929 and 1930:
Table 578: CSU Equipment Loopback T
- Page 1931 and 1932:
CSU Repeater Loopback Test (#1211)
- Page 1933 and 1934:
Table 579: CSU Repeater Loopback Te
- Page 1935 and 1936:
Table 580: CPE Loopback Jack Test (
- Page 1937 and 1938:
Far CSU Loopback Test (#1213) Enter
- Page 1939 and 1940:
Table 581: Far CSU Loopback Test (#
- Page 1941 and 1942:
Table 582: One-Way Span Test (#1214
- Page 1943 and 1944:
End Loopback/Span Test (#1216) This
- Page 1945 and 1946:
Table 584: End Loopback/Span Test (
- Page 1947 and 1948:
Table 585: ICSU Status LEDs Test (#
- Page 1949 and 1950:
Table 586: Trunk-side Layer 1 Query
- Page 1951 and 1952:
This test runs on TBRI-PT (ISDN Tru
- Page 1953 and 1954:
Signaling Link State Test (#1251) S
- Page 1955 and 1956:
Table 590: ATM Board Reset (#1256)
- Page 1957 and 1958:
Table 592: XX Error Codes, ATM Boar
- Page 1959 and 1960:
ATM Board Framer Looparound Test (#
- Page 1961 and 1962:
Table 594: ATM Board Framer Looparo
- Page 1963 and 1964:
Table 594: ATM Board Framer Looparo
- Page 1965 and 1966:
ATM Board Time Of Day Update (#1261
- Page 1967 and 1968:
Ethernet Local Looparound Test (#12
- Page 1969 and 1970:
Table 598: PPP Link Status Inquiry
- Page 1971 and 1972:
Table 599: TCP/IP Ping Test (#1281)
- Page 1973 and 1974:
Table 600: Link Integrity Inquiry T
- Page 1975 and 1976:
Table 601: TDM Looparound Test (#12
- Page 1977 and 1978:
Table 602: Session Status Test (#12
- Page 1979 and 1980:
Table 603: ATM Remote Layer 3 Query
- Page 1981 and 1982:
Table 604: ATM Board DSP Test (#129
- Page 1983 and 1984:
Table 605: ATM Crosstalk Test (#129
- Page 1985 and 1986:
Table 606: RC NPE Port Audit Test (
- Page 1987 and 1988:
This test is run on RC-BD (Radio Co
- Page 1989 and 1990:
Table 608: RC Hardware Translation
- Page 1991 and 1992:
This test is run on RC-BD (Radio Co
- Page 1993 and 1994:
ASAI Link Status Test (#1365) ASAI
- Page 1995 and 1996:
Table 612: IP Address Update Test (
- Page 1997 and 1998:
This test runs on DIG-IP-S (Digital
- Page 1999 and 2000:
Ping Test (#1379) Ping Test (#1379)
- Page 2001 and 2002:
DSP Port TDM Looparound Test (#1380
- Page 2003 and 2004:
Table 618: Windows 2000 Reset Test
- Page 2005 and 2006:
Table 620: Network Connectivity Que
- Page 2007 and 2008:
Signaling Group Ping Test (#1387) N
- Page 2009 and 2010:
MedPro Status Test (#1392) MedPro S
- Page 2011 and 2012:
Ethernet Hardware Query Test (#1405
- Page 2013 and 2014:
Table 626: MP Diagnostic Test (#140
- Page 2015 and 2016:
Table 628: Firmware Download Test (
- Page 2017 and 2018:
Network Region Interconnectivity Te
- Page 2019 and 2020:
Table 629: Network Region Interconn
- Page 2021 and 2022:
Short IP 2-Way Transmission Test (#
- Page 2023 and 2024:
Table 631: Short IP 2-Way Transmiss
- Page 2025 and 2026:
Table 632: Long IP 2-Way Transmissi
- Page 2027 and 2028:
Table 633: Verify NIC Options Test
- Page 2029 and 2030:
Table 633: Verify NIC Options Test
- Page 2031 and 2032:
Table 635: Serial Bus Status Test (
- Page 2033 and 2034:
Table 635: Serial Bus Status Test (
- Page 2035 and 2036:
Table 636: Emergency Transfer Query
- Page 2037 and 2038:
Power/Fan Lead Query Test (#1533) P
- Page 2039 and 2040:
Table 637: Power/Fan Lead Query Tes
- Page 2041 and 2042:
Table 638: Power Supply Recycle Tes
- Page 2043 and 2044:
Table 639: Power Supply Detection T
- Page 2045 and 2046:
Table 639: Power Supply Detection T
- Page 2047 and 2048:
Table 640: Power Supply Voltage Tes
- Page 2049 and 2050:
Power Supply Temperature Test (#153
- Page 2051 and 2052:
Power Supply Fan Test (#1538) Power
- Page 2053 and 2054:
Table 643: Ring Generator Interchan
- Page 2055 and 2056:
Reset Environmental Maintenance Tes
- Page 2057 and 2058:
Sanity Test (#1547) Sanity Test (#1
- Page 2059 and 2060:
ESS IP Server Interface Request (#1
- Page 2061 and 2062:
AESVCS Link Heartbeat Test (#1624)
- Page 2063 and 2064:
Table 655: Packet Count Query Test
- Page 2065 and 2066:
System Link Status (#1647) This tes
- Page 2067 and 2068:
Table 657: Power Supply Aux Sig Tes
- Page 2069 and 2070:
H.323 Signaling Layer 3 Test (#1673
- Page 2071 and 2072:
NO BOARD NO BOARD No board was dete
- Page 2073 and 2074:
Repair Procedures for DS1/UDS1 Circ
- Page 2075 and 2076:
Index Symbols _TM, see Translation
- Page 2077 and 2078:
clocks, system . . . . . . . . . .
- Page 2079 and 2080:
G G700 alarm format . . . . . . . .
- Page 2081 and 2082:
PKT-BUS (Packet Bus) . . . . . . .
- Page 2083 and 2084:
PKT-INT . . . . . . . . . . . . . .
- Page 2085 and 2086:
MOs _MP Maintenance Processor) . .
- Page 2087 and 2088:
#1534 Power Supply Recycle Test. .
- Page 2089 and 2090:
Timing Priority Number (TPN) link.
Inappropriate
Loading...
Inappropriate
You have already flagged this document.
Thank you, for helping us keep this platform clean.
The editors will have a look at it as soon as possible.
Mail this publication
Loading...
Embed
Loading...
Delete template?
Are you sure you want to delete your template?
DOWNLOAD ePAPER
This ePaper is currently not available for download.
You can find similar magazines on this topic below under ‘Recommendations’.
