- Page 1 and 2:
Maintenance Alarms for Avaya Aura C
- Page 3 and 4:
Contents Introduction . . . . . . .
- Page 5 and 6:
CAB-CALM (Customer alarm) . . . . .
- Page 7 and 8:
MAINT (PN Maintenance Circuit Pack)
- Page 9 and 10:
SYS-PRNT (System Printer) . . . . .
- Page 11 and 12:
Customer-Provided Alarming Device T
- Page 13 and 14:
Synchronization Update Test (#417)
- Page 15 and 16:
SNI Sanity Timer Test (#964) . . .
- Page 17 and 18:
Power Supply Recycle Test (#1534).
- Page 19 and 20:
Introduction This document provides
- Page 21 and 22:
Audience If the trouble still has n
- Page 23 and 24:
Paragraphs or inline comments Struc
- Page 25 and 26:
Table 1: Typography used in this bo
- Page 27 and 28:
Related resources Related resources
- Page 29 and 30:
Safety labels and security alert la
- Page 31 and 32:
Sending us comments Avaya welcomes
- Page 33 and 34:
Chapter 1: Communication Manager Ma
- Page 35 and 36:
G700 Subsystems Displaying MOs Main
- Page 37 and 38:
Table 5: Media Module Types 2 of 2
- Page 39 and 40:
Abort Code 1412 ● Off-Board probl
- Page 41 and 42:
4. G650 MGs have power supply in sl
- Page 43 and 44:
AC-POWER AC Power for AC-Powered Sy
- Page 45 and 46:
Note: The Note: following tests app
- Page 47 and 48:
Demand test descriptions and error
- Page 49 and 50:
ADJ-IP (ASAI Adjunct TCP/IP Link) c
- Page 51 and 52:
Table 11: Administered Connection E
- Page 53 and 54:
ADX8D-BD (AUDIX Circuit Pack) ADX8D
- Page 55 and 56:
Table 12: ADX8D-PT Error Log Entrie
- Page 57 and 58:
ADX8D-RS (AUDIX Reserve Slots) See
- Page 59 and 60:
ADX16A-P (AUDIX Analog Line/Control
- Page 61 and 62:
ADX16A-P (AUDIX Analog Line/Control
- Page 63 and 64:
ADX16D-P (16-Port AUDIX Digital Por
- Page 65 and 66:
ADX16D-P (16-Port AUDIX Digital Por
- Page 67 and 68:
AESV-LNK (AE Services Link) MO Name
- Page 69 and 70:
Aux Data Description AESV-LNK (AE S
- Page 71 and 72:
AESV-SES (AE Services Session) Link
- Page 73 and 74:
Demand test descriptions and error
- Page 75 and 76:
Table 18: AN-LN-PT Error log entrie
- Page 77 and 78:
Demand test descriptions and error
- Page 79 and 80:
Ringing Caused by Maintenance Testi
- Page 81 and 82:
Demand test descriptions and error
- Page 83 and 84:
ANL-LINE (8-Port Analog Line) MO Na
- Page 85 and 86:
ANL-LINE (8-Port Analog Line) b. Er
- Page 87 and 88:
-BD (Announcement circuit pack) -BD
- Page 89 and 90:
-BD (Announcement circuit pack) c.
- Page 91 and 92:
● Ports 1 AND 9 abort Test 206 wi
- Page 93 and 94:
Note: The WARNING: Reseating -BD (A
- Page 95 and 96:
Order of investigation Short Test S
- Page 97 and 98:
Error log entries and recommended a
- Page 99 and 100:
ANNOUNCE (announcement) ANNOUNCE (a
- Page 101 and 102:
Table 24: Aux data error codes and
- Page 103 and 104:
ASAI-BD (Multi-Application Platform
- Page 105 and 106:
Table 25: ASAI-EPT Error Log Entrie
- Page 107 and 108:
ASAI-EPT (ASAI Endpoint) g. Error T
- Page 109 and 110:
Table 26: ASAI cause values 2 of 3
- Page 111 and 112:
ASAI-PT (ASAI Port) ASAI-PT (ASAI P
- Page 113 and 114:
ASAI-PT (ASAI Port) d. Error Type 1
- Page 115 and 116:
ATM-BCH (ATM B-Chel Trunk) ATM-BCH
- Page 117 and 118:
B-Chel Alarms ATM-BCH (ATM B-Chel T
- Page 119 and 120:
ATM-BCH (ATM B-Chel Trunk) ● Outg
- Page 121 and 122:
Demand test descriptions and error
- Page 123 and 124:
Error log entries and recommended a
- Page 125 and 126:
LEDs The ATM Interface circuit pack
- Page 127 and 128:
6. Enter test board location, and v
- Page 129 and 130:
A-side ATM-EI—Critical Reliabilit
- Page 131 and 132:
Table 34: ATM-EI Error Log Entries
- Page 133 and 134:
ATM-EI (Expansion Interface Circuit
- Page 135 and 136:
Table 35: ATM Error Types 1024 - 11
- Page 137 and 138:
Table 37: Error type 1281 Aux Data
- Page 139 and 140:
Table 37: Error type 1281 Aux Data
- Page 141 and 142:
CAUTION: If CAUTION: If ATM-EI (Exp
- Page 143 and 144:
ATM-EI (Expansion Interface Circuit
- Page 145 and 146:
ATM-INTF (ATM Interface) S8700-seri
- Page 147 and 148:
ATM-NTWK (ATM Network Error) S8700-
- Page 149 and 150:
Table 40: Error codes and Aux Data
- Page 151 and 152:
Table 40: Error codes and Aux Data
- Page 153 and 154:
Table 40: Error codes and Aux Data
- Page 155 and 156:
ATM-NTWK (ATM Network Error) d. Err
- Page 157 and 158:
ATM-NTWK (ATM Network Error) The
- Page 159 and 160:
PNC-DUP Related Commands ATM PNC-DU
- Page 161 and 162:
ATM PNC-DUP (ATM PNC Duplication)
- Page 163 and 164:
ATM PNC-DUP (ATM PNC Duplication) A
- Page 165 and 166:
PNC Interchanges ATM PNC-DUP (ATM P
- Page 167 and 168:
● The global refresh from releasi
- Page 169 and 170:
Table 45: Error Log Encode Field De
- Page 171 and 172:
Error log entries and recommended a
- Page 173 and 174:
ATM-SGRP (ATM Signaling Group) g. E
- Page 175 and 176:
3890 A request to use a network ser
- Page 177 and 178:
3928 A call was denied because of a
- Page 179 and 180:
Stratum 4 Synchronization ATM-SYNC
- Page 181 and 182:
ATM-SYNC Commands ATM-SYNC (ATM Syn
- Page 183 and 184:
ATM-SYNC (ATM Synchronization) 2. T
- Page 185 and 186:
LEDs Virtual D-Chels ATM-TRK (Circu
- Page 187 and 188:
Table 54: ATM-TRK Error Log entries
- Page 189 and 190:
ATM-TRK (Circuit Emulation Service
- Page 191 and 192:
Table 55: Error type 1281 Aux Data
- Page 193 and 194:
ATM-TRK (Circuit Emulation Service
- Page 195 and 196:
If Then There are no packet bus ala
- Page 197 and 198:
Order of Investigation Short Test S
- Page 199 and 200:
ATTE-AJ (Ethernet Avaya Adjunct) Se
- Page 201 and 202:
AUX-TRK (Auxiliary Trunk) AUX-TRK (
- Page 203 and 204:
Table 56: AUX-TRK Error Log Entries
- Page 205 and 206:
AXA12-BD (AUDIX Circuit Pack) MO Na
- Page 207 and 208:
AXD12-BD (AUDIX circuit pack) MO Na
- Page 209 and 210:
BRI-BD (ISDN-BRI Line Circuit Pack)
- Page 211 and 212:
BRI-BD (ISDN-BRI Line Circuit Pack)
- Page 213 and 214:
BRI-BD (ISDN-BRI Line Circuit Pack)
- Page 215 and 216:
BRI-PORT (ISDN-BRI Port) Note: The
- Page 217 and 218:
BRI-PORT (ISDN-BRI Port) This secti
- Page 219 and 220:
BRI-PORT (ISDN-BRI Port) Notes: a.
- Page 221 and 222:
Demand test descriptions and error
- Page 223 and 224:
BRI-SET, Various Adjuncts term ``IS
- Page 225 and 226:
Table 59: BRI-SET/Adjunct Error Log
- Page 227 and 228:
BRI-SET, Various Adjuncts 3. If the
- Page 229 and 230:
50 Requested Facility Not Subscribe
- Page 231 and 232:
Table 61: ASAI CAUSE VALUES; (BRI-S
- Page 233 and 234:
SPID Facility Test BRI-SET, Various
- Page 235 and 236:
Table 63: Service SPID Display BRI-
- Page 237 and 238:
CAB-EXFR (Emergency Transfer) G650
- Page 239 and 240:
CAB-MTCE (Media Gateway Maintenance
- Page 241 and 242:
CAB-PFL (Power Fan Lead) G650 CAB-P
- Page 243 and 244:
CAB-TEMP (Cabinet Temperature) G650
- Page 245 and 246:
CABINET (Cabinet Sensors) S8700 Ser
- Page 247 and 248:
CMC1 Table 69: CMC1: Cabinet sensor
- Page 249 and 250:
Demand test descriptions and error
- Page 251 and 252:
CARR-POW (Carrier Power Supply) MO
- Page 253 and 254:
AC-Powered Cabinets AC Power-Distri
- Page 255 and 256:
Figure 8: AC Power Distribution in
- Page 257 and 258:
Figure 10: Power-Distribution Unit
- Page 259 and 260:
DC-Powered Cabinets DC Power-Distri
- Page 261 and 262:
CARR-POW (Carrier Power Supply) The
- Page 263 and 264:
CDR-LNK (Call Detail Recording Link
- Page 265 and 266:
CLAN-BD (Control LAN Circuit Pack)
- Page 267 and 268:
Table 72: CLAN-BD Error Log Entries
- Page 269 and 270:
Note: 2561 CLAN-BD (Control LAN Cir
- Page 271 and 272:
CLAN-BD (Control LAN Circuit Pack)
- Page 273 and 274:
CLSFY-BD (Call Classifier Circuit P
- Page 275 and 276:
CLSFY-PT (Call Classifier Port) 1.
- Page 277 and 278:
CO-DS1 (DS1 CO Trunk) Note: For MO
- Page 279 and 280:
Table 74: CO-DS1 Error Log Entries
- Page 281 and 282:
CO-TRK (Analog CO Trunk) CO-TRK (An
- Page 283 and 284:
Ground Start Operation CO-TRK (Anal
- Page 285 and 286:
Table 75: CO-TRK Error Log Entries
- Page 287 and 288:
Table 76: CO Trunk Errors with No T
- Page 289 and 290:
Note: The Note: The CO-TRK (Analog
- Page 291 and 292:
CONFIG (System Configuration) ’1
- Page 293 and 294:
Table 78: Converting Error Types To
- Page 295 and 296:
Table 78: Converting Error Types To
- Page 297 and 298:
DAT-LINE (Data Line Port) DAT-LINE
- Page 299 and 300:
Demand test descriptions and error
- Page 301 and 302:
DC-POWER (Single-Carrier Cabinet En
- Page 303 and 304:
DETR-BD (Tone Detector Circuit) DET
- Page 305 and 306:
DID-DS1 (Direct Inward Dial Trunk)
- Page 307 and 308:
DID-DS1 (Direct Inward Dial Trunk)
- Page 309 and 310:
DID-TRK (Direct Inward Dial Trunk)
- Page 311 and 312:
Table 82: DID-TRK Error Log Entries
- Page 313 and 314:
DID-TRK (Direct Inward Dial Trunk)
- Page 315 and 316:
DIG-IP-S (Digital IP Station) DIG-I
- Page 317 and 318:
DIG-IP-S (Digital IP Station) i. Er
- Page 319 and 320:
Figure 14: Digital Line Connectivit
- Page 321 and 322:
For Systems Supporting Circuit Pack
- Page 323 and 324:
Automatic Download Actions This sec
- Page 325 and 326:
Parameter Download Status DIG-LINE
- Page 327 and 328:
DIG-LINE (Digital Line) or move voi
- Page 329 and 330:
Demand test descriptions and error
- Page 331 and 332:
DIOD-BD (DIOD Trunk Circuit Pack) D
- Page 333 and 334:
Error log entries and recommended a
- Page 335 and 336:
DIOD-DS1 (DS1 DIOD Trunk) e. Error
- Page 337 and 338:
DIOD-TRK (DIOD Trunk) DIOD-TRK (DIO
- Page 339 and 340:
Table 88: DIOD-TRK Error Log Entrie
- Page 341 and 342:
DLY-MTCE (Daily Maintenance) DLY-MT
- Page 343 and 344:
DLY-MTCE (Daily Maintenance) ● On
- Page 345 and 346:
DS1-BD (DS1 Interface Circuit Pack)
- Page 347 and 348:
Table 91: DS1-BD Error Log Entries
- Page 349 and 350:
Table 91: DS1-BD Error Log Entries
- Page 351 and 352:
DS1-BD (DS1 Interface Circuit Pack)
- Page 353 and 354:
DS1-BD (DS1 Interface Circuit Pack)
- Page 355 and 356:
DS1-FAC (DS1 Facility) S8700-series
- Page 357 and 358:
DS1-FAC (DS1 Facility) The TN1654 D
- Page 359 and 360:
DS1 Interface Options DS1-FAC (DS1
- Page 361 and 362:
Table 92: DS1 Interface Options adm
- Page 363 and 364:
Clearing Firmware Errors DS1-FAC (D
- Page 365 and 366:
DS1-FAC (DS1 Facility) 1. Enter dis
- Page 367 and 368:
DS1-FAC (DS1 Facility) Aux Data 2:
- Page 369 and 370:
DS1-FAC (DS1 Facility) 4. Enter dis
- Page 371 and 372:
Demand test descriptions and error
- Page 373 and 374:
DS1C-BD (DS1 Converter Circuit Pack
- Page 375 and 376:
Figure 23: DS1 Converter Complex in
- Page 377 and 378:
DS1C-BD (DS1 Converter Circuit Pack
- Page 379 and 380:
Replacing a DS1 Converter Circuit P
- Page 381 and 382:
WARNING: Do WARNING: Replacing WARN
- Page 383 and 384:
Upgrading TN574 DS1 Converter Circu
- Page 385 and 386:
Converting DS1-CONV Complex to Dire
- Page 387 and 388:
Removing Fiber Connectivity to an P
- Page 389 and 390:
Table 98: Downgrading from Critical
- Page 391 and 392:
Table 99: DS1C-BD Error Log Entries
- Page 393 and 394:
DS1C-BD (DS1 Converter Circuit Pack
- Page 395 and 396:
DS1C-BD (DS1 Converter Circuit Pack
- Page 397 and 398:
DT-LN-BD (Data Line Circuit Pack) D
- Page 399 and 400:
Error log entries and recommended a
- Page 401 and 402:
E-DIG-BD (Multi Application Platfor
- Page 403 and 404:
E-DIG-ST (Emulated Digital Line) No
- Page 405 and 406:
EMG-XFER (Emergency Transfer) MO Na
- Page 407 and 408:
EMG-XFER (Emergency Transfer) Deman
- Page 409 and 410:
Error log entries and recommended a
- Page 411 and 412:
ESS (Enterprise Survivable Server)
- Page 413 and 414:
CAUTION: Entering Note: ATM ESS (En
- Page 415 and 416:
Note: Note: Tip: Customer Note: It
- Page 417 and 418:
ESS (Enterprise Survivable Server)
- Page 419 and 420:
Error log entries and recommended a
- Page 421 and 422:
ETH-PT (Control LAN Ethernet) h. Er
- Page 423 and 424:
ETR-PT (Enhanced Tone Receiver Port
- Page 425 and 426:
Demand tests descriptions and error
- Page 427 and 428:
EXP-INTF (Expansion Interface Circu
- Page 429 and 430:
Figure 27: Center Stage Switch Conf
- Page 431 and 432:
Figure 29: Fiber Link with DS1 Conv
- Page 433 and 434:
LEDs EXP-INTF (Expansion Interface
- Page 435 and 436:
Expansion Interface LEDs EXP-INTF (
- Page 437 and 438:
EXP-INTF (Expansion Interface Circu
- Page 439 and 440:
CAUTION: If CAUTION: If, CAUTION: I
- Page 441 and 442:
EXP-INTF (Expansion Interface Circu
- Page 443 and 444:
EXP-INTF (Expansion Interface Circu
- Page 445 and 446:
Table 109: EXP-INTF Error Log Entri
- Page 447 and 448:
EXP-INTF (Expansion Interface Circu
- Page 449 and 450:
EXP-INTF (Expansion Interface Circu
- Page 451 and 452:
EXP-PN (Expansion Port Network) S87
- Page 453 and 454:
Error log entries and recommended a
- Page 455 and 456:
EXT-DEV (External Device Alarm) G65
- Page 457 and 458:
EXT-DEV ADMIN? N (External Device A
- Page 459 and 460:
EXT-DEV ADMIN? Y (External Device A
- Page 461 and 462:
FIBER-LK (Fiber Link) MO Name in Lo
- Page 463 and 464:
Table 116: Expansion Interface Circ
- Page 465 and 466:
FIBER-LK (Fiber Link) c. Error Type
- Page 467 and 468:
Table 122: Tests Run for an SNI-to-
- Page 469 and 470:
Table 123: FW-DWNLD Error Log Entri
- Page 471 and 472:
Table 125: Aux Data for Error Type
- Page 473 and 474:
Table 125: Aux Data for Error Type
- Page 475 and 476:
Table 125: Aux Data for Error Type
- Page 477 and 478:
Table 126: Aux Data for Error Type
- Page 479 and 480:
FW-STDL (Firmware Station Download)
- Page 481 and 482:
Read the image into memory FW-STDL
- Page 483 and 484:
Troubleshooting firmware download p
- Page 485 and 486:
Table 129: Error Type 257 Aux Data
- Page 487 and 488:
Table 131: Schedule States of statu
- Page 489 and 490:
GPTD-PT (General-Purpose Tone Detec
- Page 491 and 492:
H323-BCH (H.323 B-Chel) H323-BCH (H
- Page 493 and 494:
H323-SGR (H.323 Signaling Group) MO
- Page 495 and 496:
H323-SGR (H.323 Signaling Group) h.
- Page 497 and 498:
3878 The far-end switch has indicat
- Page 499 and 500:
H323-SGR (H.323 Signaling Group) Ta
- Page 501 and 502:
H323-STN (H.323 IP Station) origina
- Page 503 and 504:
HYB-LINE (Hybrid Line) HYB-LINE (Hy
- Page 505 and 506:
HYB-LINE (Hybrid Line) Notes: a. Er
- Page 507 and 508:
INADS (INADS Link) MO Name in Log A
- Page 509 and 510:
Table 139: INADS Link Test Error Lo
- Page 511 and 512:
IPMEDPRO (IP Media Processor) IPMED
- Page 513 and 514:
Table 140: TN2302 IPMEDPRO Error Lo
- Page 515 and 516:
IPMEDPRO (TN2302 IP Media Processor
- Page 517 and 518:
IPMEDPRO (TN2302 IP Media Processor
- Page 519 and 520:
IPMEDPRO (TN2602AP IP Media Resourc
- Page 521 and 522:
Table 141: TN2602AP IPMEDPRO Error
- Page 523 and 524:
IPMEDPRO (TN2602AP IP Media Resourc
- Page 525 and 526:
Order of Investigation Short Test S
- Page 527 and 528:
IPSV-CTL (IP Server Interface Contr
- Page 529 and 530:
System Configurations with Duplicat
- Page 531 and 532:
Table 147: Cabinets that support IP
- Page 533 and 534:
AUX Data Descriptions IPSV-CTL (IP
- Page 535 and 536:
An example of the output of the lis
- Page 537 and 538:
IP-SVR (IP Server Interface) The TN
- Page 539 and 540:
Control Network Interface IP-SVR (I
- Page 541 and 542:
IP-SVR (IP Server Interface) The fo
- Page 543 and 544:
Table 153: IPSI LEDs 2 of 2 Functio
- Page 545 and 546:
ISDN-PLK (ISDN-PRI Signaling Link P
- Page 547 and 548:
ISDN-PLK (ISDN-PRI Signaling Link P
- Page 549 and 550:
ISDN-SGR (ISDN-PRI Signaling Group)
- Page 551 and 552:
Table 156: ISDN-SGR Error Log Entri
- Page 553 and 554:
ISDN-SGR (ISDN-PRI Signaling Group)
- Page 555 and 556:
ISDN-SGR (ISDN-PRI Signaling Group)
- Page 557 and 558:
ISDN-TRK (DS1 ISDN Trunk) Note: Man
- Page 559 and 560:
Alarming Based on Service States IS
- Page 561 and 562:
ISDN-TRK (DS1 ISDN Trunk) The follo
- Page 563 and 564:
Table 158: Service States 2 of 2 Se
- Page 565 and 566:
ISDN-TRK (DS1 ISDN Trunk) f. Error
- Page 567 and 568:
Demand test descriptions and error
- Page 569 and 570:
LGATE-AJ (Ethernet ASAI Endpoint) S
- Page 571 and 572:
LGATE-PT (Ethernet Adjunct Port) Se
- Page 573 and 574:
Figure 36: License mode algorithm F
- Page 575 and 576:
LIC-ERR (License Error Mode) g. Err
- Page 577 and 578:
LIC-ERR (License Error Mode) - A co
- Page 579 and 580:
Table 163: License error messages 2
- Page 581 and 582:
LOG-SVN (Login Security Violation)
- Page 583 and 584:
MAINT (PN Maintenance Circuit Pack)
- Page 585 and 586:
Table 165: MAINT Error Log Entries
- Page 587 and 588:
MAPD-BD (MAPD Interface Circuit Pac
- Page 589 and 590:
4. Insert the backup diskette into
- Page 591 and 592:
Table 168: TN802 LCD messages for I
- Page 593 and 594:
MAPD-BD (MAPD Interface Circuit Pac
- Page 595 and 596:
MAPD-BD (MAPD Interface Circuit Pac
- Page 597 and 598:
Figure 41: TN802 board assembly and
- Page 599 and 600:
Table 171: MAPD-BD Error Log entrie
- Page 601 and 602:
MAPD-BD (MAPD Interface Circuit Pac
- Page 603 and 604:
MAPD-BD (MAPD Interface Circuit Pac
- Page 605 and 606:
Figure 42: TN802 faceplate Figure n
- Page 607 and 608:
Demand test descriptions and error
- Page 609 and 610:
Error log entries and recommended a
- Page 611 and 612:
MEDPRO (Media Processor MAPD Circui
- Page 613 and 614:
Table 175: MEDPRO-C Error Log Entri
- Page 615 and 616:
MEDPRO-C (Media Processor Control)
- Page 617 and 618:
Error log entries and recommended a
- Page 619 and 620:
MED-GTWY (MEDIA GATEWAY) MED-GTWY (
- Page 621 and 622:
MET-BD (MET Line Circuit Pack) MET-
- Page 623 and 624:
Table 179: MET-LINE Error Log Entri
- Page 625 and 626:
Order of Investigation Short Test S
- Page 627 and 628:
Table 180: MG-ANA Error Log Entries
- Page 629 and 630:
MG_ANN (Media Gateway Announcement
- Page 631 and 632:
MG-ANN (Voice Announcements) MG-ANN
- Page 633 and 634:
Table 183: MG-BRI Error Log Entries
- Page 635 and 636:
MG-DCP (Digital Line Media Module)
- Page 637 and 638:
MG-DCP (Digital Line Media Module)
- Page 639 and 640:
Table 185: MG-DS1 Error Log Entries
- Page 641 and 642:
● Be administered using the add d
- Page 643 and 644:
MG-DS1 (DS1 Interface Media Module)
- Page 645 and 646:
MG-IAMM (Integrated Analog Media Mo
- Page 647 and 648:
MG-IAMM (Integrated Analog Media Mo
- Page 649 and 650:
MG-IBRI (Integrated BRI Trunk Media
- Page 651 and 652:
MIS (Management Information System)
- Page 653 and 654:
Figure 43: TN787 Multimedia Interfa
- Page 655 and 656:
Table 189: MMI-BD Error Log Entries
- Page 657 and 658:
MMI-LEV (Multimedia Interface Resou
- Page 659 and 660:
Demand test descriptions and error
- Page 661 and 662:
Figure 45: TN787 MMI (MULTIMEDIA IN
- Page 663 and 664:
MMI-PT (Multimedia Interface Port)
- Page 665 and 666:
Error log entries and recommended a
- Page 667 and 668:
MODEM-PT (Modem Pool Port) MODEM-PT
- Page 669 and 670:
MODEM-PT (Modem Pool Port) Figure 4
- Page 671 and 672:
Table 193: MODEM-PT Error Log Entri
- Page 673 and 674:
M/T-ANL (Maintenance/Test Analog Po
- Page 675 and 676:
Demand test descriptions and error
- Page 677 and 678:
Error log entries and recommended a
- Page 679 and 680:
Demand test descriptions and error
- Page 681 and 682:
Figure 49: ISDN-PRI Outgoing Test C
- Page 683 and 684:
Demand test descriptions and error
- Page 685 and 686:
Table 197: M/T-PKT Error Log Entrie
- Page 687 and 688:
NO-LIC (No License) Note: The Note:
- Page 689 and 690:
Error log entries and recommended a
- Page 691 and 692:
NR-CONN (Network-Region Connect) MO
- Page 693 and 694:
NR-REG (Network Region Registration
- Page 695 and 696:
OPS-LINE (DS1 Off-Premises Station
- Page 697 and 698:
Demand test descriptions and error
- Page 699 and 700:
Stand-Alone DCP Data Modules PDMODU
- Page 701 and 702:
Figure 52: Typical Data Module Conf
- Page 703 and 704:
Note: Refer Note: Refer Note: Refer
- Page 705 and 706:
_PE (Processor Ethernet) Alarms The
- Page 707 and 708:
PE Interchange Priority Mismatch Al
- Page 709 and 710:
PE-BCHL (PRI Endpoint Port) Multipl
- Page 711 and 712:
PE-BCHL (PRI Endpoint Port) ● Out
- Page 713 and 714:
Table 204: PRI Endpoint Port Servic
- Page 715 and 716:
PE-BCHL (PRI Endpoint Port) automat
- Page 717 and 718:
Demand test descriptions and error
- Page 719 and 720:
PKT-BUS (Packet Bus) ● Certain ca
- Page 721 and 722:
PKT-BUS (Packet Bus) f. Error Type
- Page 723 and 724:
PKT-INT (Packet Interface) MO Name
- Page 725 and 726:
Figure 55: Distributed PKT-INTs IPS
- Page 727 and 728:
PKT-INT (Packet Interface) If a dow
- Page 729 and 730:
Figure 56: IP-PNC Duplex Reliabilit
- Page 731 and 732:
Figure 57: Duplex-Reliability Confi
- Page 733 and 734:
Critical-Reliability Configuration
- Page 735 and 736:
S8700 series PKT-INT (Packet Interf
- Page 737 and 738:
PKT-INT (Packet Interface) For a ca
- Page 739 and 740:
PKT-INT (Packet Interface) an out-o
- Page 741 and 742:
PKT-INT (Packet Interface) l. Error
- Page 743 and 744:
PLAT-ALM (Platform Alarms) PLAT-ALM
- Page 745 and 746:
Procedures for Restoring the PMS Li
- Page 747 and 748:
PMS-LINK (Property Management Syste
- Page 749 and 750:
Demand test descriptions and error
- Page 751 and 752:
PMS-PRNT (PMS Printer Link) PMS Pri
- Page 753 and 754:
PMS-PRNT (PMS Printer Link) e. Erro
- Page 755 and 756:
PNC-DUP Related Commands PNC-DUP (P
- Page 757 and 758:
Figure 62: Duplicated PNC with Cent
- Page 759 and 760:
PNC-DUP (PNC Duplication) 4. Remove
- Page 761 and 762:
PNC State-of-Health Indexes PNC-DUP
- Page 763 and 764:
● There has been a spontaneous PN
- Page 765 and 766:
PNC-DUP (PNC Duplication) Most repa
- Page 767 and 768:
PNC-DUP (PNC Duplication) The infor
- Page 769 and 770:
PNC-DUP (PNC Duplication) The last
- Page 771 and 772:
PNC-DUP (PNC Duplication) x. Error
- Page 773 and 774:
POWER S8700-series Fiber-PNC This s
- Page 775 and 776:
Replacing the Battery Assembly (J58
- Page 777 and 778:
Order of Investigation Short Test S
- Page 779 and 780:
Recycle carrier POW-SUP (Power Supp
- Page 781 and 782:
POW-SUP (Power Supply) c. Error Typ
- Page 783 and 784:
PPP-PT (Control LAN Packet/Port) MO
- Page 785 and 786:
PPP-PT (Control LAN Packet/Port) d.
- Page 787 and 788:
PRI-CDR (Call Detail Recording Link
- Page 789 and 790:
Error log entries and recommended a
- Page 791 and 792:
PROC-SAN (Process Sanity Audits) MO
- Page 793 and 794:
Table 218: PS-RGEN Error Log Entrie
- Page 795 and 796:
RANL-STA (Remote Analog Line (Stati
- Page 797 and 798:
RANL-STA (Remote Analog Line (Stati
- Page 799 and 800:
Table 220: RC-BD Error Log Entries
- Page 801 and 802:
RC-BD (Radio Controller Board) t. E
- Page 803 and 804:
Terminal Types RDIG-STA (Remote Dig
- Page 805 and 806:
Note: This Note: Plugging RDIG-STA
- Page 807 and 808:
Possible reasons for no terminal do
- Page 809 and 810:
RDIG-STA (Remote Digital Station) k
- Page 811 and 812:
RING-GEN (Analog Ring Generator) MO
- Page 813 and 814:
RMC-ENV (Power/Fan Sensors) G600 on
- Page 815 and 816:
Demand test descriptions and error
- Page 817 and 818:
S-SYN-BD (Speech Synthesis Circuit
- Page 819 and 820:
Table 228: S-SYN-PT Error Log Entri
- Page 821 and 822:
SEC-CDR (Call Detail Recording Link
- Page 823 and 824:
Figure 65: Wiring diagram for seria
- Page 825 and 826:
● Source of input power - AC, DC,
- Page 827 and 828:
SER-BUS (Serial Communication Bus)
- Page 829 and 830:
SIP-SGRP (SIP Signaling Group) MO N
- Page 831 and 832:
Note: Near SIP-SGRP (SIP Signaling
- Page 833 and 834:
SIP-SGRP (SIP Signaling Group) Tabl
- Page 835 and 836:
SIP-SGRP (SIP Signaling Group) Tabl
- Page 837 and 838:
SIP-SGRP (SIP Signaling Group) Tabl
- Page 839 and 840:
SIP-SGRP (SIP Signaling Group) Tabl
- Page 841 and 842:
SIP-SGRP (SIP Signaling Group) Tabl
- Page 843 and 844:
SN-CONF (Switch Node Configuration)
- Page 845 and 846:
SN-CONF (Switch Node Configuration)
- Page 847 and 848:
SNC-BD (Switch Node Clock Circuit P
- Page 849 and 850:
SNC LEDs SNC-BD (Switch Node Clock
- Page 851 and 852:
Error log entries and recommended a
- Page 853 and 854:
SNC-BD (Switch Node Clock Circuit P
- Page 855 and 856:
Table 233: SNC-LINK Error Log Entri
- Page 857 and 858:
SNC-LINK (Switch Node Clock Link) 3
- Page 859 and 860:
Table 234: SNC-REF Error Log Entrie
- Page 861 and 862:
SNI-BD (SNI Circuit Pack) S8700-ser
- Page 863 and 864:
SNI-BD (SNI Circuit Pack) Figure 70
- Page 865 and 866:
SNI Administration and SNI Board In
- Page 867 and 868:
Replacing an SNI Circuit Pack— Du
- Page 869 and 870:
Note: Note Note: Make SNI-BD (SNI C
- Page 871 and 872:
Table 236: SNI-BD Error Log Entries
- Page 873 and 874:
SNI-BD (SNI Circuit Pack) Procedure
- Page 875 and 876:
SNI-PEER (SNI Peer Link) S8700-seri
- Page 877 and 878:
Procedure 1 SNI-PEER (SNI Peer Link
- Page 879 and 880:
SP-REG-M (Survivable Processor-Main
- Page 881 and 882:
SP-REG-S (Survivable Processor) SP-
- Page 883 and 884:
STRAT-3 (Stratum-3 Clock) S8700-ser
- Page 885 and 886:
Stratum-3 Clock LED Strategy STRAT-
- Page 887 and 888:
Error log entries and recommended a
- Page 889 and 890:
If the alarm is MAJOR: ● Check co
- Page 891 and 892:
SVC-SLOT (Service Slot) SVC-SLOT (S
- Page 893 and 894:
SYNC (Port Network Synchronization)
- Page 895 and 896:
SYNC (Port Network Synchronization)
- Page 897 and 898:
SYNC (Port Network Synchronization)
- Page 899 and 900:
Troubleshooting Synchronization Pro
- Page 901 and 902:
Figure 77: Synchronization Troubles
- Page 903 and 904:
Figure 79: Synchronization Troubles
- Page 905 and 906:
Figure 81: Synchronization Troubles
- Page 907 and 908:
Figure 83: Synchronization Troubles
- Page 909 and 910:
SYNC (Port Network Synchronization)
- Page 911 and 912:
SYNC (Port Network Synchronization)
- Page 913 and 914:
Figure 86: Facility Fault Sectional
- Page 915 and 916:
CAUTION: Synchronization SYNC (Port
- Page 917 and 918:
Error log entries and recommended a
- Page 919 and 920:
SYNC (Port Network Synchronization)
- Page 921 and 922:
SYNC (Port Network Synchronization)
- Page 923 and 924:
SYNC (Port Network Synchronization)
- Page 925 and 926:
SYS-LINK (System Links) SYS-LINK (S
- Page 927 and 928:
Note: For SYS-LINK (System Links) N
- Page 929 and 930:
SYS-LINK (System Links) h. Error Ty
- Page 931 and 932:
SYS-PRNT (System Printer) 3. Verify
- Page 933 and 934:
SYSTEM (System) MO Name Alarm Level
- Page 935 and 936:
S8400-BD (S8400 Server) S8400 MO Na
- Page 937 and 938:
TBRI-BD (ISDN Trunk-Side BRI Circui
- Page 939 and 940:
TBRI-BD (ISDN Trunk-Side BRI Circui
- Page 941 and 942:
Demand test descriptions and error
- Page 943 and 944:
Error log entries and recommended a
- Page 945 and 946:
T305 ISDN T305 timeout T3081 ISDN T
- Page 947 and 948:
TBRI-PT (ISDN Trunk-Side BRI Port)
- Page 949 and 950:
TBRI-TRK (ISDN Trunk-Side BRI Chel)
- Page 951 and 952:
Demand test descriptions and error
- Page 953 and 954:
TDM-Bus Fault Detection and Isolati
- Page 955 and 956:
TDM-BUS (TDM Bus) In Procedure 2, a
- Page 957 and 958:
TDM-BUS (TDM Bus) If Procedure 3 fa
- Page 959 and 960:
TDM-BUS (TDM Bus) In this procedure
- Page 961 and 962:
Restarting Non-Functioning Port Cir
- Page 963 and 964:
TDM-BUS (TDM Bus) d. Error Type 513
- Page 965 and 966:
Table 259: Synchronization - Tone C
- Page 967 and 968:
TDM-CLK (TDM Bus Clock) e. Error Ty
- Page 969 and 970:
j. Error Type 2049: S8700-series Fi
- Page 971 and 972:
TDMODULE (Trunk Data Module) See PD
- Page 973 and 974:
TIE-DS1 (DS1 Tie Trunk) TIE-DS1 (DS
- Page 975 and 976:
Table 262: TIE-DS1 Error Log Entrie
- Page 977 and 978:
TIE-DS1 (DS1 Tie Trunk) i. Error Ty
- Page 979 and 980:
TIE-TRK (Analog Tie Trunk) MO Name
- Page 981 and 982:
TIE-TRK (Analog Tie Trunk) Addition
- Page 983 and 984:
TIE-TRK (Analog Tie Trunk) b. Error
- Page 985 and 986:
Order of Investigation Short Test S
- Page 987 and 988:
TONE-BD (Tone-Clock Circuit Pack) T
- Page 989 and 990:
Figure 88: S8700 IP-PNC Duplex Reli
- Page 991 and 992:
Figure 89: Duplex-Reliability Confi
- Page 993 and 994:
Critical Reliability TONE-BD (Tone-
- Page 995 and 996:
TONE-BD (Tone-Clock Circuit Pack) I
- Page 997 and 998:
Stratum 3 TONE-BD (Tone-Clock Circu
- Page 999 and 1000:
5. Restart the affected port networ
- Page 1001 and 1002:
CAUTION: If TONE-BD (Tone-Clock Cir
- Page 1003 and 1004:
Table 268: TONE-BD Error Log Entrie
- Page 1005 and 1006:
TONE-BD (Tone-Clock Circuit Pack) d
- Page 1007 and 1008:
TONE-BD (Tone-Clock Circuit Pack) n
- Page 1009 and 1010:
Note: Whenever, TONE-BD (Tone-Clock
- Page 1011 and 1012:
TONE-PT (Tone Generator) TONE-PT (T
- Page 1013 and 1014:
TONE-PT (Tone Generator) g. Error T
- Page 1015 and 1016:
TR-LN-BD (Analog Trunk/Line Board)
- Page 1017 and 1018:
The two maintenance commands for AD
- Page 1019 and 1020:
TTR-LEV (TTR Level) Typical causes
- Page 1021 and 1022:
TTR-LEV (TTR Level) d. Error Type 4
- Page 1023 and 1024:
UDS1-BD (UDS1 Interface Circuit Pac
- Page 1025 and 1026:
● Trunk Group is busied out/relea
- Page 1027 and 1028:
UDS1-BD (UDS1 Interface Circuit Pac
- Page 1029 and 1030:
Table 273: UDS1-BD Error Log Entrie
- Page 1031 and 1032:
Table 273: UDS1-BD Error Log Entrie
- Page 1033 and 1034:
UDS1-BD (UDS1 Interface Circuit Pac
- Page 1035 and 1036:
UDS1-BD (UDS1 Interface Circuit Pac
- Page 1037 and 1038:
UDS1-BD (UDS1 Interface Circuit Pac
- Page 1039 and 1040:
Note: G700: UDS1-BD (UDS1 Interface
- Page 1041 and 1042:
VAL-BD (Voice announcements over LA
- Page 1043 and 1044:
VAL-BD (Voice announcements over LA
- Page 1045 and 1046:
Note: 2561-2668 VAL-BD (Voice annou
- Page 1047 and 1048:
VAL-BD (Voice announcements over LA
- Page 1049 and 1050:
VAL-PT (Voice Announcements over LA
- Page 1051 and 1052:
VAL-PT (Voice Announcements over LA
- Page 1053 and 1054:
VC-BD (Voice Conditioner Circuit Pa
- Page 1055 and 1056:
VC-DSPPT (Voice Conditioner DSP Por
- Page 1057 and 1058:
VC-LEV (Voice Conditioner Resource
- Page 1059 and 1060:
VC-LEV (Voice Conditioner Resource
- Page 1061 and 1062:
Demand test descriptions and error
- Page 1063 and 1064:
WAE-PORT (Wideband Access Endpoint
- Page 1065 and 1066:
XXX-BD (Common Port Circuit Pack/Me
- Page 1067 and 1068:
Error log entries and recommended a
- Page 1069 and 1070:
XXX-BD (Common Port Circuit Pack/Me
- Page 1071 and 1072:
Chapter 2: Maintenance Demand Tests
- Page 1073 and 1074:
Table 282: Dial Tone Test (#0) 3 of
- Page 1075 and 1076:
CO Port Diagnostic Test (#3) CO Por
- Page 1077 and 1078:
Battery and Power Supply Query Test
- Page 1079 and 1080:
Table 284: Battery and Power Supply
- Page 1081 and 1082:
Table 284: Battery and Power Supply
- Page 1083 and 1084:
Table 284: Battery and Power Supply
- Page 1085 and 1086:
Table 285: NPE Crosstalk Test (#6)
- Page 1087 and 1088:
Table 285: NPE Crosstalk Test (#6)
- Page 1089 and 1090:
Table 285: NPE Crosstalk Test (#6)
- Page 1091 and 1092:
Table 285: NPE Crosstalk Test (#6)
- Page 1093 and 1094:
Table 286: Conference Circuit Test
- Page 1095 and 1096:
Table 286: Conference Circuit Test
- Page 1097 and 1098:
Table 286: Conference Circuit Test
- Page 1099 and 1100:
Table 287: GPP NPE Crosstalk Test (
- Page 1101 and 1102:
Table 287: GPP NPE Crosstalk Test (
- Page 1103 and 1104:
Table 287: GPP NPE Crosstalk Test (
- Page 1105 and 1106:
Digital Line Electronic Power Feed
- Page 1107 and 1108:
Local Loop Test (#13) This test is
- Page 1109 and 1110:
Table 289: Local Loop Test (#13) 3
- Page 1111 and 1112:
Table 289: Local Loop Test (#13) 5
- Page 1113 and 1114:
Table 289: Local Loop Test (#13) 7
- Page 1115 and 1116:
Table 289: Local Loop Test (#13) 9
- Page 1117 and 1118:
Digital Station Audits Test (#17) D
- Page 1119 and 1120:
Table 291: Digital Station Audits T
- Page 1121 and 1122:
Table 291: Digital Station Audits T
- Page 1123 and 1124:
Table 292: Looparound and Conferenc
- Page 1125 and 1126:
Table 292: Looparound and Conferenc
- Page 1127 and 1128:
Table 293: Port Diagnostic Test (#3
- Page 1129 and 1130:
Table 293: Port Diagnostic Test (#3
- Page 1131 and 1132:
● AN-LN-PT (Analog Line Port) ●
- Page 1133 and 1134:
Table 294: Port Audit and Update Te
- Page 1135 and 1136:
Tone Generator Transmission Test (#
- Page 1137 and 1138:
Table 295: Tone Generator Transmiss
- Page 1139 and 1140:
Table 296: Tone Generator Update/Au
- Page 1141 and 1142:
Table 297: Tone Detection Verificat
- Page 1143 and 1144:
Table 298: Tone Detector Audit/Upda
- Page 1145 and 1146:
Table 299: Clock Health Inquiry Tes
- Page 1147 and 1148:
This test is run for ANL-LINE (8-Po
- Page 1149 and 1150:
Table 300: Looparound and Conferenc
- Page 1151 and 1152:
Table 300: Looparound and Conferenc
- Page 1153 and 1154:
Table 301: ONS Ringer Application T
- Page 1155 and 1156:
Table 302: NPE Audit Test (#50) 2 o
- Page 1157 and 1158:
Table 303: Ringing Application Test
- Page 1159 and 1160:
● VC-BD (Voice Conditioner Circui
- Page 1161 and 1162:
Table 305: SAKI Sanity Test (#53) 2
- Page 1163 and 1164:
Table 306: Analog Electronic Power
- Page 1165 and 1166:
Table 307: Hybrid Circuit and Confe
- Page 1167 and 1168:
Table 307: Hybrid Circuit and Confe
- Page 1169 and 1170:
Hybrid Line Remote Digital Looparou
- Page 1171 and 1172:
Table 310: Analog Line Station Lamp
- Page 1173 and 1174:
Table 311: Analog Line Audits Test
- Page 1175 and 1176:
Table 312: Analog Line Ringer Updat
- Page 1177 and 1178:
Table 313: Tie Trunk Seizure Test (
- Page 1179 and 1180:
Table 314: Tie Trunk EPF Test (#74)
- Page 1181 and 1182: Table 315: RMC Power/Fan Query Test
- Page 1183 and 1184: AC Power Query Test (#78) AC Power
- Page 1185 and 1186: Table 316: AC Power Query Test (#78
- Page 1187 and 1188: Table 317: Single-Carrier Cabinet P
- Page 1189 and 1190: Table 318: Tone Generator Crosstalk
- Page 1191 and 1192: Table 319: Modem Pool NPE Crosstalk
- Page 1193 and 1194: Table 320: Modem Pool Conference Te
- Page 1195 and 1196: Table 320: Modem Pool Conference Te
- Page 1197 and 1198: Modem Pool Conversion Resource Loop
- Page 1199 and 1200: Modem Pool Conversion Resource Loop
- Page 1201 and 1202: Modem Pool Audit Test (#99) Modem P
- Page 1203 and 1204: Table 323: Sanity Handshake Test (#
- Page 1205 and 1206: Customer-Provided Alarming Device T
- Page 1207 and 1208: Carrier Power Supply Recycle Overri
- Page 1209 and 1210: ● POWER ● POW-SUP (Power Supply
- Page 1211 and 1212: Table 328: Ring Generator Query Tes
- Page 1213 and 1214: Table 328: Ring Generator Query Tes
- Page 1215 and 1216: Table 329: External Device Alarm Qu
- Page 1217 and 1218: Table 330: Cabinet Temperature Quer
- Page 1219 and 1220: Table 330: Cabinet Temperature Quer
- Page 1221 and 1222: Table 330: Cabinet Temperature Quer
- Page 1223 and 1224: Table 331: Emergency Transfer Query
- Page 1225 and 1226: Table 333: OLS Recycle Test (#126)
- Page 1227 and 1228: Table 334: OLS/Power Unit Query Tes
- Page 1229 and 1230: Table 334: OLS/Power Unit Query Tes
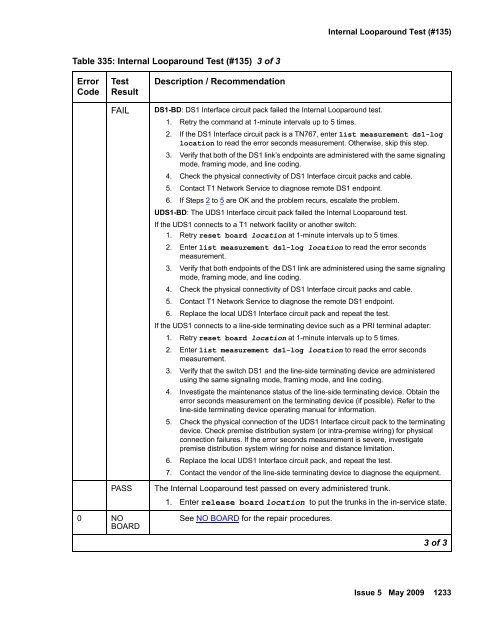
- Page 1231: This test is run on the following m
- Page 1235 and 1236: Table 336: DS1 Tie Trunk Seizure Te
- Page 1237 and 1238: Loss of Signal Alarm Inquiry Test (
- Page 1239 and 1240: Table 337: Loss of Signal Alarm Inq
- Page 1241 and 1242: Table 337: Loss of Signal Alarm Inq
- Page 1243 and 1244: Table 337: Loss of Signal Alarm Inq
- Page 1245 and 1246: Blue Alarm Inquiry Test (#139) Blue
- Page 1247 and 1248: Red Alarm Inquiry Test (#140) Red A
- Page 1249 and 1250: Yellow Alarm Inquiry Test (#141) On
- Page 1251 and 1252: Major Alarm Inquiry Test (#142) Maj
- Page 1253 and 1254: Table 342: Minor Alarm Inquiry Test
- Page 1255 and 1256: Table 343: Slip Alarm Inquiry Test
- Page 1257 and 1258: DS1 Translation Update Test (#146)
- Page 1259 and 1260: Table 346: TDM Bus Clock Circuit St
- Page 1261 and 1262: Table 347: TDM Bus Clock Slip Inqui
- Page 1263 and 1264: This test runs on the following mai
- Page 1265 and 1266: Table 349: TDM Bus Clock Parameter
- Page 1267 and 1268: Table 350: Analog Looparound Test (
- Page 1269 and 1270: This test runs on S-SYN-PT (Speech
- Page 1271 and 1272: Table 353: Speech Synthesis DSP Ton
- Page 1273 and 1274: Table 354: Speech Synthesis Memory
- Page 1275 and 1276: Speech Synthesis Parameter Update T
- Page 1277 and 1278: Table 358: Digital Looparound Test
- Page 1279 and 1280: Table 358: Digital Looparound Test
- Page 1281 and 1282: Table 359: Data Module Internal Loo
- Page 1283 and 1284:
Table 359: Data Module Internal Loo
- Page 1285 and 1286:
Playback Speech Memory Array Test (
- Page 1287 and 1288:
Table 361: Playback Speech Memory A
- Page 1289 and 1290:
Announcement Checksum Test (#209) A
- Page 1291 and 1292:
Table 363: Announcement Checksum Te
- Page 1293 and 1294:
Table 364: 140AY Looparound Test (#
- Page 1295 and 1296:
This test runs on -BD (Announcement
- Page 1297 and 1298:
Link Tear Down Test (#213) Link Tea
- Page 1299 and 1300:
Link Retry Test (#215) Link Retry T
- Page 1301 and 1302:
Neon Test (#220) Neon Test (#220) T
- Page 1303 and 1304:
Table 369: Neon Test (#220) 3 of 3
- Page 1305 and 1306:
Table 371: MTP SAT Chel Local Loopa
- Page 1307 and 1308:
Table 372: Serial Chel Local Loopar
- Page 1309 and 1310:
Expansion Interface Fiber Out-of-Fr
- Page 1311 and 1312:
Expansion Interface Local Looparoun
- Page 1313 and 1314:
Table 375: Expansion Interface Loca
- Page 1315 and 1316:
Expansion Interface 2-Way Transmiss
- Page 1317 and 1318:
Expansion Interface 2-Way Transmiss
- Page 1319 and 1320:
Expansion Interface 2-Way Transmiss
- Page 1321 and 1322:
Expansion Interface Lightwave Trans
- Page 1323 and 1324:
Expansion Interface Lightwave Trans
- Page 1325 and 1326:
Expansion Interface Lightwave Trans
- Page 1327 and 1328:
Expansion Interface Lightwave Trans
- Page 1329 and 1330:
Signaling Link State Audit Test (#2
- Page 1331 and 1332:
Table 379: Signaling Link State Aud
- Page 1333 and 1334:
Table 380: Service State Audit Test
- Page 1335 and 1336:
Table 381: Call State Audit Test (#
- Page 1337 and 1338:
ISDN Test Call Test (#258) Note: No
- Page 1339 and 1340:
Table 382: ISDN Test Call Test (#25
- Page 1341 and 1342:
Table 382: ISDN Test Call Test (#25
- Page 1343 and 1344:
Idle Time Slot Test (#294) Idle Tim
- Page 1345 and 1346:
Non-control Chel Test (#297) Non-co
- Page 1347 and 1348:
Expansion Interface Lock Query Test
- Page 1349 and 1350:
Table 389: PN Maintenance Circuit P
- Page 1351 and 1352:
Table 390: Battery Holdover Hardwar
- Page 1353 and 1354:
Table 391: DS1 OPS Switchhook Inqui
- Page 1355 and 1356:
Table 392: DS1 CO Trunk Dial Tone S
- Page 1357 and 1358:
Expansion Interface Control Chel Te
- Page 1359 and 1360:
Expansion Interface Reset Test (#33
- Page 1361 and 1362:
Table 394: Expansion Interface Rese
- Page 1363 and 1364:
Table 395: PN Maintenance Circuit P
- Page 1365 and 1366:
This test runs on M/T-DIG (Maintena
- Page 1367 and 1368:
Table 397: Digital Port Sanity Test
- Page 1369 and 1370:
Table 399: Packet Bus Port Health I
- Page 1371 and 1372:
Table 400: Maintenance/Test Circuit
- Page 1373 and 1374:
Board Type Check Test (#574) If the
- Page 1375 and 1376:
Expansion Interface Packet Interfac
- Page 1377 and 1378:
Table 403: Expansion Interface Pack
- Page 1379 and 1380:
Table 403: Expansion Interface Pack
- Page 1381 and 1382:
Table 403: Expansion Interface Pack
- Page 1383 and 1384:
LANBIC Receive Parity Error Counter
- Page 1385 and 1386:
If errors are: They may be due to:
- Page 1387 and 1388:
Table 407: Invalid LAPD Frame Error
- Page 1389 and 1390:
Congestion Query Test (#600) If the
- Page 1391 and 1392:
Link Status Test (#601) Link Status
- Page 1393 and 1394:
Table 411: TSC Heartbeat Inquiry Te
- Page 1395 and 1396:
Table 411: TSC Heartbeat Inquiry Te
- Page 1397 and 1398:
Table 412: BRI NPE Crosstalk Test (
- Page 1399 and 1400:
Table 413: BRI Port Local LAN Loopa
- Page 1401 and 1402:
Table 414: BRI Port Local TDM Loopa
- Page 1403 and 1404:
Level 1 Status Inquiry Test (#621)
- Page 1405 and 1406:
Table 416: Level 1 Status Inquiry T
- Page 1407 and 1408:
Table 416: Level 1 Status Inquiry T
- Page 1409 and 1410:
Table 418: CRC Error Counter Test (
- Page 1411 and 1412:
● ASAI-PT (ASAI Port) ● BRI-POR
- Page 1413 and 1414:
Table 421: Signaling Link Status Te
- Page 1415 and 1416:
Table 422: BRI Remote Loopback Test
- Page 1417 and 1418:
Table 422: BRI Remote Loopback Test
- Page 1419 and 1420:
Table 423: BRI XID Test (#628) 2 of
- Page 1421 and 1422:
Table 423: BRI XID Test (#628) 4 of
- Page 1423 and 1424:
Table 424: BRI Layer 3 Query Test (
- Page 1425 and 1426:
BRI Set Audits Test (#630) BRI Set
- Page 1427 and 1428:
Primary Signaling Link Hardware Che
- Page 1429 and 1430:
Remote Layer 3 Query (#637) Tests #
- Page 1431 and 1432:
Table 427: Remote Layer 3 Query (#6
- Page 1433 and 1434:
Table 429: Signaling Link Board Che
- Page 1435 and 1436:
Table 430: Layer 2 Status Query Tes
- Page 1437 and 1438:
Table 431: Stratum-3 Clock Alarm Qu
- Page 1439 and 1440:
Table 431: Stratum-3 Clock Alarm Qu
- Page 1441 and 1442:
Standby Reference Health Check Test
- Page 1443 and 1444:
Table 433: Tie Trunk Seizure Test (
- Page 1445 and 1446:
Table 434: SNI Circuit Path Test (#
- Page 1447 and 1448:
Table 434: SNI Circuit Path Test (#
- Page 1449 and 1450:
SNI Destructive Facility Off-Board
- Page 1451 and 1452:
Table 436: SNI Destructive Facility
- Page 1453 and 1454:
Table 436: SNI Destructive Facility
- Page 1455 and 1456:
Table 437: SNI Destructive Facility
- Page 1457 and 1458:
Table 437: SNI Destructive Facility
- Page 1459 and 1460:
Incorrectly Connected SNI-to-SNI Fi
- Page 1461 and 1462:
Table 438: FIBER-LK Configuration A
- Page 1463 and 1464:
Table 438: FIBER-LK Configuration A
- Page 1465 and 1466:
Table 438: FIBER-LK Configuration A
- Page 1467 and 1468:
Table 438: FIBER-LK Configuration A
- Page 1469 and 1470:
Table 438: FIBER-LK Configuration A
- Page 1471 and 1472:
Table 439: SNC-BD Configuration Aud
- Page 1473 and 1474:
Table 439: SNC-BD Configuration Aud
- Page 1475 and 1476:
Table 440: SNI-BD Configuration Aud
- Page 1477 and 1478:
Table 440: SNI-BD Configuration Aud
- Page 1479 and 1480:
Table 441: Processor Route Audit Te
- Page 1481 and 1482:
Switch Node Interface Reset Test (#
- Page 1483 and 1484:
Table 442: Switch Node Interface Re
- Page 1485 and 1486:
Table 443: Packet Neighbor Link Tes
- Page 1487 and 1488:
Table 443: Packet Neighbor Link Tes
- Page 1489 and 1490:
This test runs on FIBER-LK (Fiber L
- Page 1491 and 1492:
Table 445: Failure Audit Test (#777
- Page 1493 and 1494:
SNC On-Board Test (#778) This test
- Page 1495 and 1496:
This test runs on the SNC-BD (Switc
- Page 1497 and 1498:
Table 447: TPN Test (#779) 3 of 3 E
- Page 1499 and 1500:
Table 448: Switch Node Clock Reset
- Page 1501 and 1502:
Reset Board Test (#787) The reset s
- Page 1503 and 1504:
Far-End DS1 Converter Circuit Pack
- Page 1505 and 1506:
Far-End Lightwave Transceiver Loopb
- Page 1507 and 1508:
Table 451: Far-End Lightwave Transc
- Page 1509 and 1510:
Table 452: DS1 Facilities Connectiv
- Page 1511 and 1512:
DS1C Board Options Audit (#795) DS1
- Page 1513 and 1514:
Far-End Internal Loopback Test (#79
- Page 1515 and 1516:
Table 454: Far-End Internal Loopbac
- Page 1517 and 1518:
Table 455: DS1 Interface Options Au
- Page 1519 and 1520:
Table 456: Near-End External Loopba
- Page 1521 and 1522:
Table 457: Automatic Transmission T
- Page 1523 and 1524:
Table 457: Automatic Transmission T
- Page 1525 and 1526:
Table 458: Packet Interface Memory
- Page 1527 and 1528:
Table 458: Packet Interface Memory
- Page 1529 and 1530:
Packet Interface Maintenance Loopar
- Page 1531 and 1532:
Packet Interface Maintenance Loopar
- Page 1533 and 1534:
Packet Interface Read and Clear Cou
- Page 1535 and 1536:
256 512 768 (cont’d) FAIL (cont
- Page 1537 and 1538:
Active-Standby Peer Link Test (#888
- Page 1539 and 1540:
Table 462: Active-Standby Peer Link
- Page 1541 and 1542:
Table 463: Packet Interface Reset T
- Page 1543 and 1544:
PN Cold Restart Test (#955) This te
- Page 1545 and 1546:
PN Warm Restart Test (#956) PN Warm
- Page 1547 and 1548:
SNI Sanity Timer Test (#964) SNI Sa
- Page 1549 and 1550:
SNI Fiber Out of Frame Query Test (
- Page 1551 and 1552:
Table 471: SNI Fiber Out of Frame Q
- Page 1553 and 1554:
Table 471: SNI Fiber Out of Frame Q
- Page 1555 and 1556:
Table 471: SNI Fiber Out of Frame Q
- Page 1557 and 1558:
VC Summer Port Local TDM Looparound
- Page 1559 and 1560:
VC Summer Port Local TDM Looparound
- Page 1561 and 1562:
Table 473: VC DSP Port NPE Crosstal
- Page 1563 and 1564:
Table 474: VC DSP Port Local TDM Lo
- Page 1565 and 1566:
Figure 113: VC DSP Port DSP Looparo
- Page 1567 and 1568:
Table 475: VC DSP Port DSP Looparou
- Page 1569 and 1570:
Table 477: TSI Looparound Test (#11
- Page 1571 and 1572:
Table 478: Resource Looparound Test
- Page 1573 and 1574:
Table 479: MMI Synchronization Stat
- Page 1575 and 1576:
This test runs on DIG-LINE (Digital
- Page 1577 and 1578:
Table 481: Digital Terminal Remote
- Page 1579 and 1580:
Table 482: DS1 Board Loopback Test
- Page 1581 and 1582:
Table 483: CSU Equipment Loopback T
- Page 1583 and 1584:
CSU Repeater Loopback Test (#1211)
- Page 1585 and 1586:
Table 484: CSU Repeater Loopback Te
- Page 1587 and 1588:
Table 485: CPE Loopback Jack Test (
- Page 1589 and 1590:
Far CSU Loopback Test (#1213) Enter
- Page 1591 and 1592:
Table 486: Far CSU Loopback Test (#
- Page 1593 and 1594:
Table 487: One-Way Span Test (#1214
- Page 1595 and 1596:
End Loopback/Span Test (#1216) This
- Page 1597 and 1598:
Table 489: End Loopback/Span Test (
- Page 1599 and 1600:
Table 490: ICSU Status LEDs Test (#
- Page 1601 and 1602:
Table 491: Trunk-side Layer 1 Query
- Page 1603 and 1604:
This test runs on TBRI-PT (ISDN Tru
- Page 1605 and 1606:
Table 493: BRI Port Slip Query Test
- Page 1607 and 1608:
Table 495: ATM Board Reset (#1256)
- Page 1609 and 1610:
ATM Board Error Query Test (#1259)
- Page 1611 and 1612:
Table 498: YY Error Codes, ATM Boar
- Page 1613 and 1614:
ATM Board Framer Looparound Test (#
- Page 1615 and 1616:
Table 499: ATM Board Framer Looparo
- Page 1617 and 1618:
Table 499: ATM Board Framer Looparo
- Page 1619 and 1620:
SCOTCH Synchronous Looparound Test
- Page 1621 and 1622:
PPP Link Status Inquiry Test (#1279
- Page 1623 and 1624:
Table 504: TCP/IP Ping Test (#1281)
- Page 1625 and 1626:
Link Integrity Inquiry Test (#1282)
- Page 1627 and 1628:
Table 506: TDM Looparound Test (#12
- Page 1629 and 1630:
Session Status Test (#1286) Session
- Page 1631 and 1632:
ATM Remote Layer 3 Query (#1291) AT
- Page 1633 and 1634:
ATM Board DSP Test (#1293) The test
- Page 1635 and 1636:
ATM Crosstalk Test (#1298) ATM Cros
- Page 1637 and 1638:
Table 510: ATM Crosstalk Test (#129
- Page 1639 and 1640:
RC NPE Port Loop Test (#1316) Not a
- Page 1641 and 1642:
Table 513: RC Hardware Translation
- Page 1643 and 1644:
RC NPE Allocation Test (#1336) RC N
- Page 1645 and 1646:
Table 515: RC Tone Loopback Test (#
- Page 1647 and 1648:
IP Address Update Test (#1371) IP A
- Page 1649 and 1650:
Table 518: Registration Status Inqu
- Page 1651 and 1652:
Media Path PING Test (#1374) Media
- Page 1653 and 1654:
Table 521: Ping Test (#1379) 2 of 2
- Page 1655 and 1656:
Table 522: DSP Port TDM Looparound
- Page 1657 and 1658:
This test runs on MEDPROPT (MEDPRO
- Page 1659 and 1660:
Note: Failure Note: of this test wi
- Page 1661 and 1662:
Table 527: Signaling Group Ping Tes
- Page 1663 and 1664:
Table 528: MedPro Status Test (#139
- Page 1665 and 1666:
Table 530: Ethernet Hardware Query
- Page 1667 and 1668:
DSP Port Status Query Test (#1407)
- Page 1669 and 1670:
Table 533: Firmware Download Test (
- Page 1671 and 1672:
Table 534: Network Region Interconn
- Page 1673 and 1674:
Table 535: Echo Canceller Test (#14
- Page 1675 and 1676:
Table 536: Short IP 2-Way Transmiss
- Page 1677 and 1678:
Long IP 2-Way Transmission Test (#1
- Page 1679 and 1680:
Table 537: Long IP 2-Way Transmissi
- Page 1681 and 1682:
Table 538: Verify NIC Options Test
- Page 1683 and 1684:
Table 539: Link State Audit Test (#
- Page 1685 and 1686:
Table 540: Serial Bus Status Test (
- Page 1687 and 1688:
Table 540: Serial Bus Status Test (
- Page 1689 and 1690:
Table 541: Emergency Transfer Query
- Page 1691 and 1692:
Table 542: Power/Fan Lead Query Tes
- Page 1693 and 1694:
Power Supply Recycle Test (#1534) P
- Page 1695 and 1696:
Table 543: Power Supply Recycle Tes
- Page 1697 and 1698:
Table 544: Power Supply Detection T
- Page 1699 and 1700:
Table 545: Power Supply Voltage Tes
- Page 1701 and 1702:
Table 545: Power Supply Voltage Tes
- Page 1703 and 1704:
Table 546: Power Supply Temperature
- Page 1705 and 1706:
Ring Generator Interchange Test (#1
- Page 1707 and 1708:
Table 549: Ring Generator Status Te
- Page 1709 and 1710:
Table 550: Reset Environmental Main
- Page 1711 and 1712:
Environmental Maintenance Initializ
- Page 1713 and 1714:
Disable ESS Cluster (#1607) Disable
- Page 1715 and 1716:
This test runs on IPMEDPRO (TN2602A
- Page 1717 and 1718:
Table 560: Packet Count Query Test
- Page 1719 and 1720:
This test runs on POW-SUP (Power Su
- Page 1721 and 1722:
Table 563: Board Health Query Test
- Page 1723 and 1724:
This test runs on SIP-SGRP (SIP Sig
- Page 1725 and 1726:
Hyperactive DS1/UDS1 Interface Circ
- Page 1727 and 1728:
Index Numerical 8-port analog line
- Page 1729 and 1730:
E E-DIG-BD MO . . . . . . . . . . .
- Page 1731 and 1732:
ANL-BD . . . . . . . . . . . . . .
- Page 1733 and 1734:
econfiguration . . . . . . . . . .
- Page 1735 and 1736:
#1505 Short IP 2-Way Transmission T
- Page 1737 and 1738:
TN2182 circuit packs enhanced tone


