Attention! Your ePaper is waiting for publication!
By publishing your document, the content will be optimally indexed by Google via AI and sorted into the right category for over 500 million ePaper readers on YUMPU.
This will ensure high visibility and many readers!

Your ePaper is now published and live on YUMPU!
You can find your publication here:
Share your interactive ePaper on all platforms and on your website with our embed function

Demand test descriptions and error codes - Avaya Support
Demand test descriptions and error codes - Avaya Support
Demand test descriptions and error codes - Avaya Support
Create successful ePaper yourself
Turn your PDF publications into a flip-book with our unique Google optimized e-Paper software.
6. Click on the new item icon, <strong>and</strong> the laptop connects to the host pcANYWHERE<br />
application on the TN802 circuit pack.<br />
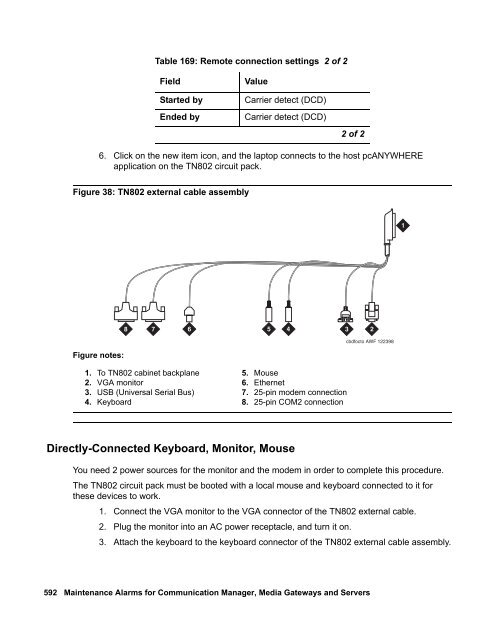
Figure 38: TN802 external cable assembly<br />
Figure notes:<br />
8<br />
1. To TN802 cabinet backplane<br />
2. VGA monitor<br />
3. USB (Universal Serial Bus)<br />
4. Keyboard<br />
7<br />
Table 169: Remote connection settings 2 of 2<br />
Field Value<br />
Started by Carrier detect (DCD)<br />
Ended by Carrier detect (DCD)<br />
5. Mouse<br />
6. Ethernet<br />
7. 25-pin modem connection<br />
8. 25-pin COM2 connection<br />
Directly-Connected Keyboard, Monitor, Mouse<br />
6<br />
2 of 2<br />
cbdfocto AWF 122398<br />
You need 2 power sources for the monitor <strong>and</strong> the modem in order to complete this procedure.<br />
The TN802 circuit pack must be booted with a local mouse <strong>and</strong> keyboard connected to it for<br />
these devices to work.<br />
1. Connect the VGA monitor to the VGA connector of the TN802 external cable.<br />
2. Plug the monitor into an AC power receptacle, <strong>and</strong> turn it on.<br />
3. Attach the keyboard to the keyboard connector of the TN802 external cable assembly.<br />
592 Maintenance Alarms for Communication Manager, Media Gateways <strong>and</strong> Servers<br />
5<br />
4<br />
3<br />
2<br />
1
6. Click on the new item icon, <strong>and</strong> the laptop connects to the host pcANYWHERE application on the TN802 circuit pack. Figure 38: TN802 external cable assembly Figure notes: 8 1. To TN802 cabinet backplane 2. VGA monitor 3. USB (Universal Serial Bus) 4. Keyboard 7 Table 169: Remote connection settings 2 of 2 Field Value Started by Carrier detect (DCD) Ended by Carrier detect (DCD) 5. Mouse 6. Ethernet 7. 25-pin modem connection 8. 25-pin COM2 connection Directly-Connected Keyboard, Monitor, Mouse 6 2 of 2 cbdfocto AWF 122398 You need 2 power sources for the monitor <strong>and</strong> the modem in order to complete this procedure. The TN802 circuit pack must be booted with a local mouse <strong>and</strong> keyboard connected to it for these devices to work. 1. Connect the VGA monitor to the VGA connector of the TN802 external cable. 2. Plug the monitor into an AC power receptacle, <strong>and</strong> turn it on. 3. Attach the keyboard to the keyboard connector of the TN802 external cable assembly. 592 Maintenance Alarms for Communication Manager, Media Gateways <strong>and</strong> Servers 5 4 3 2 1
MAPD-BD (MAPD Interface Circuit Pack) 4. Attach the mouse to the mouse connector of the TN802 external cable assembly. 5. Insert the circuit pack to cause it to boot. Troubleshooting LAN Connections This section contains information for troubleshooting ● External Connections to the LAN ● Internal Connections to the LAN External Connections to the LAN Test the external connections to the LAN by pinging the local host, the external IP trunk server, <strong>and</strong> another device connected to the network. 1. Click Start in Windows (lower left-h<strong>and</strong> corner), then select Programs, then Comm<strong>and</strong> Prompt. This starts a DOS comm<strong>and</strong>-line session. 2. At the comm<strong>and</strong> prompt, enter ping 127.0.0.1 (the local host’s default address). If configured correctly, the system displays: Reply from nnn.nn.nn.nn: bytes=32 time
- Page 1 and 2:
Maintenance Alarms for Avaya Aura C
- Page 3 and 4:
Contents Introduction . . . . . . .
- Page 5 and 6:
CAB-CALM (Customer alarm) . . . . .
- Page 7 and 8:
MAINT (PN Maintenance Circuit Pack)
- Page 9 and 10:
SYS-PRNT (System Printer) . . . . .
- Page 11 and 12:
Customer-Provided Alarming Device T
- Page 13 and 14:
Synchronization Update Test (#417)
- Page 15 and 16:
SNI Sanity Timer Test (#964) . . .
- Page 17 and 18:
Power Supply Recycle Test (#1534).
- Page 19 and 20:
Introduction This document provides
- Page 21 and 22:
Audience If the trouble still has n
- Page 23 and 24:
Paragraphs or inline comments Struc
- Page 25 and 26:
Table 1: Typography used in this bo
- Page 27 and 28:
Related resources Related resources
- Page 29 and 30:
Safety labels and security alert la
- Page 31 and 32:
Sending us comments Avaya welcomes
- Page 33 and 34:
Chapter 1: Communication Manager Ma
- Page 35 and 36:
G700 Subsystems Displaying MOs Main
- Page 37 and 38:
Table 5: Media Module Types 2 of 2
- Page 39 and 40:
Abort Code 1412 ● Off-Board probl
- Page 41 and 42:
4. G650 MGs have power supply in sl
- Page 43 and 44:
AC-POWER AC Power for AC-Powered Sy
- Page 45 and 46:
Note: The Note: following tests app
- Page 47 and 48:
Demand test descriptions and error
- Page 49 and 50:
ADJ-IP (ASAI Adjunct TCP/IP Link) c
- Page 51 and 52:
Table 11: Administered Connection E
- Page 53 and 54:
ADX8D-BD (AUDIX Circuit Pack) ADX8D
- Page 55 and 56:
Table 12: ADX8D-PT Error Log Entrie
- Page 57 and 58:
ADX8D-RS (AUDIX Reserve Slots) See
- Page 59 and 60:
ADX16A-P (AUDIX Analog Line/Control
- Page 61 and 62:
ADX16A-P (AUDIX Analog Line/Control
- Page 63 and 64:
ADX16D-P (16-Port AUDIX Digital Por
- Page 65 and 66:
ADX16D-P (16-Port AUDIX Digital Por
- Page 67 and 68:
AESV-LNK (AE Services Link) MO Name
- Page 69 and 70:
Aux Data Description AESV-LNK (AE S
- Page 71 and 72:
AESV-SES (AE Services Session) Link
- Page 73 and 74:
Demand test descriptions and error
- Page 75 and 76:
Table 18: AN-LN-PT Error log entrie
- Page 77 and 78:
Demand test descriptions and error
- Page 79 and 80:
Ringing Caused by Maintenance Testi
- Page 81 and 82:
Demand test descriptions and error
- Page 83 and 84:
ANL-LINE (8-Port Analog Line) MO Na
- Page 85 and 86:
ANL-LINE (8-Port Analog Line) b. Er
- Page 87 and 88:
-BD (Announcement circuit pack) -BD
- Page 89 and 90:
-BD (Announcement circuit pack) c.
- Page 91 and 92:
● Ports 1 AND 9 abort Test 206 wi
- Page 93 and 94:
Note: The WARNING: Reseating -BD (A
- Page 95 and 96:
Order of investigation Short Test S
- Page 97 and 98:
Error log entries and recommended a
- Page 99 and 100:
ANNOUNCE (announcement) ANNOUNCE (a
- Page 101 and 102:
Table 24: Aux data error codes and
- Page 103 and 104:
ASAI-BD (Multi-Application Platform
- Page 105 and 106:
Table 25: ASAI-EPT Error Log Entrie
- Page 107 and 108:
ASAI-EPT (ASAI Endpoint) g. Error T
- Page 109 and 110:
Table 26: ASAI cause values 2 of 3
- Page 111 and 112:
ASAI-PT (ASAI Port) ASAI-PT (ASAI P
- Page 113 and 114:
ASAI-PT (ASAI Port) d. Error Type 1
- Page 115 and 116:
ATM-BCH (ATM B-Chel Trunk) ATM-BCH
- Page 117 and 118:
B-Chel Alarms ATM-BCH (ATM B-Chel T
- Page 119 and 120:
ATM-BCH (ATM B-Chel Trunk) ● Outg
- Page 121 and 122:
Demand test descriptions and error
- Page 123 and 124:
Error log entries and recommended a
- Page 125 and 126:
LEDs The ATM Interface circuit pack
- Page 127 and 128:
6. Enter test board location, and v
- Page 129 and 130:
A-side ATM-EI—Critical Reliabilit
- Page 131 and 132:
Table 34: ATM-EI Error Log Entries
- Page 133 and 134:
ATM-EI (Expansion Interface Circuit
- Page 135 and 136:
Table 35: ATM Error Types 1024 - 11
- Page 137 and 138:
Table 37: Error type 1281 Aux Data
- Page 139 and 140:
Table 37: Error type 1281 Aux Data
- Page 141 and 142:
CAUTION: If CAUTION: If ATM-EI (Exp
- Page 143 and 144:
ATM-EI (Expansion Interface Circuit
- Page 145 and 146:
ATM-INTF (ATM Interface) S8700-seri
- Page 147 and 148:
ATM-NTWK (ATM Network Error) S8700-
- Page 149 and 150:
Table 40: Error codes and Aux Data
- Page 151 and 152:
Table 40: Error codes and Aux Data
- Page 153 and 154:
Table 40: Error codes and Aux Data
- Page 155 and 156:
ATM-NTWK (ATM Network Error) d. Err
- Page 157 and 158:
ATM-NTWK (ATM Network Error) The
- Page 159 and 160:
PNC-DUP Related Commands ATM PNC-DU
- Page 161 and 162:
ATM PNC-DUP (ATM PNC Duplication)
- Page 163 and 164:
ATM PNC-DUP (ATM PNC Duplication) A
- Page 165 and 166:
PNC Interchanges ATM PNC-DUP (ATM P
- Page 167 and 168:
● The global refresh from releasi
- Page 169 and 170:
Table 45: Error Log Encode Field De
- Page 171 and 172:
Error log entries and recommended a
- Page 173 and 174:
ATM-SGRP (ATM Signaling Group) g. E
- Page 175 and 176:
3890 A request to use a network ser
- Page 177 and 178:
3928 A call was denied because of a
- Page 179 and 180:
Stratum 4 Synchronization ATM-SYNC
- Page 181 and 182:
ATM-SYNC Commands ATM-SYNC (ATM Syn
- Page 183 and 184:
ATM-SYNC (ATM Synchronization) 2. T
- Page 185 and 186:
LEDs Virtual D-Chels ATM-TRK (Circu
- Page 187 and 188:
Table 54: ATM-TRK Error Log entries
- Page 189 and 190:
ATM-TRK (Circuit Emulation Service
- Page 191 and 192:
Table 55: Error type 1281 Aux Data
- Page 193 and 194:
ATM-TRK (Circuit Emulation Service
- Page 195 and 196:
If Then There are no packet bus ala
- Page 197 and 198:
Order of Investigation Short Test S
- Page 199 and 200:
ATTE-AJ (Ethernet Avaya Adjunct) Se
- Page 201 and 202:
AUX-TRK (Auxiliary Trunk) AUX-TRK (
- Page 203 and 204:
Table 56: AUX-TRK Error Log Entries
- Page 205 and 206:
AXA12-BD (AUDIX Circuit Pack) MO Na
- Page 207 and 208:
AXD12-BD (AUDIX circuit pack) MO Na
- Page 209 and 210:
BRI-BD (ISDN-BRI Line Circuit Pack)
- Page 211 and 212:
BRI-BD (ISDN-BRI Line Circuit Pack)
- Page 213 and 214:
BRI-BD (ISDN-BRI Line Circuit Pack)
- Page 215 and 216:
BRI-PORT (ISDN-BRI Port) Note: The
- Page 217 and 218:
BRI-PORT (ISDN-BRI Port) This secti
- Page 219 and 220:
BRI-PORT (ISDN-BRI Port) Notes: a.
- Page 221 and 222:
Demand test descriptions and error
- Page 223 and 224:
BRI-SET, Various Adjuncts term ``IS
- Page 225 and 226:
Table 59: BRI-SET/Adjunct Error Log
- Page 227 and 228:
BRI-SET, Various Adjuncts 3. If the
- Page 229 and 230:
50 Requested Facility Not Subscribe
- Page 231 and 232:
Table 61: ASAI CAUSE VALUES; (BRI-S
- Page 233 and 234:
SPID Facility Test BRI-SET, Various
- Page 235 and 236:
Table 63: Service SPID Display BRI-
- Page 237 and 238:
CAB-EXFR (Emergency Transfer) G650
- Page 239 and 240:
CAB-MTCE (Media Gateway Maintenance
- Page 241 and 242:
CAB-PFL (Power Fan Lead) G650 CAB-P
- Page 243 and 244:
CAB-TEMP (Cabinet Temperature) G650
- Page 245 and 246:
CABINET (Cabinet Sensors) S8700 Ser
- Page 247 and 248:
CMC1 Table 69: CMC1: Cabinet sensor
- Page 249 and 250:
Demand test descriptions and error
- Page 251 and 252:
CARR-POW (Carrier Power Supply) MO
- Page 253 and 254:
AC-Powered Cabinets AC Power-Distri
- Page 255 and 256:
Figure 8: AC Power Distribution in
- Page 257 and 258:
Figure 10: Power-Distribution Unit
- Page 259 and 260:
DC-Powered Cabinets DC Power-Distri
- Page 261 and 262:
CARR-POW (Carrier Power Supply) The
- Page 263 and 264:
CDR-LNK (Call Detail Recording Link
- Page 265 and 266:
CLAN-BD (Control LAN Circuit Pack)
- Page 267 and 268:
Table 72: CLAN-BD Error Log Entries
- Page 269 and 270:
Note: 2561 CLAN-BD (Control LAN Cir
- Page 271 and 272:
CLAN-BD (Control LAN Circuit Pack)
- Page 273 and 274:
CLSFY-BD (Call Classifier Circuit P
- Page 275 and 276:
CLSFY-PT (Call Classifier Port) 1.
- Page 277 and 278:
CO-DS1 (DS1 CO Trunk) Note: For MO
- Page 279 and 280:
Table 74: CO-DS1 Error Log Entries
- Page 281 and 282:
CO-TRK (Analog CO Trunk) CO-TRK (An
- Page 283 and 284:
Ground Start Operation CO-TRK (Anal
- Page 285 and 286:
Table 75: CO-TRK Error Log Entries
- Page 287 and 288:
Table 76: CO Trunk Errors with No T
- Page 289 and 290:
Note: The Note: The CO-TRK (Analog
- Page 291 and 292:
CONFIG (System Configuration) ’1
- Page 293 and 294:
Table 78: Converting Error Types To
- Page 295 and 296:
Table 78: Converting Error Types To
- Page 297 and 298:
DAT-LINE (Data Line Port) DAT-LINE
- Page 299 and 300:
Demand test descriptions and error
- Page 301 and 302:
DC-POWER (Single-Carrier Cabinet En
- Page 303 and 304:
DETR-BD (Tone Detector Circuit) DET
- Page 305 and 306:
DID-DS1 (Direct Inward Dial Trunk)
- Page 307 and 308:
DID-DS1 (Direct Inward Dial Trunk)
- Page 309 and 310:
DID-TRK (Direct Inward Dial Trunk)
- Page 311 and 312:
Table 82: DID-TRK Error Log Entries
- Page 313 and 314:
DID-TRK (Direct Inward Dial Trunk)
- Page 315 and 316:
DIG-IP-S (Digital IP Station) DIG-I
- Page 317 and 318:
DIG-IP-S (Digital IP Station) i. Er
- Page 319 and 320:
Figure 14: Digital Line Connectivit
- Page 321 and 322:
For Systems Supporting Circuit Pack
- Page 323 and 324:
Automatic Download Actions This sec
- Page 325 and 326:
Parameter Download Status DIG-LINE
- Page 327 and 328:
DIG-LINE (Digital Line) or move voi
- Page 329 and 330:
Demand test descriptions and error
- Page 331 and 332:
DIOD-BD (DIOD Trunk Circuit Pack) D
- Page 333 and 334:
Error log entries and recommended a
- Page 335 and 336:
DIOD-DS1 (DS1 DIOD Trunk) e. Error
- Page 337 and 338:
DIOD-TRK (DIOD Trunk) DIOD-TRK (DIO
- Page 339 and 340:
Table 88: DIOD-TRK Error Log Entrie
- Page 341 and 342:
DLY-MTCE (Daily Maintenance) DLY-MT
- Page 343 and 344:
DLY-MTCE (Daily Maintenance) ● On
- Page 345 and 346:
DS1-BD (DS1 Interface Circuit Pack)
- Page 347 and 348:
Table 91: DS1-BD Error Log Entries
- Page 349 and 350:
Table 91: DS1-BD Error Log Entries
- Page 351 and 352:
DS1-BD (DS1 Interface Circuit Pack)
- Page 353 and 354:
DS1-BD (DS1 Interface Circuit Pack)
- Page 355 and 356:
DS1-FAC (DS1 Facility) S8700-series
- Page 357 and 358:
DS1-FAC (DS1 Facility) The TN1654 D
- Page 359 and 360:
DS1 Interface Options DS1-FAC (DS1
- Page 361 and 362:
Table 92: DS1 Interface Options adm
- Page 363 and 364:
Clearing Firmware Errors DS1-FAC (D
- Page 365 and 366:
DS1-FAC (DS1 Facility) 1. Enter dis
- Page 367 and 368:
DS1-FAC (DS1 Facility) Aux Data 2:
- Page 369 and 370:
DS1-FAC (DS1 Facility) 4. Enter dis
- Page 371 and 372:
Demand test descriptions and error
- Page 373 and 374:
DS1C-BD (DS1 Converter Circuit Pack
- Page 375 and 376:
Figure 23: DS1 Converter Complex in
- Page 377 and 378:
DS1C-BD (DS1 Converter Circuit Pack
- Page 379 and 380:
Replacing a DS1 Converter Circuit P
- Page 381 and 382:
WARNING: Do WARNING: Replacing WARN
- Page 383 and 384:
Upgrading TN574 DS1 Converter Circu
- Page 385 and 386:
Converting DS1-CONV Complex to Dire
- Page 387 and 388:
Removing Fiber Connectivity to an P
- Page 389 and 390:
Table 98: Downgrading from Critical
- Page 391 and 392:
Table 99: DS1C-BD Error Log Entries
- Page 393 and 394:
DS1C-BD (DS1 Converter Circuit Pack
- Page 395 and 396:
DS1C-BD (DS1 Converter Circuit Pack
- Page 397 and 398:
DT-LN-BD (Data Line Circuit Pack) D
- Page 399 and 400:
Error log entries and recommended a
- Page 401 and 402:
E-DIG-BD (Multi Application Platfor
- Page 403 and 404:
E-DIG-ST (Emulated Digital Line) No
- Page 405 and 406:
EMG-XFER (Emergency Transfer) MO Na
- Page 407 and 408:
EMG-XFER (Emergency Transfer) Deman
- Page 409 and 410:
Error log entries and recommended a
- Page 411 and 412:
ESS (Enterprise Survivable Server)
- Page 413 and 414:
CAUTION: Entering Note: ATM ESS (En
- Page 415 and 416:
Note: Note: Tip: Customer Note: It
- Page 417 and 418:
ESS (Enterprise Survivable Server)
- Page 419 and 420:
Error log entries and recommended a
- Page 421 and 422:
ETH-PT (Control LAN Ethernet) h. Er
- Page 423 and 424:
ETR-PT (Enhanced Tone Receiver Port
- Page 425 and 426:
Demand tests descriptions and error
- Page 427 and 428:
EXP-INTF (Expansion Interface Circu
- Page 429 and 430:
Figure 27: Center Stage Switch Conf
- Page 431 and 432:
Figure 29: Fiber Link with DS1 Conv
- Page 433 and 434:
LEDs EXP-INTF (Expansion Interface
- Page 435 and 436:
Expansion Interface LEDs EXP-INTF (
- Page 437 and 438:
EXP-INTF (Expansion Interface Circu
- Page 439 and 440:
CAUTION: If CAUTION: If, CAUTION: I
- Page 441 and 442:
EXP-INTF (Expansion Interface Circu
- Page 443 and 444:
EXP-INTF (Expansion Interface Circu
- Page 445 and 446:
Table 109: EXP-INTF Error Log Entri
- Page 447 and 448:
EXP-INTF (Expansion Interface Circu
- Page 449 and 450:
EXP-INTF (Expansion Interface Circu
- Page 451 and 452:
EXP-PN (Expansion Port Network) S87
- Page 453 and 454:
Error log entries and recommended a
- Page 455 and 456:
EXT-DEV (External Device Alarm) G65
- Page 457 and 458:
EXT-DEV ADMIN? N (External Device A
- Page 459 and 460:
EXT-DEV ADMIN? Y (External Device A
- Page 461 and 462:
FIBER-LK (Fiber Link) MO Name in Lo
- Page 463 and 464:
Table 116: Expansion Interface Circ
- Page 465 and 466:
FIBER-LK (Fiber Link) c. Error Type
- Page 467 and 468:
Table 122: Tests Run for an SNI-to-
- Page 469 and 470:
Table 123: FW-DWNLD Error Log Entri
- Page 471 and 472:
Table 125: Aux Data for Error Type
- Page 473 and 474:
Table 125: Aux Data for Error Type
- Page 475 and 476:
Table 125: Aux Data for Error Type
- Page 477 and 478:
Table 126: Aux Data for Error Type
- Page 479 and 480:
FW-STDL (Firmware Station Download)
- Page 481 and 482:
Read the image into memory FW-STDL
- Page 483 and 484:
Troubleshooting firmware download p
- Page 485 and 486:
Table 129: Error Type 257 Aux Data
- Page 487 and 488:
Table 131: Schedule States of statu
- Page 489 and 490:
GPTD-PT (General-Purpose Tone Detec
- Page 491 and 492:
H323-BCH (H.323 B-Chel) H323-BCH (H
- Page 493 and 494:
H323-SGR (H.323 Signaling Group) MO
- Page 495 and 496:
H323-SGR (H.323 Signaling Group) h.
- Page 497 and 498:
3878 The far-end switch has indicat
- Page 499 and 500:
H323-SGR (H.323 Signaling Group) Ta
- Page 501 and 502:
H323-STN (H.323 IP Station) origina
- Page 503 and 504:
HYB-LINE (Hybrid Line) HYB-LINE (Hy
- Page 505 and 506:
HYB-LINE (Hybrid Line) Notes: a. Er
- Page 507 and 508:
INADS (INADS Link) MO Name in Log A
- Page 509 and 510:
Table 139: INADS Link Test Error Lo
- Page 511 and 512:
IPMEDPRO (IP Media Processor) IPMED
- Page 513 and 514:
Table 140: TN2302 IPMEDPRO Error Lo
- Page 515 and 516:
IPMEDPRO (TN2302 IP Media Processor
- Page 517 and 518:
IPMEDPRO (TN2302 IP Media Processor
- Page 519 and 520:
IPMEDPRO (TN2602AP IP Media Resourc
- Page 521 and 522:
Table 141: TN2602AP IPMEDPRO Error
- Page 523 and 524:
IPMEDPRO (TN2602AP IP Media Resourc
- Page 525 and 526:
Order of Investigation Short Test S
- Page 527 and 528:
IPSV-CTL (IP Server Interface Contr
- Page 529 and 530:
System Configurations with Duplicat
- Page 531 and 532:
Table 147: Cabinets that support IP
- Page 533 and 534:
AUX Data Descriptions IPSV-CTL (IP
- Page 535 and 536:
An example of the output of the lis
- Page 537 and 538:
IP-SVR (IP Server Interface) The TN
- Page 539 and 540:
Control Network Interface IP-SVR (I
- Page 541 and 542: IP-SVR (IP Server Interface) The fo
- Page 543 and 544: Table 153: IPSI LEDs 2 of 2 Functio
- Page 545 and 546: ISDN-PLK (ISDN-PRI Signaling Link P
- Page 547 and 548: ISDN-PLK (ISDN-PRI Signaling Link P
- Page 549 and 550: ISDN-SGR (ISDN-PRI Signaling Group)
- Page 551 and 552: Table 156: ISDN-SGR Error Log Entri
- Page 553 and 554: ISDN-SGR (ISDN-PRI Signaling Group)
- Page 555 and 556: ISDN-SGR (ISDN-PRI Signaling Group)
- Page 557 and 558: ISDN-TRK (DS1 ISDN Trunk) Note: Man
- Page 559 and 560: Alarming Based on Service States IS
- Page 561 and 562: ISDN-TRK (DS1 ISDN Trunk) The follo
- Page 563 and 564: Table 158: Service States 2 of 2 Se
- Page 565 and 566: ISDN-TRK (DS1 ISDN Trunk) f. Error
- Page 567 and 568: Demand test descriptions and error
- Page 569 and 570: LGATE-AJ (Ethernet ASAI Endpoint) S
- Page 571 and 572: LGATE-PT (Ethernet Adjunct Port) Se
- Page 573 and 574: Figure 36: License mode algorithm F
- Page 575 and 576: LIC-ERR (License Error Mode) g. Err
- Page 577 and 578: LIC-ERR (License Error Mode) - A co
- Page 579 and 580: Table 163: License error messages 2
- Page 581 and 582: LOG-SVN (Login Security Violation)
- Page 583 and 584: MAINT (PN Maintenance Circuit Pack)
- Page 585 and 586: Table 165: MAINT Error Log Entries
- Page 587 and 588: MAPD-BD (MAPD Interface Circuit Pac
- Page 589 and 590: 4. Insert the backup diskette into
- Page 591: Table 168: TN802 LCD messages for I
- Page 595 and 596: MAPD-BD (MAPD Interface Circuit Pac
- Page 597 and 598: Figure 41: TN802 board assembly and
- Page 599 and 600: Table 171: MAPD-BD Error Log entrie
- Page 601 and 602: MAPD-BD (MAPD Interface Circuit Pac
- Page 603 and 604: MAPD-BD (MAPD Interface Circuit Pac
- Page 605 and 606: Figure 42: TN802 faceplate Figure n
- Page 607 and 608: Demand test descriptions and error
- Page 609 and 610: Error log entries and recommended a
- Page 611 and 612: MEDPRO (Media Processor MAPD Circui
- Page 613 and 614: Table 175: MEDPRO-C Error Log Entri
- Page 615 and 616: MEDPRO-C (Media Processor Control)
- Page 617 and 618: Error log entries and recommended a
- Page 619 and 620: MED-GTWY (MEDIA GATEWAY) MED-GTWY (
- Page 621 and 622: MET-BD (MET Line Circuit Pack) MET-
- Page 623 and 624: Table 179: MET-LINE Error Log Entri
- Page 625 and 626: Order of Investigation Short Test S
- Page 627 and 628: Table 180: MG-ANA Error Log Entries
- Page 629 and 630: MG_ANN (Media Gateway Announcement
- Page 631 and 632: MG-ANN (Voice Announcements) MG-ANN
- Page 633 and 634: Table 183: MG-BRI Error Log Entries
- Page 635 and 636: MG-DCP (Digital Line Media Module)
- Page 637 and 638: MG-DCP (Digital Line Media Module)
- Page 639 and 640: Table 185: MG-DS1 Error Log Entries
- Page 641 and 642: ● Be administered using the add d
- Page 643 and 644:
MG-DS1 (DS1 Interface Media Module)
- Page 645 and 646:
MG-IAMM (Integrated Analog Media Mo
- Page 647 and 648:
MG-IAMM (Integrated Analog Media Mo
- Page 649 and 650:
MG-IBRI (Integrated BRI Trunk Media
- Page 651 and 652:
MIS (Management Information System)
- Page 653 and 654:
Figure 43: TN787 Multimedia Interfa
- Page 655 and 656:
Table 189: MMI-BD Error Log Entries
- Page 657 and 658:
MMI-LEV (Multimedia Interface Resou
- Page 659 and 660:
Demand test descriptions and error
- Page 661 and 662:
Figure 45: TN787 MMI (MULTIMEDIA IN
- Page 663 and 664:
MMI-PT (Multimedia Interface Port)
- Page 665 and 666:
Error log entries and recommended a
- Page 667 and 668:
MODEM-PT (Modem Pool Port) MODEM-PT
- Page 669 and 670:
MODEM-PT (Modem Pool Port) Figure 4
- Page 671 and 672:
Table 193: MODEM-PT Error Log Entri
- Page 673 and 674:
M/T-ANL (Maintenance/Test Analog Po
- Page 675 and 676:
Demand test descriptions and error
- Page 677 and 678:
Error log entries and recommended a
- Page 679 and 680:
Demand test descriptions and error
- Page 681 and 682:
Figure 49: ISDN-PRI Outgoing Test C
- Page 683 and 684:
Demand test descriptions and error
- Page 685 and 686:
Table 197: M/T-PKT Error Log Entrie
- Page 687 and 688:
NO-LIC (No License) Note: The Note:
- Page 689 and 690:
Error log entries and recommended a
- Page 691 and 692:
NR-CONN (Network-Region Connect) MO
- Page 693 and 694:
NR-REG (Network Region Registration
- Page 695 and 696:
OPS-LINE (DS1 Off-Premises Station
- Page 697 and 698:
Demand test descriptions and error
- Page 699 and 700:
Stand-Alone DCP Data Modules PDMODU
- Page 701 and 702:
Figure 52: Typical Data Module Conf
- Page 703 and 704:
Note: Refer Note: Refer Note: Refer
- Page 705 and 706:
_PE (Processor Ethernet) Alarms The
- Page 707 and 708:
PE Interchange Priority Mismatch Al
- Page 709 and 710:
PE-BCHL (PRI Endpoint Port) Multipl
- Page 711 and 712:
PE-BCHL (PRI Endpoint Port) ● Out
- Page 713 and 714:
Table 204: PRI Endpoint Port Servic
- Page 715 and 716:
PE-BCHL (PRI Endpoint Port) automat
- Page 717 and 718:
Demand test descriptions and error
- Page 719 and 720:
PKT-BUS (Packet Bus) ● Certain ca
- Page 721 and 722:
PKT-BUS (Packet Bus) f. Error Type
- Page 723 and 724:
PKT-INT (Packet Interface) MO Name
- Page 725 and 726:
Figure 55: Distributed PKT-INTs IPS
- Page 727 and 728:
PKT-INT (Packet Interface) If a dow
- Page 729 and 730:
Figure 56: IP-PNC Duplex Reliabilit
- Page 731 and 732:
Figure 57: Duplex-Reliability Confi
- Page 733 and 734:
Critical-Reliability Configuration
- Page 735 and 736:
S8700 series PKT-INT (Packet Interf
- Page 737 and 738:
PKT-INT (Packet Interface) For a ca
- Page 739 and 740:
PKT-INT (Packet Interface) an out-o
- Page 741 and 742:
PKT-INT (Packet Interface) l. Error
- Page 743 and 744:
PLAT-ALM (Platform Alarms) PLAT-ALM
- Page 745 and 746:
Procedures for Restoring the PMS Li
- Page 747 and 748:
PMS-LINK (Property Management Syste
- Page 749 and 750:
Demand test descriptions and error
- Page 751 and 752:
PMS-PRNT (PMS Printer Link) PMS Pri
- Page 753 and 754:
PMS-PRNT (PMS Printer Link) e. Erro
- Page 755 and 756:
PNC-DUP Related Commands PNC-DUP (P
- Page 757 and 758:
Figure 62: Duplicated PNC with Cent
- Page 759 and 760:
PNC-DUP (PNC Duplication) 4. Remove
- Page 761 and 762:
PNC State-of-Health Indexes PNC-DUP
- Page 763 and 764:
● There has been a spontaneous PN
- Page 765 and 766:
PNC-DUP (PNC Duplication) Most repa
- Page 767 and 768:
PNC-DUP (PNC Duplication) The infor
- Page 769 and 770:
PNC-DUP (PNC Duplication) The last
- Page 771 and 772:
PNC-DUP (PNC Duplication) x. Error
- Page 773 and 774:
POWER S8700-series Fiber-PNC This s
- Page 775 and 776:
Replacing the Battery Assembly (J58
- Page 777 and 778:
Order of Investigation Short Test S
- Page 779 and 780:
Recycle carrier POW-SUP (Power Supp
- Page 781 and 782:
POW-SUP (Power Supply) c. Error Typ
- Page 783 and 784:
PPP-PT (Control LAN Packet/Port) MO
- Page 785 and 786:
PPP-PT (Control LAN Packet/Port) d.
- Page 787 and 788:
PRI-CDR (Call Detail Recording Link
- Page 789 and 790:
Error log entries and recommended a
- Page 791 and 792:
PROC-SAN (Process Sanity Audits) MO
- Page 793 and 794:
Table 218: PS-RGEN Error Log Entrie
- Page 795 and 796:
RANL-STA (Remote Analog Line (Stati
- Page 797 and 798:
RANL-STA (Remote Analog Line (Stati
- Page 799 and 800:
Table 220: RC-BD Error Log Entries
- Page 801 and 802:
RC-BD (Radio Controller Board) t. E
- Page 803 and 804:
Terminal Types RDIG-STA (Remote Dig
- Page 805 and 806:
Note: This Note: Plugging RDIG-STA
- Page 807 and 808:
Possible reasons for no terminal do
- Page 809 and 810:
RDIG-STA (Remote Digital Station) k
- Page 811 and 812:
RING-GEN (Analog Ring Generator) MO
- Page 813 and 814:
RMC-ENV (Power/Fan Sensors) G600 on
- Page 815 and 816:
Demand test descriptions and error
- Page 817 and 818:
S-SYN-BD (Speech Synthesis Circuit
- Page 819 and 820:
Table 228: S-SYN-PT Error Log Entri
- Page 821 and 822:
SEC-CDR (Call Detail Recording Link
- Page 823 and 824:
Figure 65: Wiring diagram for seria
- Page 825 and 826:
● Source of input power - AC, DC,
- Page 827 and 828:
SER-BUS (Serial Communication Bus)
- Page 829 and 830:
SIP-SGRP (SIP Signaling Group) MO N
- Page 831 and 832:
Note: Near SIP-SGRP (SIP Signaling
- Page 833 and 834:
SIP-SGRP (SIP Signaling Group) Tabl
- Page 835 and 836:
SIP-SGRP (SIP Signaling Group) Tabl
- Page 837 and 838:
SIP-SGRP (SIP Signaling Group) Tabl
- Page 839 and 840:
SIP-SGRP (SIP Signaling Group) Tabl
- Page 841 and 842:
SIP-SGRP (SIP Signaling Group) Tabl
- Page 843 and 844:
SN-CONF (Switch Node Configuration)
- Page 845 and 846:
SN-CONF (Switch Node Configuration)
- Page 847 and 848:
SNC-BD (Switch Node Clock Circuit P
- Page 849 and 850:
SNC LEDs SNC-BD (Switch Node Clock
- Page 851 and 852:
Error log entries and recommended a
- Page 853 and 854:
SNC-BD (Switch Node Clock Circuit P
- Page 855 and 856:
Table 233: SNC-LINK Error Log Entri
- Page 857 and 858:
SNC-LINK (Switch Node Clock Link) 3
- Page 859 and 860:
Table 234: SNC-REF Error Log Entrie
- Page 861 and 862:
SNI-BD (SNI Circuit Pack) S8700-ser
- Page 863 and 864:
SNI-BD (SNI Circuit Pack) Figure 70
- Page 865 and 866:
SNI Administration and SNI Board In
- Page 867 and 868:
Replacing an SNI Circuit Pack— Du
- Page 869 and 870:
Note: Note Note: Make SNI-BD (SNI C
- Page 871 and 872:
Table 236: SNI-BD Error Log Entries
- Page 873 and 874:
SNI-BD (SNI Circuit Pack) Procedure
- Page 875 and 876:
SNI-PEER (SNI Peer Link) S8700-seri
- Page 877 and 878:
Procedure 1 SNI-PEER (SNI Peer Link
- Page 879 and 880:
SP-REG-M (Survivable Processor-Main
- Page 881 and 882:
SP-REG-S (Survivable Processor) SP-
- Page 883 and 884:
STRAT-3 (Stratum-3 Clock) S8700-ser
- Page 885 and 886:
Stratum-3 Clock LED Strategy STRAT-
- Page 887 and 888:
Error log entries and recommended a
- Page 889 and 890:
If the alarm is MAJOR: ● Check co
- Page 891 and 892:
SVC-SLOT (Service Slot) SVC-SLOT (S
- Page 893 and 894:
SYNC (Port Network Synchronization)
- Page 895 and 896:
SYNC (Port Network Synchronization)
- Page 897 and 898:
SYNC (Port Network Synchronization)
- Page 899 and 900:
Troubleshooting Synchronization Pro
- Page 901 and 902:
Figure 77: Synchronization Troubles
- Page 903 and 904:
Figure 79: Synchronization Troubles
- Page 905 and 906:
Figure 81: Synchronization Troubles
- Page 907 and 908:
Figure 83: Synchronization Troubles
- Page 909 and 910:
SYNC (Port Network Synchronization)
- Page 911 and 912:
SYNC (Port Network Synchronization)
- Page 913 and 914:
Figure 86: Facility Fault Sectional
- Page 915 and 916:
CAUTION: Synchronization SYNC (Port
- Page 917 and 918:
Error log entries and recommended a
- Page 919 and 920:
SYNC (Port Network Synchronization)
- Page 921 and 922:
SYNC (Port Network Synchronization)
- Page 923 and 924:
SYNC (Port Network Synchronization)
- Page 925 and 926:
SYS-LINK (System Links) SYS-LINK (S
- Page 927 and 928:
Note: For SYS-LINK (System Links) N
- Page 929 and 930:
SYS-LINK (System Links) h. Error Ty
- Page 931 and 932:
SYS-PRNT (System Printer) 3. Verify
- Page 933 and 934:
SYSTEM (System) MO Name Alarm Level
- Page 935 and 936:
S8400-BD (S8400 Server) S8400 MO Na
- Page 937 and 938:
TBRI-BD (ISDN Trunk-Side BRI Circui
- Page 939 and 940:
TBRI-BD (ISDN Trunk-Side BRI Circui
- Page 941 and 942:
Demand test descriptions and error
- Page 943 and 944:
Error log entries and recommended a
- Page 945 and 946:
T305 ISDN T305 timeout T3081 ISDN T
- Page 947 and 948:
TBRI-PT (ISDN Trunk-Side BRI Port)
- Page 949 and 950:
TBRI-TRK (ISDN Trunk-Side BRI Chel)
- Page 951 and 952:
Demand test descriptions and error
- Page 953 and 954:
TDM-Bus Fault Detection and Isolati
- Page 955 and 956:
TDM-BUS (TDM Bus) In Procedure 2, a
- Page 957 and 958:
TDM-BUS (TDM Bus) If Procedure 3 fa
- Page 959 and 960:
TDM-BUS (TDM Bus) In this procedure
- Page 961 and 962:
Restarting Non-Functioning Port Cir
- Page 963 and 964:
TDM-BUS (TDM Bus) d. Error Type 513
- Page 965 and 966:
Table 259: Synchronization - Tone C
- Page 967 and 968:
TDM-CLK (TDM Bus Clock) e. Error Ty
- Page 969 and 970:
j. Error Type 2049: S8700-series Fi
- Page 971 and 972:
TDMODULE (Trunk Data Module) See PD
- Page 973 and 974:
TIE-DS1 (DS1 Tie Trunk) TIE-DS1 (DS
- Page 975 and 976:
Table 262: TIE-DS1 Error Log Entrie
- Page 977 and 978:
TIE-DS1 (DS1 Tie Trunk) i. Error Ty
- Page 979 and 980:
TIE-TRK (Analog Tie Trunk) MO Name
- Page 981 and 982:
TIE-TRK (Analog Tie Trunk) Addition
- Page 983 and 984:
TIE-TRK (Analog Tie Trunk) b. Error
- Page 985 and 986:
Order of Investigation Short Test S
- Page 987 and 988:
TONE-BD (Tone-Clock Circuit Pack) T
- Page 989 and 990:
Figure 88: S8700 IP-PNC Duplex Reli
- Page 991 and 992:
Figure 89: Duplex-Reliability Confi
- Page 993 and 994:
Critical Reliability TONE-BD (Tone-
- Page 995 and 996:
TONE-BD (Tone-Clock Circuit Pack) I
- Page 997 and 998:
Stratum 3 TONE-BD (Tone-Clock Circu
- Page 999 and 1000:
5. Restart the affected port networ
- Page 1001 and 1002:
CAUTION: If TONE-BD (Tone-Clock Cir
- Page 1003 and 1004:
Table 268: TONE-BD Error Log Entrie
- Page 1005 and 1006:
TONE-BD (Tone-Clock Circuit Pack) d
- Page 1007 and 1008:
TONE-BD (Tone-Clock Circuit Pack) n
- Page 1009 and 1010:
Note: Whenever, TONE-BD (Tone-Clock
- Page 1011 and 1012:
TONE-PT (Tone Generator) TONE-PT (T
- Page 1013 and 1014:
TONE-PT (Tone Generator) g. Error T
- Page 1015 and 1016:
TR-LN-BD (Analog Trunk/Line Board)
- Page 1017 and 1018:
The two maintenance commands for AD
- Page 1019 and 1020:
TTR-LEV (TTR Level) Typical causes
- Page 1021 and 1022:
TTR-LEV (TTR Level) d. Error Type 4
- Page 1023 and 1024:
UDS1-BD (UDS1 Interface Circuit Pac
- Page 1025 and 1026:
● Trunk Group is busied out/relea
- Page 1027 and 1028:
UDS1-BD (UDS1 Interface Circuit Pac
- Page 1029 and 1030:
Table 273: UDS1-BD Error Log Entrie
- Page 1031 and 1032:
Table 273: UDS1-BD Error Log Entrie
- Page 1033 and 1034:
UDS1-BD (UDS1 Interface Circuit Pac
- Page 1035 and 1036:
UDS1-BD (UDS1 Interface Circuit Pac
- Page 1037 and 1038:
UDS1-BD (UDS1 Interface Circuit Pac
- Page 1039 and 1040:
Note: G700: UDS1-BD (UDS1 Interface
- Page 1041 and 1042:
VAL-BD (Voice announcements over LA
- Page 1043 and 1044:
VAL-BD (Voice announcements over LA
- Page 1045 and 1046:
Note: 2561-2668 VAL-BD (Voice annou
- Page 1047 and 1048:
VAL-BD (Voice announcements over LA
- Page 1049 and 1050:
VAL-PT (Voice Announcements over LA
- Page 1051 and 1052:
VAL-PT (Voice Announcements over LA
- Page 1053 and 1054:
VC-BD (Voice Conditioner Circuit Pa
- Page 1055 and 1056:
VC-DSPPT (Voice Conditioner DSP Por
- Page 1057 and 1058:
VC-LEV (Voice Conditioner Resource
- Page 1059 and 1060:
VC-LEV (Voice Conditioner Resource
- Page 1061 and 1062:
Demand test descriptions and error
- Page 1063 and 1064:
WAE-PORT (Wideband Access Endpoint
- Page 1065 and 1066:
XXX-BD (Common Port Circuit Pack/Me
- Page 1067 and 1068:
Error log entries and recommended a
- Page 1069 and 1070:
XXX-BD (Common Port Circuit Pack/Me
- Page 1071 and 1072:
Chapter 2: Maintenance Demand Tests
- Page 1073 and 1074:
Table 282: Dial Tone Test (#0) 3 of
- Page 1075 and 1076:
CO Port Diagnostic Test (#3) CO Por
- Page 1077 and 1078:
Battery and Power Supply Query Test
- Page 1079 and 1080:
Table 284: Battery and Power Supply
- Page 1081 and 1082:
Table 284: Battery and Power Supply
- Page 1083 and 1084:
Table 284: Battery and Power Supply
- Page 1085 and 1086:
Table 285: NPE Crosstalk Test (#6)
- Page 1087 and 1088:
Table 285: NPE Crosstalk Test (#6)
- Page 1089 and 1090:
Table 285: NPE Crosstalk Test (#6)
- Page 1091 and 1092:
Table 285: NPE Crosstalk Test (#6)
- Page 1093 and 1094:
Table 286: Conference Circuit Test
- Page 1095 and 1096:
Table 286: Conference Circuit Test
- Page 1097 and 1098:
Table 286: Conference Circuit Test
- Page 1099 and 1100:
Table 287: GPP NPE Crosstalk Test (
- Page 1101 and 1102:
Table 287: GPP NPE Crosstalk Test (
- Page 1103 and 1104:
Table 287: GPP NPE Crosstalk Test (
- Page 1105 and 1106:
Digital Line Electronic Power Feed
- Page 1107 and 1108:
Local Loop Test (#13) This test is
- Page 1109 and 1110:
Table 289: Local Loop Test (#13) 3
- Page 1111 and 1112:
Table 289: Local Loop Test (#13) 5
- Page 1113 and 1114:
Table 289: Local Loop Test (#13) 7
- Page 1115 and 1116:
Table 289: Local Loop Test (#13) 9
- Page 1117 and 1118:
Digital Station Audits Test (#17) D
- Page 1119 and 1120:
Table 291: Digital Station Audits T
- Page 1121 and 1122:
Table 291: Digital Station Audits T
- Page 1123 and 1124:
Table 292: Looparound and Conferenc
- Page 1125 and 1126:
Table 292: Looparound and Conferenc
- Page 1127 and 1128:
Table 293: Port Diagnostic Test (#3
- Page 1129 and 1130:
Table 293: Port Diagnostic Test (#3
- Page 1131 and 1132:
● AN-LN-PT (Analog Line Port) ●
- Page 1133 and 1134:
Table 294: Port Audit and Update Te
- Page 1135 and 1136:
Tone Generator Transmission Test (#
- Page 1137 and 1138:
Table 295: Tone Generator Transmiss
- Page 1139 and 1140:
Table 296: Tone Generator Update/Au
- Page 1141 and 1142:
Table 297: Tone Detection Verificat
- Page 1143 and 1144:
Table 298: Tone Detector Audit/Upda
- Page 1145 and 1146:
Table 299: Clock Health Inquiry Tes
- Page 1147 and 1148:
This test is run for ANL-LINE (8-Po
- Page 1149 and 1150:
Table 300: Looparound and Conferenc
- Page 1151 and 1152:
Table 300: Looparound and Conferenc
- Page 1153 and 1154:
Table 301: ONS Ringer Application T
- Page 1155 and 1156:
Table 302: NPE Audit Test (#50) 2 o
- Page 1157 and 1158:
Table 303: Ringing Application Test
- Page 1159 and 1160:
● VC-BD (Voice Conditioner Circui
- Page 1161 and 1162:
Table 305: SAKI Sanity Test (#53) 2
- Page 1163 and 1164:
Table 306: Analog Electronic Power
- Page 1165 and 1166:
Table 307: Hybrid Circuit and Confe
- Page 1167 and 1168:
Table 307: Hybrid Circuit and Confe
- Page 1169 and 1170:
Hybrid Line Remote Digital Looparou
- Page 1171 and 1172:
Table 310: Analog Line Station Lamp
- Page 1173 and 1174:
Table 311: Analog Line Audits Test
- Page 1175 and 1176:
Table 312: Analog Line Ringer Updat
- Page 1177 and 1178:
Table 313: Tie Trunk Seizure Test (
- Page 1179 and 1180:
Table 314: Tie Trunk EPF Test (#74)
- Page 1181 and 1182:
Table 315: RMC Power/Fan Query Test
- Page 1183 and 1184:
AC Power Query Test (#78) AC Power
- Page 1185 and 1186:
Table 316: AC Power Query Test (#78
- Page 1187 and 1188:
Table 317: Single-Carrier Cabinet P
- Page 1189 and 1190:
Table 318: Tone Generator Crosstalk
- Page 1191 and 1192:
Table 319: Modem Pool NPE Crosstalk
- Page 1193 and 1194:
Table 320: Modem Pool Conference Te
- Page 1195 and 1196:
Table 320: Modem Pool Conference Te
- Page 1197 and 1198:
Modem Pool Conversion Resource Loop
- Page 1199 and 1200:
Modem Pool Conversion Resource Loop
- Page 1201 and 1202:
Modem Pool Audit Test (#99) Modem P
- Page 1203 and 1204:
Table 323: Sanity Handshake Test (#
- Page 1205 and 1206:
Customer-Provided Alarming Device T
- Page 1207 and 1208:
Carrier Power Supply Recycle Overri
- Page 1209 and 1210:
● POWER ● POW-SUP (Power Supply
- Page 1211 and 1212:
Table 328: Ring Generator Query Tes
- Page 1213 and 1214:
Table 328: Ring Generator Query Tes
- Page 1215 and 1216:
Table 329: External Device Alarm Qu
- Page 1217 and 1218:
Table 330: Cabinet Temperature Quer
- Page 1219 and 1220:
Table 330: Cabinet Temperature Quer
- Page 1221 and 1222:
Table 330: Cabinet Temperature Quer
- Page 1223 and 1224:
Table 331: Emergency Transfer Query
- Page 1225 and 1226:
Table 333: OLS Recycle Test (#126)
- Page 1227 and 1228:
Table 334: OLS/Power Unit Query Tes
- Page 1229 and 1230:
Table 334: OLS/Power Unit Query Tes
- Page 1231 and 1232:
This test is run on the following m
- Page 1233 and 1234:
Table 335: Internal Looparound Test
- Page 1235 and 1236:
Table 336: DS1 Tie Trunk Seizure Te
- Page 1237 and 1238:
Loss of Signal Alarm Inquiry Test (
- Page 1239 and 1240:
Table 337: Loss of Signal Alarm Inq
- Page 1241 and 1242:
Table 337: Loss of Signal Alarm Inq
- Page 1243 and 1244:
Table 337: Loss of Signal Alarm Inq
- Page 1245 and 1246:
Blue Alarm Inquiry Test (#139) Blue
- Page 1247 and 1248:
Red Alarm Inquiry Test (#140) Red A
- Page 1249 and 1250:
Yellow Alarm Inquiry Test (#141) On
- Page 1251 and 1252:
Major Alarm Inquiry Test (#142) Maj
- Page 1253 and 1254:
Table 342: Minor Alarm Inquiry Test
- Page 1255 and 1256:
Table 343: Slip Alarm Inquiry Test
- Page 1257 and 1258:
DS1 Translation Update Test (#146)
- Page 1259 and 1260:
Table 346: TDM Bus Clock Circuit St
- Page 1261 and 1262:
Table 347: TDM Bus Clock Slip Inqui
- Page 1263 and 1264:
This test runs on the following mai
- Page 1265 and 1266:
Table 349: TDM Bus Clock Parameter
- Page 1267 and 1268:
Table 350: Analog Looparound Test (
- Page 1269 and 1270:
This test runs on S-SYN-PT (Speech
- Page 1271 and 1272:
Table 353: Speech Synthesis DSP Ton
- Page 1273 and 1274:
Table 354: Speech Synthesis Memory
- Page 1275 and 1276:
Speech Synthesis Parameter Update T
- Page 1277 and 1278:
Table 358: Digital Looparound Test
- Page 1279 and 1280:
Table 358: Digital Looparound Test
- Page 1281 and 1282:
Table 359: Data Module Internal Loo
- Page 1283 and 1284:
Table 359: Data Module Internal Loo
- Page 1285 and 1286:
Playback Speech Memory Array Test (
- Page 1287 and 1288:
Table 361: Playback Speech Memory A
- Page 1289 and 1290:
Announcement Checksum Test (#209) A
- Page 1291 and 1292:
Table 363: Announcement Checksum Te
- Page 1293 and 1294:
Table 364: 140AY Looparound Test (#
- Page 1295 and 1296:
This test runs on -BD (Announcement
- Page 1297 and 1298:
Link Tear Down Test (#213) Link Tea
- Page 1299 and 1300:
Link Retry Test (#215) Link Retry T
- Page 1301 and 1302:
Neon Test (#220) Neon Test (#220) T
- Page 1303 and 1304:
Table 369: Neon Test (#220) 3 of 3
- Page 1305 and 1306:
Table 371: MTP SAT Chel Local Loopa
- Page 1307 and 1308:
Table 372: Serial Chel Local Loopar
- Page 1309 and 1310:
Expansion Interface Fiber Out-of-Fr
- Page 1311 and 1312:
Expansion Interface Local Looparoun
- Page 1313 and 1314:
Table 375: Expansion Interface Loca
- Page 1315 and 1316:
Expansion Interface 2-Way Transmiss
- Page 1317 and 1318:
Expansion Interface 2-Way Transmiss
- Page 1319 and 1320:
Expansion Interface 2-Way Transmiss
- Page 1321 and 1322:
Expansion Interface Lightwave Trans
- Page 1323 and 1324:
Expansion Interface Lightwave Trans
- Page 1325 and 1326:
Expansion Interface Lightwave Trans
- Page 1327 and 1328:
Expansion Interface Lightwave Trans
- Page 1329 and 1330:
Signaling Link State Audit Test (#2
- Page 1331 and 1332:
Table 379: Signaling Link State Aud
- Page 1333 and 1334:
Table 380: Service State Audit Test
- Page 1335 and 1336:
Table 381: Call State Audit Test (#
- Page 1337 and 1338:
ISDN Test Call Test (#258) Note: No
- Page 1339 and 1340:
Table 382: ISDN Test Call Test (#25
- Page 1341 and 1342:
Table 382: ISDN Test Call Test (#25
- Page 1343 and 1344:
Idle Time Slot Test (#294) Idle Tim
- Page 1345 and 1346:
Non-control Chel Test (#297) Non-co
- Page 1347 and 1348:
Expansion Interface Lock Query Test
- Page 1349 and 1350:
Table 389: PN Maintenance Circuit P
- Page 1351 and 1352:
Table 390: Battery Holdover Hardwar
- Page 1353 and 1354:
Table 391: DS1 OPS Switchhook Inqui
- Page 1355 and 1356:
Table 392: DS1 CO Trunk Dial Tone S
- Page 1357 and 1358:
Expansion Interface Control Chel Te
- Page 1359 and 1360:
Expansion Interface Reset Test (#33
- Page 1361 and 1362:
Table 394: Expansion Interface Rese
- Page 1363 and 1364:
Table 395: PN Maintenance Circuit P
- Page 1365 and 1366:
This test runs on M/T-DIG (Maintena
- Page 1367 and 1368:
Table 397: Digital Port Sanity Test
- Page 1369 and 1370:
Table 399: Packet Bus Port Health I
- Page 1371 and 1372:
Table 400: Maintenance/Test Circuit
- Page 1373 and 1374:
Board Type Check Test (#574) If the
- Page 1375 and 1376:
Expansion Interface Packet Interfac
- Page 1377 and 1378:
Table 403: Expansion Interface Pack
- Page 1379 and 1380:
Table 403: Expansion Interface Pack
- Page 1381 and 1382:
Table 403: Expansion Interface Pack
- Page 1383 and 1384:
LANBIC Receive Parity Error Counter
- Page 1385 and 1386:
If errors are: They may be due to:
- Page 1387 and 1388:
Table 407: Invalid LAPD Frame Error
- Page 1389 and 1390:
Congestion Query Test (#600) If the
- Page 1391 and 1392:
Link Status Test (#601) Link Status
- Page 1393 and 1394:
Table 411: TSC Heartbeat Inquiry Te
- Page 1395 and 1396:
Table 411: TSC Heartbeat Inquiry Te
- Page 1397 and 1398:
Table 412: BRI NPE Crosstalk Test (
- Page 1399 and 1400:
Table 413: BRI Port Local LAN Loopa
- Page 1401 and 1402:
Table 414: BRI Port Local TDM Loopa
- Page 1403 and 1404:
Level 1 Status Inquiry Test (#621)
- Page 1405 and 1406:
Table 416: Level 1 Status Inquiry T
- Page 1407 and 1408:
Table 416: Level 1 Status Inquiry T
- Page 1409 and 1410:
Table 418: CRC Error Counter Test (
- Page 1411 and 1412:
● ASAI-PT (ASAI Port) ● BRI-POR
- Page 1413 and 1414:
Table 421: Signaling Link Status Te
- Page 1415 and 1416:
Table 422: BRI Remote Loopback Test
- Page 1417 and 1418:
Table 422: BRI Remote Loopback Test
- Page 1419 and 1420:
Table 423: BRI XID Test (#628) 2 of
- Page 1421 and 1422:
Table 423: BRI XID Test (#628) 4 of
- Page 1423 and 1424:
Table 424: BRI Layer 3 Query Test (
- Page 1425 and 1426:
BRI Set Audits Test (#630) BRI Set
- Page 1427 and 1428:
Primary Signaling Link Hardware Che
- Page 1429 and 1430:
Remote Layer 3 Query (#637) Tests #
- Page 1431 and 1432:
Table 427: Remote Layer 3 Query (#6
- Page 1433 and 1434:
Table 429: Signaling Link Board Che
- Page 1435 and 1436:
Table 430: Layer 2 Status Query Tes
- Page 1437 and 1438:
Table 431: Stratum-3 Clock Alarm Qu
- Page 1439 and 1440:
Table 431: Stratum-3 Clock Alarm Qu
- Page 1441 and 1442:
Standby Reference Health Check Test
- Page 1443 and 1444:
Table 433: Tie Trunk Seizure Test (
- Page 1445 and 1446:
Table 434: SNI Circuit Path Test (#
- Page 1447 and 1448:
Table 434: SNI Circuit Path Test (#
- Page 1449 and 1450:
SNI Destructive Facility Off-Board
- Page 1451 and 1452:
Table 436: SNI Destructive Facility
- Page 1453 and 1454:
Table 436: SNI Destructive Facility
- Page 1455 and 1456:
Table 437: SNI Destructive Facility
- Page 1457 and 1458:
Table 437: SNI Destructive Facility
- Page 1459 and 1460:
Incorrectly Connected SNI-to-SNI Fi
- Page 1461 and 1462:
Table 438: FIBER-LK Configuration A
- Page 1463 and 1464:
Table 438: FIBER-LK Configuration A
- Page 1465 and 1466:
Table 438: FIBER-LK Configuration A
- Page 1467 and 1468:
Table 438: FIBER-LK Configuration A
- Page 1469 and 1470:
Table 438: FIBER-LK Configuration A
- Page 1471 and 1472:
Table 439: SNC-BD Configuration Aud
- Page 1473 and 1474:
Table 439: SNC-BD Configuration Aud
- Page 1475 and 1476:
Table 440: SNI-BD Configuration Aud
- Page 1477 and 1478:
Table 440: SNI-BD Configuration Aud
- Page 1479 and 1480:
Table 441: Processor Route Audit Te
- Page 1481 and 1482:
Switch Node Interface Reset Test (#
- Page 1483 and 1484:
Table 442: Switch Node Interface Re
- Page 1485 and 1486:
Table 443: Packet Neighbor Link Tes
- Page 1487 and 1488:
Table 443: Packet Neighbor Link Tes
- Page 1489 and 1490:
This test runs on FIBER-LK (Fiber L
- Page 1491 and 1492:
Table 445: Failure Audit Test (#777
- Page 1493 and 1494:
SNC On-Board Test (#778) This test
- Page 1495 and 1496:
This test runs on the SNC-BD (Switc
- Page 1497 and 1498:
Table 447: TPN Test (#779) 3 of 3 E
- Page 1499 and 1500:
Table 448: Switch Node Clock Reset
- Page 1501 and 1502:
Reset Board Test (#787) The reset s
- Page 1503 and 1504:
Far-End DS1 Converter Circuit Pack
- Page 1505 and 1506:
Far-End Lightwave Transceiver Loopb
- Page 1507 and 1508:
Table 451: Far-End Lightwave Transc
- Page 1509 and 1510:
Table 452: DS1 Facilities Connectiv
- Page 1511 and 1512:
DS1C Board Options Audit (#795) DS1
- Page 1513 and 1514:
Far-End Internal Loopback Test (#79
- Page 1515 and 1516:
Table 454: Far-End Internal Loopbac
- Page 1517 and 1518:
Table 455: DS1 Interface Options Au
- Page 1519 and 1520:
Table 456: Near-End External Loopba
- Page 1521 and 1522:
Table 457: Automatic Transmission T
- Page 1523 and 1524:
Table 457: Automatic Transmission T
- Page 1525 and 1526:
Table 458: Packet Interface Memory
- Page 1527 and 1528:
Table 458: Packet Interface Memory
- Page 1529 and 1530:
Packet Interface Maintenance Loopar
- Page 1531 and 1532:
Packet Interface Maintenance Loopar
- Page 1533 and 1534:
Packet Interface Read and Clear Cou
- Page 1535 and 1536:
256 512 768 (cont’d) FAIL (cont
- Page 1537 and 1538:
Active-Standby Peer Link Test (#888
- Page 1539 and 1540:
Table 462: Active-Standby Peer Link
- Page 1541 and 1542:
Table 463: Packet Interface Reset T
- Page 1543 and 1544:
PN Cold Restart Test (#955) This te
- Page 1545 and 1546:
PN Warm Restart Test (#956) PN Warm
- Page 1547 and 1548:
SNI Sanity Timer Test (#964) SNI Sa
- Page 1549 and 1550:
SNI Fiber Out of Frame Query Test (
- Page 1551 and 1552:
Table 471: SNI Fiber Out of Frame Q
- Page 1553 and 1554:
Table 471: SNI Fiber Out of Frame Q
- Page 1555 and 1556:
Table 471: SNI Fiber Out of Frame Q
- Page 1557 and 1558:
VC Summer Port Local TDM Looparound
- Page 1559 and 1560:
VC Summer Port Local TDM Looparound
- Page 1561 and 1562:
Table 473: VC DSP Port NPE Crosstal
- Page 1563 and 1564:
Table 474: VC DSP Port Local TDM Lo
- Page 1565 and 1566:
Figure 113: VC DSP Port DSP Looparo
- Page 1567 and 1568:
Table 475: VC DSP Port DSP Looparou
- Page 1569 and 1570:
Table 477: TSI Looparound Test (#11
- Page 1571 and 1572:
Table 478: Resource Looparound Test
- Page 1573 and 1574:
Table 479: MMI Synchronization Stat
- Page 1575 and 1576:
This test runs on DIG-LINE (Digital
- Page 1577 and 1578:
Table 481: Digital Terminal Remote
- Page 1579 and 1580:
Table 482: DS1 Board Loopback Test
- Page 1581 and 1582:
Table 483: CSU Equipment Loopback T
- Page 1583 and 1584:
CSU Repeater Loopback Test (#1211)
- Page 1585 and 1586:
Table 484: CSU Repeater Loopback Te
- Page 1587 and 1588:
Table 485: CPE Loopback Jack Test (
- Page 1589 and 1590:
Far CSU Loopback Test (#1213) Enter
- Page 1591 and 1592:
Table 486: Far CSU Loopback Test (#
- Page 1593 and 1594:
Table 487: One-Way Span Test (#1214
- Page 1595 and 1596:
End Loopback/Span Test (#1216) This
- Page 1597 and 1598:
Table 489: End Loopback/Span Test (
- Page 1599 and 1600:
Table 490: ICSU Status LEDs Test (#
- Page 1601 and 1602:
Table 491: Trunk-side Layer 1 Query
- Page 1603 and 1604:
This test runs on TBRI-PT (ISDN Tru
- Page 1605 and 1606:
Table 493: BRI Port Slip Query Test
- Page 1607 and 1608:
Table 495: ATM Board Reset (#1256)
- Page 1609 and 1610:
ATM Board Error Query Test (#1259)
- Page 1611 and 1612:
Table 498: YY Error Codes, ATM Boar
- Page 1613 and 1614:
ATM Board Framer Looparound Test (#
- Page 1615 and 1616:
Table 499: ATM Board Framer Looparo
- Page 1617 and 1618:
Table 499: ATM Board Framer Looparo
- Page 1619 and 1620:
SCOTCH Synchronous Looparound Test
- Page 1621 and 1622:
PPP Link Status Inquiry Test (#1279
- Page 1623 and 1624:
Table 504: TCP/IP Ping Test (#1281)
- Page 1625 and 1626:
Link Integrity Inquiry Test (#1282)
- Page 1627 and 1628:
Table 506: TDM Looparound Test (#12
- Page 1629 and 1630:
Session Status Test (#1286) Session
- Page 1631 and 1632:
ATM Remote Layer 3 Query (#1291) AT
- Page 1633 and 1634:
ATM Board DSP Test (#1293) The test
- Page 1635 and 1636:
ATM Crosstalk Test (#1298) ATM Cros
- Page 1637 and 1638:
Table 510: ATM Crosstalk Test (#129
- Page 1639 and 1640:
RC NPE Port Loop Test (#1316) Not a
- Page 1641 and 1642:
Table 513: RC Hardware Translation
- Page 1643 and 1644:
RC NPE Allocation Test (#1336) RC N
- Page 1645 and 1646:
Table 515: RC Tone Loopback Test (#
- Page 1647 and 1648:
IP Address Update Test (#1371) IP A
- Page 1649 and 1650:
Table 518: Registration Status Inqu
- Page 1651 and 1652:
Media Path PING Test (#1374) Media
- Page 1653 and 1654:
Table 521: Ping Test (#1379) 2 of 2
- Page 1655 and 1656:
Table 522: DSP Port TDM Looparound
- Page 1657 and 1658:
This test runs on MEDPROPT (MEDPRO
- Page 1659 and 1660:
Note: Failure Note: of this test wi
- Page 1661 and 1662:
Table 527: Signaling Group Ping Tes
- Page 1663 and 1664:
Table 528: MedPro Status Test (#139
- Page 1665 and 1666:
Table 530: Ethernet Hardware Query
- Page 1667 and 1668:
DSP Port Status Query Test (#1407)
- Page 1669 and 1670:
Table 533: Firmware Download Test (
- Page 1671 and 1672:
Table 534: Network Region Interconn
- Page 1673 and 1674:
Table 535: Echo Canceller Test (#14
- Page 1675 and 1676:
Table 536: Short IP 2-Way Transmiss
- Page 1677 and 1678:
Long IP 2-Way Transmission Test (#1
- Page 1679 and 1680:
Table 537: Long IP 2-Way Transmissi
- Page 1681 and 1682:
Table 538: Verify NIC Options Test
- Page 1683 and 1684:
Table 539: Link State Audit Test (#
- Page 1685 and 1686:
Table 540: Serial Bus Status Test (
- Page 1687 and 1688:
Table 540: Serial Bus Status Test (
- Page 1689 and 1690:
Table 541: Emergency Transfer Query
- Page 1691 and 1692:
Table 542: Power/Fan Lead Query Tes
- Page 1693 and 1694:
Power Supply Recycle Test (#1534) P
- Page 1695 and 1696:
Table 543: Power Supply Recycle Tes
- Page 1697 and 1698:
Table 544: Power Supply Detection T
- Page 1699 and 1700:
Table 545: Power Supply Voltage Tes
- Page 1701 and 1702:
Table 545: Power Supply Voltage Tes
- Page 1703 and 1704:
Table 546: Power Supply Temperature
- Page 1705 and 1706:
Ring Generator Interchange Test (#1
- Page 1707 and 1708:
Table 549: Ring Generator Status Te
- Page 1709 and 1710:
Table 550: Reset Environmental Main
- Page 1711 and 1712:
Environmental Maintenance Initializ
- Page 1713 and 1714:
Disable ESS Cluster (#1607) Disable
- Page 1715 and 1716:
This test runs on IPMEDPRO (TN2602A
- Page 1717 and 1718:
Table 560: Packet Count Query Test
- Page 1719 and 1720:
This test runs on POW-SUP (Power Su
- Page 1721 and 1722:
Table 563: Board Health Query Test
- Page 1723 and 1724:
This test runs on SIP-SGRP (SIP Sig
- Page 1725 and 1726:
Hyperactive DS1/UDS1 Interface Circ
- Page 1727 and 1728:
Index Numerical 8-port analog line
- Page 1729 and 1730:
E E-DIG-BD MO . . . . . . . . . . .
- Page 1731 and 1732:
ANL-BD . . . . . . . . . . . . . .
- Page 1733 and 1734:
econfiguration . . . . . . . . . .
- Page 1735 and 1736:
#1505 Short IP 2-Way Transmission T
- Page 1737 and 1738:
TN2182 circuit packs enhanced tone
Inappropriate
Loading...
Inappropriate
You have already flagged this document.
Thank you, for helping us keep this platform clean.
The editors will have a look at it as soon as possible.
Mail this publication
Loading...
Embed
Loading...
Delete template?
Are you sure you want to delete your template?
DOWNLOAD ePAPER
This ePaper is currently not available for download.
You can find similar magazines on this topic below under ‘Recommendations’.
